
A Practical Guide to Mastering UV DTF Cup Wraps
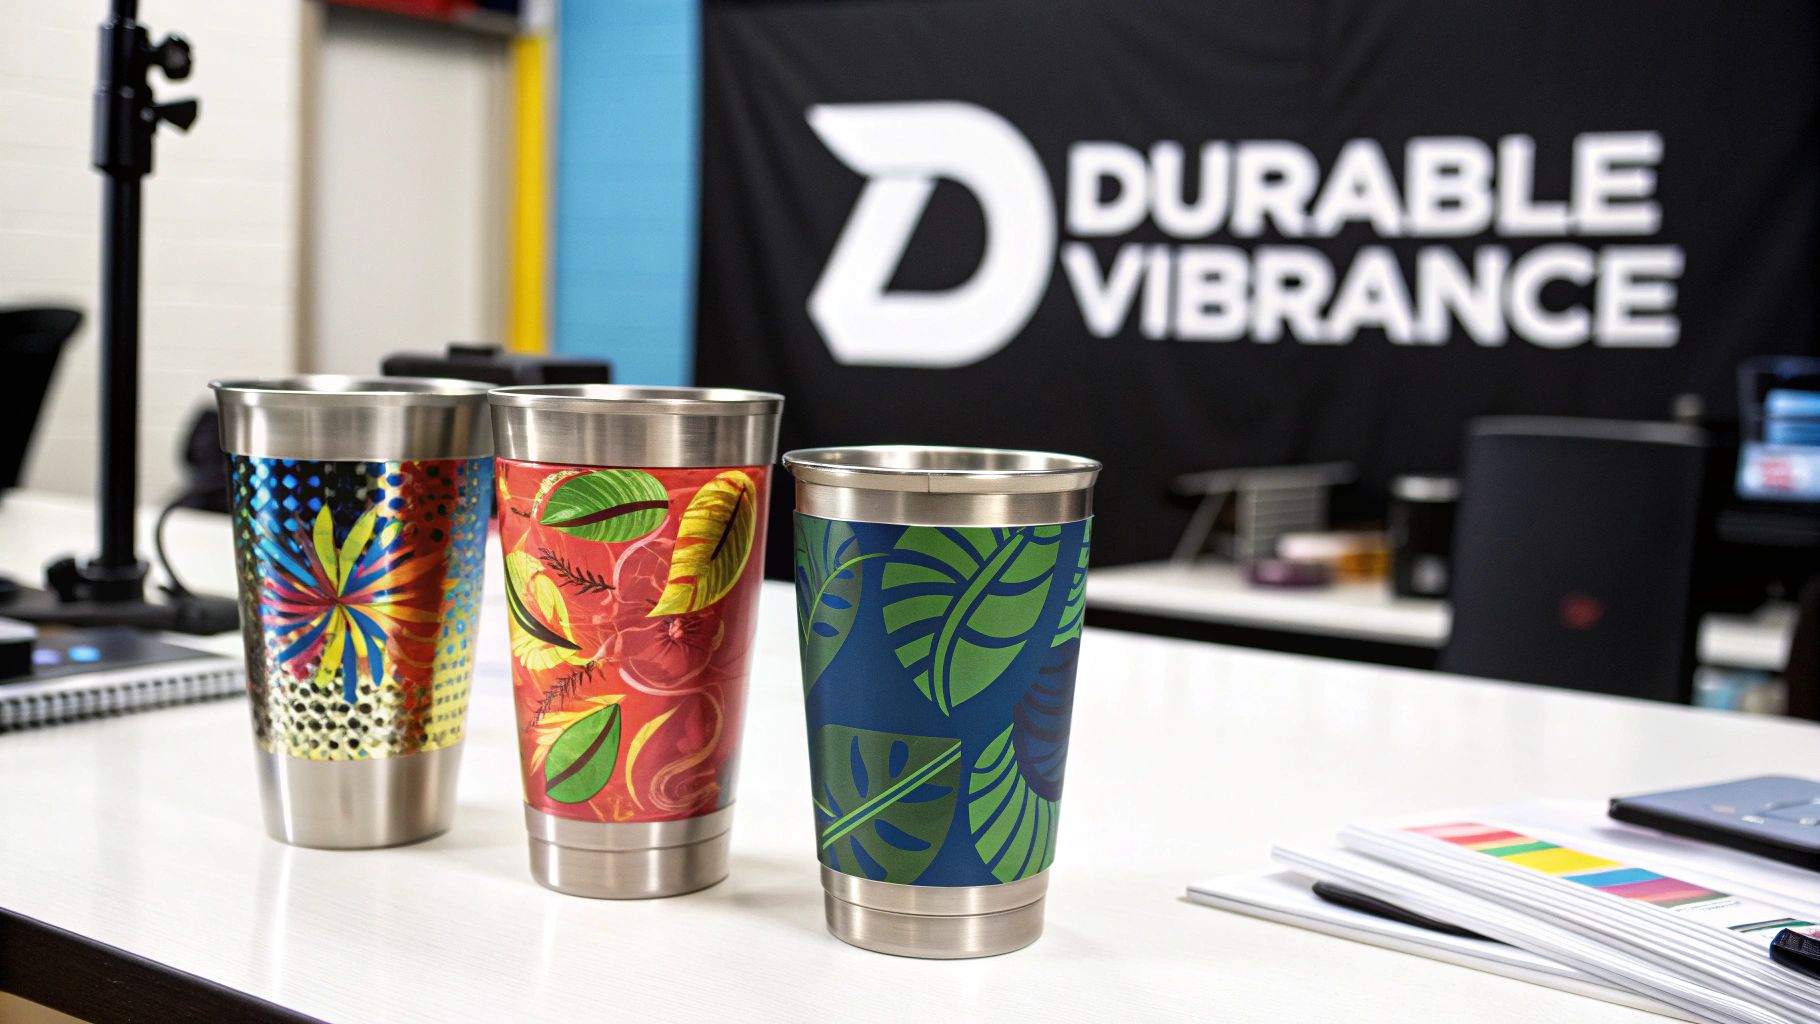
So, what exactly are UV DTF cup wraps? Think of them as next-level decals. They're vibrant, full-color designs printed with UV-curable ink that you can apply to just about any hard surface—glass, metal, plastic—without needing a heat press or dealing with the nightmare of weeding tiny vinyl pieces. The process creates a permanent, waterproof, and scratch-resistant finish that genuinely looks and feels like it was printed directly on the item. It’s no wonder they’ve become a go-to for small businesses customizing drinkware.
Why UV DTF Cup Wraps Are a Game Changer
If you've ever found yourself hunched over a table, meticulously weeding an intricate vinyl design or getting frustrated by the limitations of sublimation, then you know the struggle is real. The rise of UV DTF feels like a massive leap forward, and believe me, it’s not just another trend. This technology is fundamentally changing how small businesses customize popular products like tumblers, glass cans, and mugs.
At its heart, the method combines UV-curable inks with a direct-to-film transfer process. Unlike other techniques, this one prints a complete design—color, varnish, and adhesive—onto a special film. A pass under a UV light cures it instantly. What you're left with is a ready-to-apply transfer that acts like a super-durable sticker but has the professional finish of a direct print.
The End of Weeding and Complex Setups
Let's be honest: the best part is completely saying goodbye to weeding. For anyone creating products with detailed logos, fine text, or layered graphics, this is a lifesaver. You can churn out stunning, full-color designs in a fraction of the time it would take with layered adhesive vinyl.
On top of that, the versatility is incredible. UV DTF wraps stick to all sorts of hard, non-porous surfaces that often give other methods trouble.
- Glass and Ceramics: A perfect match for custom beer can glasses, coffee mugs, and decorative plates.
- Metals: Ideal for stainless steel tumblers, water bottles, and even small metal tins.
- Plastics: Works great on acrylic keychains, plastic cups, and other promo items.
- Treated Wood: Opens up a whole new world of custom coasters, small signs, and decorative boxes.
This flexibility means you can expand your product line without buying a bunch of different equipment. The durability also builds major customer confidence. The cured ink is tough—it’s waterproof, scratch-resistant, and holds its color beautifully, even with daily use.
A Quick Comparison
To see just how much of an advantage UV DTF offers, it helps to put it side-by-side with the old standbys. Here's a quick breakdown of how it stacks up against adhesive vinyl and sublimation.
UV DTF Wraps vs Traditional Methods
| Feature | UV DTF Cup Wraps | Adhesive Vinyl | Sublimation |
|---|---|---|---|
| Surface Compatibility | Very wide (glass, metal, plastic, wood) | Wide, but struggles with complex curves | Limited to polyester-coated or polymer items |
| Weeding Required? | No | Yes, often time-consuming | No |
| Heat Press Required? | No | No | Yes |
| Durability | High (waterproof, scratch-resistant) | Medium (can peel or fade over time) | Very High (ink is infused into surface) |
| Vibrancy & Detail | Excellent, full-color with textures | Good, but multi-color requires layering | Excellent, full-color photographic quality |
| Ease of Application | Simple peel-and-stick process | Can be tricky to align, especially layers | Requires precise heat, time, and pressure |
As you can see, UV DTF hits a sweet spot, offering incredible versatility and a high-quality finish without the labor-intensive steps of vinyl or the material constraints of sublimation.
A Market Poised for Growth
The demand for personalized drinkware is exploding, and UV DTF is riding that wave. Market analysis projects the UV DTF segment will hit $389 million by 2026, driven by a massive 47% growth in adoption among small shops and boutique retailers. Here in the US, e-commerce sales for custom tumblers jumped 28% year-over-year, largely because makers on platforms like Etsy and Shopify are embracing this tech to diversify.
The performance backs up the hype. Studies have shown UV DTF prints retain 95% of their color vibrancy even after 1,000 hours of UV exposure—a huge step up from traditional vinyl.
By simplifying the entire production workflow while delivering a top-tier product, UV DTF technology gives small businesses a serious competitive edge. It lowers the barrier to entry for creating professional-grade custom goods, which is a big deal for anyone looking into how to reduce production costs and scale their business.
If you’re familiar with high-end printing, the look and feel of a UV DTF wrap is comparable to premium raised Spot UV printed products, giving custom items a tactile, dimensional quality. This move toward more efficient, higher-quality customization is exactly why UV DTF is changing the game for so many creators.
Getting Your Gear in Order: Tools and Materials
Before you even think about hitting the print button, let's talk about setting up your workspace. Getting your tools and materials sorted out from the start is the difference between a smooth, profitable workflow and a series of frustrating, costly mistakes. Think of it like a chef's mise en place—having everything ready and in its place makes the entire process a whole lot easier.
Your setup doesn't have to break the bank, but every piece of equipment and every consumable plays a critical role. The printer is obviously the big-ticket item, but don't overlook the importance of quality films, inks, and even the cups you're decorating. That's where the real magic happens.
The Core Equipment You'll Need
This is the heart of your production. While you can always start by outsourcing your prints to test the waters, bringing the operation in-house is where you gain true control over quality, speed, and your creative vision.
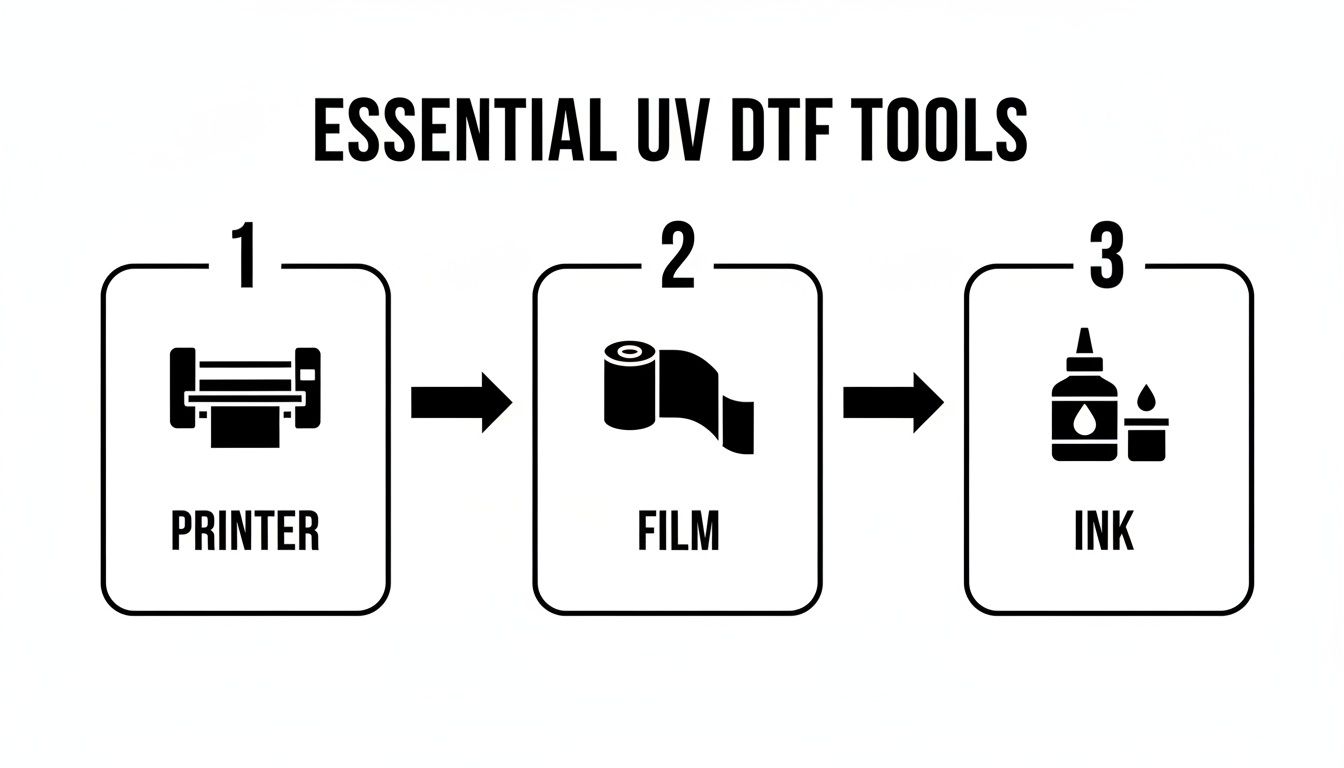
- UV DTF Printer: This is your workhorse. It's not the same as a standard DTF printer. The key difference is that a UV DTF printer is built to handle specific UV-curable inks and has an integrated UV LED lamp. This lamp is the secret sauce—it instantly cures the ink as it prints, locking in that vibrant color and creating a super durable transfer.
- Laminator: Some printers come with a built-in laminator, but many pros rely on a separate cold laminator. Its job is to perfectly bond the adhesive "B" film to your printed "A" film. A good one is worth its weight in gold because it prevents the bubbles and misalignment that can ruin an entire batch of transfers.
- UV Curing Lamp (Optional but Recommended): Depending on your workflow, an extra, standalone UV lamp can be a lifesaver. You can use it for a final cure after the transfer is on the cup or to give the ink an extra blast to ensure it's fully hardened before lamination. It’s a small addition that adds a layer of quality assurance.
It's All About the Consumables
The quality of your finished cup wrap is a direct reflection of the materials you put into it. I've seen too many people try to save a few bucks on cheap films or mystery inks only to deal with peeling transfers and unhappy customers. It's just not worth it.
First, you have the films. This is a two-part system: the A Film and the B Film. Your design gets printed (in reverse) directly onto the "A" film, which acts as the carrier. Then, the "B" film, which is basically a sheet of high-tack adhesive, is laminated on top. The two work together to create the finished transfer decal.
Just as crucial are the inks. You need high-quality UV DTF inks specifically formulated to cure instantly under UV light. They need to have fantastic adhesion and rich color saturation. We've found that USA-made inks, like those from Cobra DTF, deliver consistent, vibrant results without the batch-to-batch guesswork you can get with some overseas suppliers. For a much deeper look at the whole process, check out our complete guide to UV DTF printing.
Here’s a piece of advice I always give to newcomers: Buy your films and inks from the same supplier. They are designed and tested to work as a system. Mixing and matching brands is a gamble that can lead to all sorts of headaches, from poor adhesion to funky colors.
Choosing the Right Cups and Drinkware
Finally, let's talk about your canvas. The beauty of UV DTF is how versatile it is, but it definitely has its favorite surfaces.
- Glass Cans and Mugs: Smooth glass is a perfect match. The transfers look absolutely stunning.
- Stainless Steel Tumblers: Whether they're coated or just bare stainless steel, these work incredibly well.
- Hard Plastics: Things like acrylic tumblers or other rigid, smooth plastics are also fantastic candidates.
The common thread here is a clean, smooth, non-porous surface. Always, and I mean always, prep your items by wiping them down with isopropyl alcohol. This gets rid of any finger oils or factory residue and is the single most important step for getting a strong, permanent bond.
This emphasis on quality and durability isn't just a niche concern—it's where the whole market is heading. The global market for this tech was valued at $215M and is on track to hit a massive $1.5B by 2033. A huge driver of that is the demand for durable decorations on glass and metal, which account for 25% of this growth as people shift away from disposable or less resilient options. Here in the US, many shops are making the switch to UV DTF because quality inks can cut their environmental impact by up to 40% thanks to zero-VOC emissions and recyclable films. It’s a win for your business and a win for the planet.
Your Workflow for Printing Perfect Transfers
This is where the rubber meets the road—turning a digital design into a tangible, ready-to-apply transfer. Getting this workflow dialed in is what separates the pros from the amateurs, and it's the key to producing consistent, high-quality uv dtf cup wraps for every single order.
Let's walk through it with a real-world example. Imagine you've just landed an order from a local coffee shop. They want 50 custom-branded 16oz glass cans with their logo. Here's how you'd get it done.
Preparing Your Design File for Print
Before you even think about touching the printer, your success starts with the design file. It doesn't matter if you're working in Adobe Illustrator or Affinity Designer; the goal is the same: create a file that's built for quality and efficiency.
For that coffee shop order, they'll probably send you a single logo file. Your first job is to arrange copies of that logo onto one large artboard so you can print them all at once. We call this creating a gang sheet, and it’s a massive time and material saver.
Pay close attention to these three settings:
- Resolution: Always work at 300 DPI (dots per inch). Anything less, and you'll risk your final print looking pixelated or blurry.
- Color Mode: Set your file to CMYK (Cyan, Magenta, Yellow, Black). This is the standard for professional printing and ensures the colors on your screen will closely match the final printed product.
- File Format: When you're ready, export the file as a high-quality PNG with a transparent background. That transparency is critical—it tells the printer exactly where not to print ink, leaving only your design behind.
If you want to really master this, our guide on creating UV DTF gang sheets dives deep into optimizing your layouts to get the most out of every inch of film.
Printing Directly Onto the A Film
With your gang sheet good to go, it's time to print. The process involves printing your design in reverse onto the "A" film, which acts as the carrier sheet for your transfer.
You'll load the A film into your UV DTF printer, making sure the printable side is facing the right way (it usually has a slightly tacky or matte feel to it). From there, you'll jump into your RIP software to configure the print job. This is where you tell the printer to lay down a layer of white ink first, followed by the CMYK color layer right on top. That white base is the secret sauce that makes your colors pop, especially on trickier surfaces like clear glass or dark-colored tumblers.
As the ink is applied, the printer's built-in UV lamp cures it instantly, hardening it into a durable, slightly raised layer you can actually feel.
My Pro Tip: Before you print an entire sheet, always run a small test print. It takes a few extra minutes, but it can save you from wasting a whole sheet of expensive film and ink because of a simple file error. I've learned this one the hard way.
The Crucial Lamination Step
Once your design is printed and cured on the A film, you’re ready to apply the "B" film. Think of this B film as a transparent sheet coated with a powerful adhesive—it's what will ultimately stick your design to the cup. Honestly, getting this step right is non-negotiable if you want a professional-looking wrap.
The main goal is to laminate the B film over the printed A film without trapping any air bubbles or creating wrinkles. Your best bet here is a cold laminator.
- Start by carefully aligning the edge of the B film with the A film.
- Feed both films through the laminator slowly. The machine applies steady, even pressure across the entire surface.
- This pressure perfectly bonds the adhesive from the B film directly onto your cured ink design.
Don't have a laminator? You can do it by hand with a good squeegee, but it takes a bit of practice. Start on one end and slowly press the B film down, using the squeegee to push out any air as you move across the sheet.
After lamination, you're almost there. The last thing to do is cut the individual designs out of the gang sheet. I recommend using a sharp craft knife and a ruler for clean, precise cuts.
And just like that, you have a stack of perfect, ready-to-apply UV DTF cup wraps for that coffee shop order, all set for the final application.
Mastering the Art of Flawless Application
A great print is just the starting point. The real craftsmanship comes through in the application—that’s where a simple transfer becomes a durable, professional-looking product that feels great in your customer's hands. Let's get into the nitty-gritty of applying UV DTF cup wraps perfectly, every single time.
The secret to a flawless finish isn't in the wrap itself, but in the cup you're applying it to. Honestly, skipping proper prep is the number one reason I see wraps fail. You end up with peeling edges and frustrating bubbles that can sink an otherwise fantastic product. It’s just like painting a wall; you wouldn't slap a coat of paint over a dirty surface and expect it to last.
The Unskippable Prep Step
First, give the cup a good wash with mild soap and water to get rid of any obvious dust or grime. Then, dry it completely with a lint-free cloth. That’s a decent start, but it’s not the whole story.
The most crucial part of prep is wiping the entire application area with 70% isopropyl alcohol. This step is non-negotiable. It cuts through all the invisible stuff—fingerprint oils, manufacturing residue—that prevents the adhesive from getting a solid grip. Let it air dry for a minute or two, and from this point on, do your best not to touch that clean surface with your bare hands.
A truly clean surface is the foundation for strong, lasting adhesion. Taking this one extra step can boost the bond strength of your wrap by over 50%, which dramatically cuts down on any chance of peeling or lifting later on.
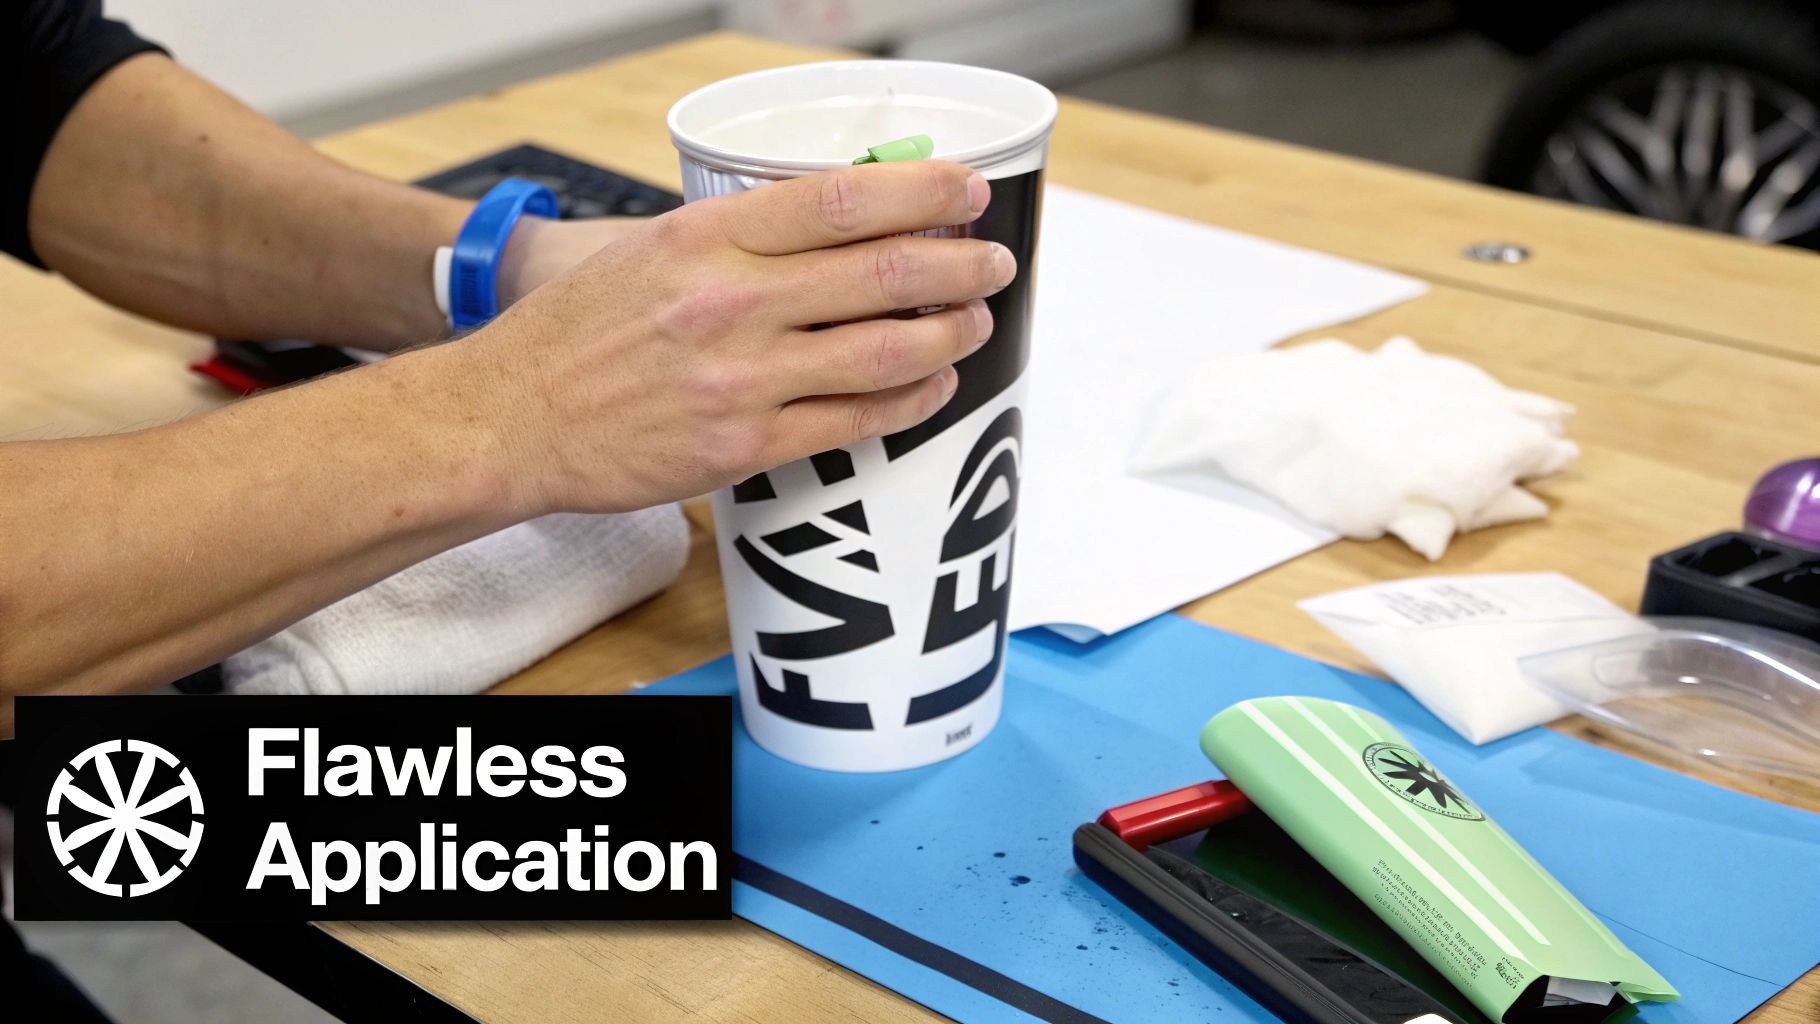
The Hinge Method for Perfect Alignment
Okay, let's get this thing on straight. Getting a full wrap perfectly aligned can be nerve-wracking; even a tiny slant at the beginning can turn into a crooked disaster by the end. This is exactly why the "hinge method" is your best friend.
- Position the Wrap: Lay the wrap on the cup and fiddle with it until it’s lined up just right. A small piece of painter's tape can help hold it temporarily.
- Create the Hinge: Place a strip of tape vertically down the center of the wrap, taping it to the cup. This hinge locks your alignment in place.
- Apply One Side: Lift one side of the wrap, peel the backing away until you hit the center tape, and then just snip that piece of backing off.
- Squeegee It Down: Grab a felt-tipped squeegee and press the sticky side down, working from the center hinge outward. This motion pushes air out as you go, stopping bubbles before they start.
- Repeat for the Other Side: Now, peel off your center tape. Lift the remaining side of the wrap, pull off the rest of the backing, and squeegee from the center outward again.
Using this technique pretty much eliminates the guesswork and gives you a straight, bubble-free transfer. Just remember to use firm, overlapping strokes with your squeegee to make sure every last bit of the design makes solid contact.
Conquering Curves and Tapers
Putting a wrap on a perfectly straight tumbler is one thing, but what about tapered cups or mugs with weird curves? This is where a lot of people get stuck. The trick is to slow down and change your strategy.
Instead of trying to apply it all in one go, work in smaller sections. For a tapered tumbler, I always start at the widest part and gently work my way down, letting the wrap naturally conform to the shape. You might even need to make a few tiny relief cuts on the edges of the backing paper to help it lay flat without creasing.
Here are a few more tips from the trenches for those tricky surfaces:
- Use Your Fingers: Sometimes your fingers are the best tool for the job. You can use them to gently mold the wrap around curves with firm, steady pressure.
- Start in the Middle: On a curved surface, anchoring the center of the design first and then smoothing out toward the edges can prevent a lot of wrinkles.
- Don't Overstretch: Be really careful not to pull or stretch the film. It can distort your design and, worse, weaken the adhesive.
Once the wrap is fully applied, go over the whole thing one more time with a microfiber cloth, rubbing firmly to really lock in that bond. Pay extra attention to the edges and any tiny, detailed parts. Finally, and this is important, let the cup sit for at least 24 hours before washing. This "curing" time lets the adhesive fully set, ensuring all your hard work pays off with a beautiful, durable product your customers will love.
Working Out the Kinks: Troubleshooting Your UV DTF Prints
Sooner or later, every printer runs into a snag. It’s just part of the game. When your UV DTF cup wraps start acting up, it can feel like you’re just burning through time and expensive film. Don't worry, we've all been there. Let's walk through some of the most common headaches and how to fix them so you can get back to making amazing products.
Instead of throwing things at the wall to see what sticks, it helps to know what to look for. Most problems come down to a few key areas: the curing process, how you prep the cup, or the way you apply the wrap. Figuring out why it’s happening is half the battle.
Why Won't My Design Stick to the Cup?
This one is a classic. You press the wrap, burnish it down, and then as you peel the carrier film back… the whole design lifts right off with it. It’s a sure sign of a bad bond, but what’s the root cause?
Nine times out of ten, the problem is the cup itself. Even a brand-new cup that looks perfectly clean can have a microscopic layer of oil or manufacturing residue on it. That invisible film is all it takes to ruin the adhesion.
- The Fix: Get serious about your prep work. Before you even think about applying the wrap, give the surface a very thorough wipe-down with 70% isopropyl alcohol and a clean, lint-free cloth. Let it flash off and completely air dry. You’d be surprised how often this one simple step—which solves this problem about 90% of the time—is the only thing you need to do.
Another possibility is that you aren't using enough elbow grease. That adhesive needs firm, consistent pressure to create a permanent bond with the surface.
I tell people to think of the adhesive as having thousands of tiny hooks. If you just lightly smooth it over, those hooks can't dig in and grab hold. A firm, methodical pass with a good squeegee is what truly sets the design.
My Colors Look Faded or Washed Out
You printed a gorgeous, vibrant graphic, but on the cup, it looks weak and muted. This is almost always a pre-application issue, meaning the problem happened back at your printer. Washed-out colors are a dead giveaway that something is off with your ink or your print settings.
First things first, check your ink levels. Are you running low on anything? Pay special attention to your white ink. A thin or weak white base layer is like trying to paint on a gray canvas—it will dull down every color you lay on top of it, which is especially noticeable on clear or dark-colored cups.
If the inks are full, it’s time to look at your RIP software.
- Make sure you’re using a high-quality print mode.
- Double-check that your white ink density is cranked up, usually to 100%.
- Confirm your design file is in CMYK. Printing an RGB file can cause some wild and unexpected color shifts.
Ugh, My Edges Are Peeling and Corners Are Lifting
This is the one that keeps us up at night. You finish a beautiful order, and a few days later, the client sends a picture of a wrap where the corners are already starting to lift. This means the bond was weak from the get-go, especially around the edges.
Usually, this happens because we focus all our pressure on the middle of the design and neglect the outer edges during application. It’s an easy mistake to make.
Actionable Solution: After you've done your main pass with the squeegee, go back for a second round. I like to use a microfiber cloth wrapped around my thumb to really press down on every single edge, corner, and tiny detail. This focused pressure makes sure the most delicate parts of the design are just as secure as the center. Letting the wrap sit and "cure" for a few minutes before you peel off the carrier film can also make a big difference.
Got Questions About UV DTF Cup Wraps? We've Got Answers.
When you're getting started with UV DTF cup wraps, a few key questions always pop up. It's totally normal. Getting these sorted out is the fastest way to get comfortable with the process and make sure your finished cups look amazing.
We've pulled together the most common questions we hear from fellow printers and small business owners, with practical answers based on real-world experience. Let's tackle them head-on.
Are UV DTF Cup Wraps Dishwasher Safe?
This is the big one, and the answer is critical for keeping your customers happy. While UV DTF wraps are incredibly tough and 100% waterproof, we always tell people to hand wash only. It's the only way to be sure the wrap will last for years.
Think about what happens inside a dishwasher: super-hot water, high-pressure jets, and really strong detergents. That environment will eventually wear down the adhesive and can start to dull the ink. It's the same reason you wouldn't take a custom-painted guitar through an automatic car wash.
A simple piece of advice for your customers can make all the difference. Tell them to gently wash their custom cups with a soft sponge and regular dish soap. This one small step protects their purchase and your reputation.
Can I Use My Regular DTF Printer for This?
I get this question a lot, and the answer is a hard no. You absolutely cannot use a standard direct-to-film printer—the kind for t-shirts—to make UV DTF wraps. Trying it will only lead to a huge, wet mess and could even damage your machine.
The two printing methods are like night and day. They use completely different inks and curing processes.
- Regular DTF uses water-based inks made for fabric, which need a heat press to set.
- UV DTF uses special inks that cure, or harden, instantly when hit with UV light.
A regular DTF printer just doesn't have the UV lamp needed to solidify the ink. Without it, the print will never dry.
How Do I Stop Bubbles and Edges from Peeling?
Getting a perfect, bubble-free application comes down to two things: prep and technique. Nine times out of ten, bubbles and peeling edges happen because the cup wasn't perfectly clean to begin with. Always, always wipe the surface down with 70% isopropyl alcohol first to get rid of any dust or finger oils.
When you're ready to apply the wrap, use a squeegee with a felt edge and apply firm, even pressure. Start from the middle and push outwards—this forces any trapped air out to the sides instead of getting stuck under the design. For the edges, give them an extra, firm rubdown with a microfiber cloth after the wrap is on. Another pro tip: let the wrap sit for a few minutes before you pull off the clear carrier film. This gives the adhesive a little extra time to grab hold.
What Kinds of Surfaces Can I Put These On?
This is where UV DTF really gets fun. The versatility is off the charts. You can stick these wraps on just about any hard, smooth surface you can think of.
Here are some of the most popular items people are customizing:
- Glass (tumblers, coffee mugs, and those popular glass cans)
- Shiny ceramics
- Stainless steel and other metals
- Hard plastics, like acrylic blanks
- Wood that has been sealed or varnished
The goal is a clean, non-porous surface where the adhesive can get a solid grip. They won't work on fabric, silicone, or anything rough and porous like raw wood or concrete.
Ready to create stunning, durable custom drinkware with less hassle? Cobra DTF offers premium, USA-made UV DTF supplies to help your business thrive. Experience vibrant colors, fast 1-3 day shipping, and unbeatable quality. Explore our products at https://cobradtf.com.