

How to Print an Iron On Transfer for Perfect Custom Tees
So, you've got a great design and you're ready to see it on a t-shirt. Awesome. Making your own iron-on transfers is one of the most satisfying ways to create custom gear. It really comes down to three things: picking the right transfer paper for your project, printing your design correctly (and mirrored!), and then applying it with heat.
Your Guide to Flawless Iron On Transfers
Let's walk through the whole process, from the file on your computer to the finished product. We'll focus on the critical decisions you need to make right at the start, because getting these fundamentals right is what separates a homemade-looking shirt from a professional-quality one.
This isn't just a niche hobby anymore. The demand for custom apparel has exploded, and the materials that make it possible—like heat transfer paper and vinyl—are big business. We're talking about a global market valued at around USD 1.6 billion in 2025, which is expected to climb to USD 2.27 billion by 2034. If you're interested in the numbers, you can learn more about the growing heat transfer market and its trends.
To give you a quick bird's-eye view, here are the core stages we'll be covering.
Quick Overview of the Iron On Transfer Process
| Stage | Key Action | Why It's Important |
|---|---|---|
| 1. Design & Prep | Finalize your artwork and mirror the image. | Mirroring ensures the design reads correctly after being flipped and pressed onto the fabric. |
| 2. Paper Selection | Choose transfer paper based on fabric color and printer type. | The wrong paper can lead to a faded design, a stiff feel, or even damage your printer. |
| 3. Printing | Print the mirrored design onto the correct side of the transfer paper. | Proper print settings and orientation are crucial for a vibrant, high-quality transfer. |
| 4. Application | Use a heat press or iron to transfer the design onto the garment. | Consistent heat and pressure are what permanently bond the ink to the fabric fibers. |
Think of this table as your roadmap. Nailing each stage is key to getting a great result every time.
Key Decisions in the Transfer Process
Before you hit "print," a couple of choices will make or break your project. Getting these wrong is a common rookie mistake, so let’s get them right from the get-go.
-
Light vs. Dark Fabrics: The color of your shirt is the first thing to consider. Transfer paper for light fabrics is mostly transparent, so the fabric color shows through the non-printed areas. For dark garments, you need special paper with an opaque white background; otherwise, your design’s colors will look muddy or disappear completely.
-
Inkjet vs. Laser Printers: You have to match your paper to your printer. They are not interchangeable. Inkjet transfer paper is designed for liquid ink, while laser paper is built to withstand the heat and toner of a laser printer. Trying to use inkjet paper in a laser printer is a recipe for a melted mess and a potentially ruined machine.
Making these two decisions correctly is half the battle. Once you've got the right paper for your fabric and your printer, you’re well on your way to creating something that looks fantastic.
Choosing the Right Tools and Materials
Before you even think about printing, let's talk about getting your toolkit in order. This is, without a doubt, the most important step. Having the right gear from the get-go is the secret to avoiding those all-too-common frustrations—like faded colors, stiff designs, or transfers that start peeling after the first wash.
It's not just about grabbing the first sheet of paper you see and hitting "print." The choices you make here will make or break your final product.
Transfer Paper: The Foundation of Your Project
The single most critical decision you'll make is your transfer paper. This one choice completely dictates the final look, feel, and durability of your design. There's no one-size-fits-all answer here; the best paper depends on two things: the color of your garment and the type of printer you have.
For light-colored fabrics like white, pastels, or ash grey, the transfer paper is transparent where you don't print. This lets the fabric’s color show through, giving your design a softer, more integrated appearance. On the other hand, paper made for dark fabrics has a solid, opaque white base. This layer acts as a primer, making sure your colors pop on a black or navy shirt instead of getting swallowed by the dark background.
Key Takeaway: The absolute number one rule is to match your paper to your fabric color. If you use light-fabric paper on a dark shirt, your design will be almost invisible. Use dark-fabric paper on a light shirt, and you'll likely end up with a noticeable white box around your art.
You also have to match the paper to your printer—this isn't optional.
- Inkjet Transfer Paper: This is what most home crafters use. It's specifically made to absorb the liquid inks from an inkjet printer.
- Laser Transfer Paper: This type is built to handle the intense heat from a laser printer's fuser. Using it in an inkjet won't work, and putting inkjet paper in a laser printer can seriously damage the machine.
If you're curious about the science behind it all, this guide on what is transfer paper is a great resource for a deeper dive.
Essential Application and Cutting Tools
Once your design is printed, you’ll need a few more things to bring it to life.
A reliable heat source is non-negotiable. For professional, long-lasting results, nothing beats a heat press. It delivers the consistent temperature and even pressure required for a perfect bond. While you can use a household iron, you'll need to make sure it gets hot enough and be ready to apply a lot of firm, steady pressure across the entire design.
You'll also need a good cutting tool. A sharp pair of scissors will do the job for simple shapes, but you'll want to trim away all the excess paper for a clean look. If you're working with detailed designs, a cutting machine like a Cricut or Silhouette is a game-changer, giving you perfectly clean edges every time.
Getting Your Design Ready to Print
A fantastic design is only half the battle. If the digital file isn’t prepped correctly, even the best artwork can lead to a disappointing final product. This is where you lay the groundwork for a perfect press, long before the heat press even starts to warm up.
I can’t tell you how many amazing projects I've seen ruined by one simple, forgotten step: mirroring the image. When you press a standard transfer, it's placed face-down on the fabric, so the final result is a reverse of what you printed. It’s a classic mistake, but thankfully, an easy one to avoid.
The Mirroring Rule and Resolution
Before you hit "print," you absolutely must flip your design horizontally in your editing software. This simple action ensures that any text or asymmetrical parts of your graphic appear correctly once they're ironed on. Think of it like a temporary tattoo—what you see on the paper is the mirror image of how it will look on your skin (or, in this case, your shirt).
Another non-negotiable for a professional finish is image resolution. For sharp, clean lines and vibrant colors, your file needs to be at 300 DPI (dots per inch). Anything less and you're heading for a fuzzy, pixelated transfer that looks amateurish up close.
File Prep and Optimization
Want to get the most out of every sheet of expensive transfer paper? Learn to "nest" your designs. This just means arranging multiple smaller graphics onto a single page to minimize waste. You can easily do this in software like Adobe Photoshop or even free tools like Canva.
Proper file prep is what separates a homemade craft from a high-quality custom product. If you're new to this, checking out some artwork submission tips for beginners can save you a lot of headaches.
Taking the time to get this right makes sense. After all, transfer paper is a key player in the textile decoration industry, which has a projected global market value of USD 3.3 billion by 2025. Using your materials wisely is just good business.
Key Takeaway: Before you print, always ask yourself two questions: Is my design flipped horizontally? Is the resolution at least 300 DPI? If the answer is yes to both, you're ready to go.
Getting Your Printer Settings Dialed In
Just hitting 'Print' with the default settings is a surefire way to get a dull, faded transfer. To get those sharp, vibrant results you see from the pros, you have to get under the hood and tell your printer exactly what you’re printing on. This is where you take control of the ink flow, and it’s the difference between a crisp design and a blurry mess.
Think of it this way: your printer’s settings are the control panel for quality. A few small tweaks here will have a huge impact on your final shirt. That print dialog box is your key to unlocking what your printer can really do.
This little window is your command center. It’s how you tell the machine you're not just using regular copy paper.
Fine-Tuning for a Perfect Print
The first and most critical setting to change is the paper type (sometimes called media type). Whatever you do, don't leave this on 'Plain Paper'. This setting dictates how much ink the printer lays down. You need to look for an option that matches what you're doing.
Usually, you'll find choices like:
- T-Shirt Transfer
- Iron-On Transfer
- Specialty Paper
- Matte Photo Paper
If your printer doesn't have a specific "T-Shirt Transfer" option, 'Matte Photo Paper' is my go-to backup. It signals the printer to apply a good, rich layer of ink that soaks in perfectly without oversaturating the film and causing bleeding.
My Two Cents: Getting the paper type right is everything. It controls the ink saturation and drying time, which helps you dodge common headaches like smudging or weird color bands.
Next, you'll want to find the print quality setting. Crank that baby up. Never settle for 'Standard' or 'Normal'. Go for the highest setting available, which might be called 'Best', 'High', or 'Photo'. This will slow the printing down, but that's a good thing! It gives the printer time to lay down the ink precisely for maximum detail and deep, rich colors that really pop.
If you want to dig even deeper, we cover these settings with more examples in our guide on how to print on transfer paper.
Honestly, these two adjustments—paper type and print quality—are the most important things you can do. They’re what separate a project that looks homemade from a custom garment that looks professionally made. Taking a minute to get these settings right ensures your iron-on has the best possible shot at looking amazing before it even gets near a heat press.
Applying Your Transfer with Perfect Heat and Pressure
This is where the magic happens. Your design is printed, and now it's time to permanently bond it to the fabric. Getting this right comes down to a simple but crucial formula: the right temperature, the right pressure, and the right timing. It's all about technique.
If you’re working with a standard household iron, a little prep work goes a long way. First thing’s first: always turn off the steam function. Steam is the enemy of a good transfer. Next, forget about your flimsy ironing board. You need a solid, heat-resistant surface, like a wooden cutting board placed on a sturdy table, to get the firm pressure required for a permanent bond.
When it's time to press, you need to apply some serious, even pressure. I’m talking about using your body weight and keeping the iron in constant motion to prevent any scorching. It feels a bit like a workout, but that consistent pressure is what melts the adhesive and forces it deep into the fabric fibers.
This detailed process shows a key step in the journey of bringing an iron-on transfer to life on a garment.
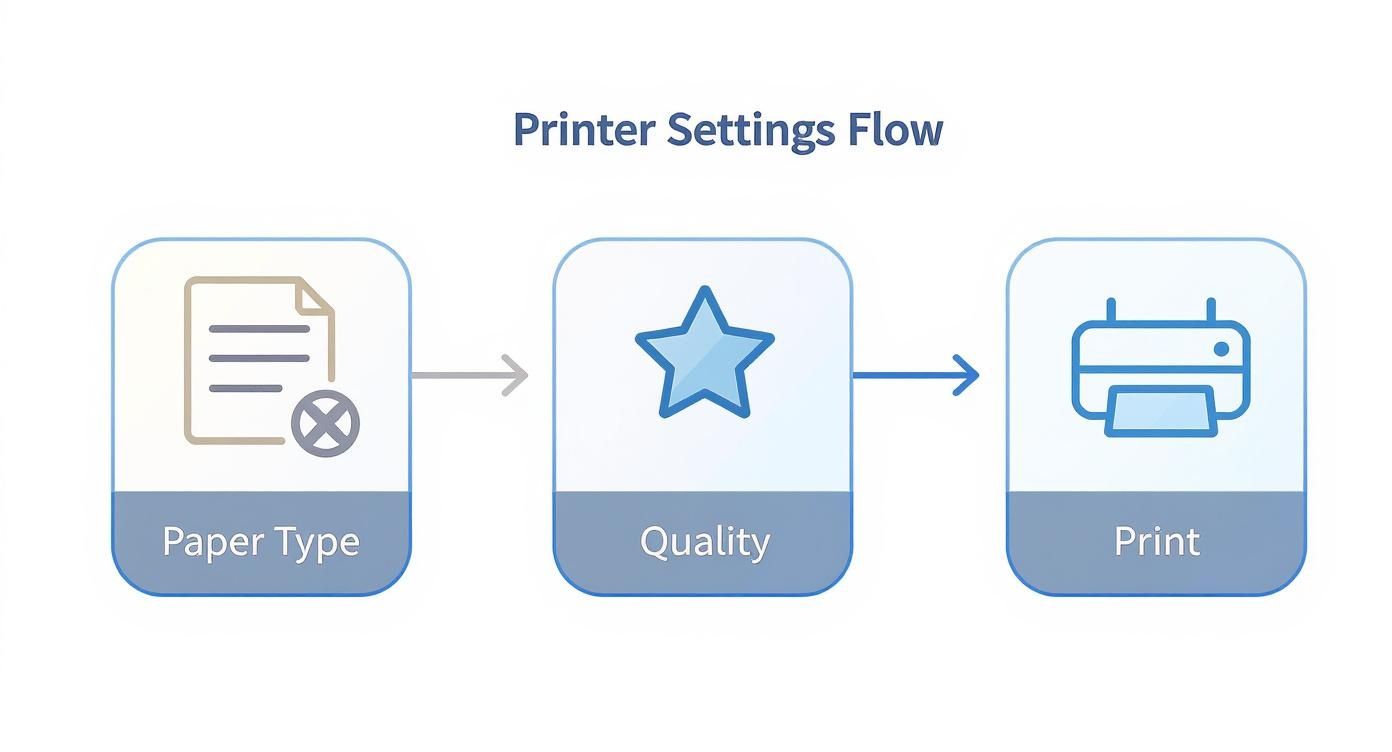
As you can see, choosing the right paper and getting your quality settings dialed in are fundamental steps you need to nail before you even think about pressing print.
Heat Press and Peel Types
A heat press really changes the game by taking all the guesswork out of the process. It gives you precise control over temperature and time, which is exactly what you need. Always trust the instructions that came with your transfer paper—they are your guide. For most DTF transfers, you'll be looking at a temperature somewhere between 300°F and 330°F.
Pro Tip: I always pre-press my garments for about 5-10 seconds before applying the transfer. This quick step removes hidden moisture and any stubborn wrinkles, giving you a perfectly flat surface for the best possible adhesion.
Finally, you absolutely need to know your transfer’s peel type. This is a non-negotiable detail that can make or break your finished product.
- Hot Peel: Just like it sounds, you peel the backing off immediately after pressing while everything is still hot. This method often leaves the design with a softer, more flexible feel.
- Cold Peel: You have to be patient with this one. Let the garment and transfer cool down completely before you even think about touching the backing. If you peel too early, you risk pulling the entire design right off with it.
For those interested in the business side of things, this market is growing fast. The global iron-on transfer sheet market was valued at approximately $1.21 billion in 2024 and is on track to hit $2.19 billion by 2033.
If you're exploring other fabric crafts, understanding techniques for applying fusible materials flawlessly can provide some great parallel insights, as they also rely on that perfect combination of heat and pressure. We cover this application stage from top to bottom in our complete guide on how to iron on a transfer.
Troubleshooting Common Iron-On Transfer Problems
Even when you follow the steps perfectly, things can sometimes go sideways. Let's walk through a few of the most common snags I see people run into, so you'll know exactly how to fix them.
Why Is My Transfer Cracking or Peeling After Washing?
This is the number one question, and the answer almost always comes down to heat and pressure. If your design lifts or cracks after a wash, it's a sure sign the adhesive didn't properly fuse with the fabric. It just sat on top instead of bonding.
First, check your pressing surface. A standard ironing board is your enemy here—it has too much padding and give. You need a rock-solid surface like a countertop (with a protective layer) or a dedicated heat press platen. You have to apply serious, even body weight to get that bond. Don't be shy!
Also, don't eyeball the time. If the instructions say press for 45 seconds, cutting it short by even 15 seconds can be the difference between a shirt that lasts and one that peels on the first wash.
A Quick Word on Aftercare: To get the most life out of your creations, always wash them inside out in cold water. I highly recommend hanging them to dry, but if you must use a dryer, stick to the lowest heat setting.
Can I Just Use Any Transfer Paper in My Laser Printer?
Please don't do this. I've heard horror stories. Inkjet transfer paper is designed for, well, inkjets. A laser printer works by using intense heat to fuse toner to the page.
If you run inkjet paper through a laser printer, its coating will likely melt all over the internal components, especially the fuser. This is a messy, expensive repair—if it can be repaired at all. Always buy the paper specifically made for your printer type. It will be clearly marked "For Inkjet Printers" or "For Laser Printers."
Do I Really Have to Mirror My Image Every Time?
Most of the time, yes. For standard transfers, especially those for light-colored fabrics, you print a mirrored version of your design and apply it face-down onto the shirt. When you peel the backing away, it appears the right way around.
However, this isn't a universal rule. Some papers, particularly opaque ones designed for dark fabrics, are applied face-up, meaning you shouldn't mirror the image.
The best advice I can give is to stop and read the instructions that came with your paper. It's the only way to know for sure. Every brand is a little different, and that one piece of paper can save you from a frustrating mistake.
Ready to create stunning, durable custom apparel without the guesswork? Cobra DTF offers premium, USA-made Direct-to-Film transfers that provide vibrant, professional results every time. Check out our high-quality transfers and see the difference for yourself.