How to Print on Transfer Paper Perfectly Every Time
Learning how to print on transfer paper is a pretty simple process once you get the hang of it. You just need to get your artwork ready, print it on the special paper, and then use heat to transfer it to your fabric. The trick is to match the right paper to your fabric color and carefully follow the instructions for the brand you're using.
Your Starting Point for Perfect Transfers
If you're diving into the world of custom t-shirts and decor, welcome! Transfer paper is an incredible tool that lets you take a design from your screen and bring it to life on a physical product. It’s perfect for small businesses, crafters, or really anyone who wants to make something unique.
This technology is a big reason the global market for textile transfer paper is booming. In fact, it's projected to hit a staggering USD 1546.3 billion by 2035. That's all driven by people like you who want custom gear. If you're interested in the numbers, you can dig into the full report on textile transfer paper market insights.
This guide will cover all the details, but let's start with the basics. I've found it's easiest to think of the process in three main stages:
- Artwork Setup: This is where you prep your digital file so it prints perfectly.
- Printing: Dialing in your printer settings is key to getting a vibrant, crisp image on the paper.
- Application: The final step where you use heat to permanently apply the design to your item.
Choosing the Right Paper Type
The first decision you'll make is also one of the most important: picking the right paper. Your choice comes down to one simple thing—the color of the fabric you're printing on.
If you use the wrong paper, your design will look faded, see-through, or just plain wrong. For example, the standard paper for light fabrics has a clear film. If you put that on a black shirt, the dark fabric will show right through your design, and your colors will look dull and muddy.
Key Takeaway: I can't stress this enough: the most common mistake I see beginners make is using "light fabric" transfer paper on a dark shirt. The results are almost always a huge letdown because the inks just aren't opaque enough to stand out.
To avoid that headache, you need to understand the difference between the two main types of paper. They are not the same and require totally different steps, especially when you're setting up your artwork and pressing the design.
Before we go further, it helps to see a direct comparison. This table breaks down the core differences between paper for light fabrics and paper for dark fabrics.
Transfer Paper for Light vs Dark Fabrics At a Glance
| Feature | Light Fabric Transfer Paper | Dark Fabric Transfer Paper |
|---|---|---|
| Background Film | Transparent/Clear | White/Opaque |
| Artwork Printing | Must be mirrored (flipped horizontally) | Printed as is (do not mirror) |
| How to Apply | Printed side down onto the fabric | Printed side up (peel from backing first) |
| Feel on Fabric | Softer, less noticeable feel | Thicker, more like a vinyl patch |
| Best For | White, beige, pastels, light gray fabrics | Black, navy, red, and all dark colors |
Understanding these distinctions from the get-go will save you from wasting paper, ink, and your favorite t-shirts. Always double-check that you're grabbing the right box of paper for the job before you even think about hitting "print."
Getting Your Tools and Materials in Order
Before you even think about hitting "print," let's talk about setting yourself up for success. Having all your gear lined up and ready to go is the secret to a smooth, headache-free process. It’s the difference between a project that flows perfectly and one that sends you back to the drawing board.
First things first: the transfer paper. This is the foundation of your print. The type of printer you have is non-negotiable here—inkjets need inkjet paper, and lasers need laser paper. It sounds simple, but I've seen people try to mix and match. Trust me, it leads to smudged, unusable prints and can even gum up your printer.
Picking the Right Fabric
What you're pressing onto—your substrate—is just as crucial as the paper. The fabric’s material will dramatically change how the transfer bonds to it and how it holds up over time. Cotton is a classic for its comfort, but you'll often find that polyester blends really make the colors pop with incredible vibrancy.
If you're unsure which fabric is best for your specific design, we've put together a detailed breakdown on the differences between cotton and polyester for printing that’s worth a read. It can save you a lot of trial and error.
Applying the Heat
Now, let's talk about the heat source. You can use a household iron for a small, one-off project, but it’s a gamble. Irons are notorious for having hot spots and inconsistent pressure, which is the number one reason transfers start peeling after the first wash.
For results that look professional and actually last, a heat press is the only way to go. It gives you precise, consistent control over the three most important variables in the game:
- Temperature: It hits and holds the exact heat needed for the transfer to properly melt and fuse with the fabric fibers.
- Pressure: You get perfectly even pressure across every inch of your design, which means no weak spots or lifting corners.
- Time: A built-in timer ensures you get the perfect cure without scorching your garment.
A dedicated heat press is a game-changer. I’ve found that it completely eliminates the guesswork and dramatically increases the washability and professional finish of every single item I create.
Finally, you'll want to round out your toolkit with a few small but mighty accessories. A Teflon sheet (or even parchment paper) is a must-have to protect your heat press platen and the garment itself. If you're working with intricate designs on opaque paper, a good set of weeding tools will save you a ton of frustration. And never, ever forget to use a lint roller on your fabric right before you press—those tiny stray fibers can get trapped under your design and ruin an otherwise perfect print.
Preparing Your Artwork for a Flawless Print
A killer transfer begins long before you hit the print button. It all starts with the digital file. Getting your artwork set up correctly is the single most important thing you can do to ensure the final product looks crisp, professional, and exactly how you envisioned it.
The first, and most classic, mistake I see people make is forgetting to mirror the image. For transfers going onto light-colored fabrics, you absolutely have to flip your design horizontally. Think about it: you're placing the paper face-down, so the mirrored image will press onto the shirt in the correct orientation. It’s a simple checkbox in your software, but skipping it is a surefire way to ruin a perfectly good shirt.
Now, when you're working with opaque transfers for dark fabrics, the rules change. Most of the time, you do not mirror the image for these. You'll print it as-is, peel it from the backing, and then place it on the garment right-side-up. Every paper is a little different, so always double-check the instructions, but this is a solid rule of thumb.
Getting the Resolution and Dimensions Just Right
Want your design to look sharp and clean, not like a blurry, pixelated mess? The magic number is 300 DPI (dots per inch). This is the gold standard for high-quality printing, and it guarantees your lines will be crisp and your colors will pop.
You can usually find this setting in your design software under a menu like "Image Size" or "Scale Image." Whether you're using Adobe Photoshop or a free tool like GIMP, make sure your file is set to 300 DPI before you start designing.
Trust me, it's way easier to scale a high-resolution image down than to try and add detail to a low-resolution file that just isn't there.
You also need to set your canvas size to the exact physical dimensions you want on the shirt. If the final print should be 10 inches wide, make your digital canvas 10 inches wide at 300 DPI. This takes all the guesswork out of the process and ensures what you see on screen is what you get on the fabric.
Expert Tip: What looks great on a bright computer screen doesn't always translate perfectly to ink on paper. I always do a quick test print on a regular piece of paper first. It’s a cheap and easy way to check your colors and confirm the size before you use up your good transfer paper.
Finding unique graphics is just as crucial as the technical setup. If you're looking for inspiration, there are some great sources for high-quality t-shirt graphics out there that can really elevate your project. And for more creative ideas, take a look at our guide on making custom iron-on shirt decals.
Getting Your Printer Settings Dialed In for Rich, Bold Colors
If you just hit "print" using your printer's default settings, I can almost guarantee you'll be disappointed. Those standard settings are built for printing text on plain copy paper, which means they're programmed to use as little ink as possible. On transfer paper, that translates to weak, faded colors that look like a pale ghost of your original design.
To get those deep, saturated colors that pop, you've got to jump into the print dialog box and tweak a few key settings yourself. This is the secret step that turns a regular inkjet printer into a workhorse for creating pro-level custom gear. Making these adjustments basically tells your printer to slow down, get serious, and lay down a much heavier layer of ink.
Choose the Right Media Type
The single most important setting to get right is the media or paper type. This choice dictates how much ink the printer puts down and how it expects that ink to behave on the surface. You probably won't find a specific "Transfer Paper" option, so you need to pick the next best thing.
Look for a high-quality photo paper setting. My go-to options are:
- T-Shirt Transfer: If you see this, you're golden. It's the perfect choice.
- Photo Paper Matte: This is my most common workaround. Matte photo paper is made to absorb a lot of ink, which is exactly what we need, making it a great substitute for a dedicated transfer setting.
- Photo Paper Glossy or Premium Photo Paper: These are also solid choices. They signal to the printer that it needs to lay down heavy ink coverage to produce a vibrant image.
Whatever you do, stay away from the "Plain Paper" setting. It will starve your design of ink and leave it looking washed out and sad.
My Pro Tip: Before I print on my final, expensive transfer sheet, I always run a quick nozzle check from the printer's maintenance menu. It’s a simple diagnostic print that shows if any nozzles are clogged (you'll see gaps or lines). Catching and fixing this early saves you from the headache of discovering ugly banding on your finished transfer.
Crank Up the Print Quality
Next up is the print quality itself. You'll usually find this under a 'Quality' or 'Print Quality' setting, though sometimes it’s tucked away in an 'Advanced' tab. You want to slide this all the way up from 'Standard' or 'Normal' to the highest setting available, like 'Best' or 'High'.
This forces the printer to slow its roll, use its tiniest ink droplets, and make multiple passes over the paper. The result is a much sharper, more detailed print with incredibly rich color saturation. Yes, it takes longer to print, but the difference in quality is night and day, especially for artwork with fine lines or smooth gradients.
Ultimately, these two settings—media type and quality—work together to ensure your transfer paper gets fully saturated with ink. This is non-negotiable, as the heat transfer process relies on having enough ink and high heat (often around 400°F) to create a durable bond with the fabric. This balance of quality and affordability is why it's such a popular method. For a deeper dive into market trends, check out these insights on the heat transfer paper and vinyl market.
Bringing Your Design to Life: The Heat Application Process
You've got a perfectly printed design, and now it's time for the magic. This is the moment your digital artwork becomes a real, wearable piece. But getting it right comes down to a careful balance of temperature, pressure, and time.
While you can use a household iron in a pinch, a dedicated heat press is the gold standard. It gives you the consistent, even control that an iron just can't deliver, which is why it's the go-to for anyone serious about making pro-level gear that lasts.
This graphic breaks down the essential settings you'll need for a standard heat press application.
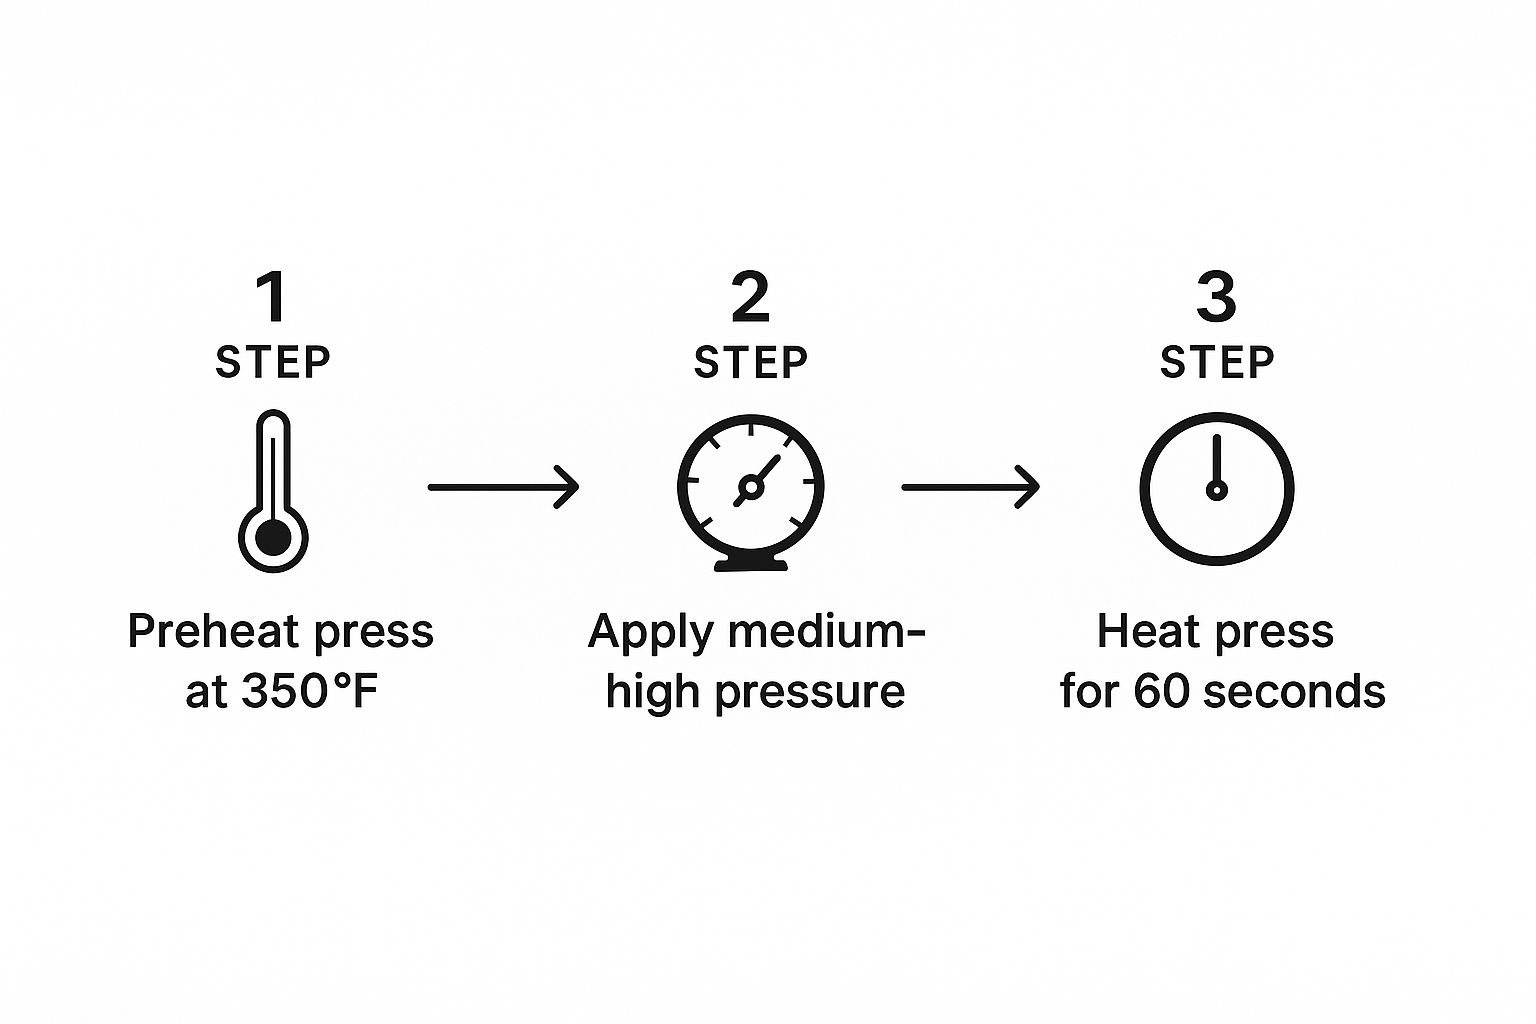
Think of heat, pressure, and time as the three legs of a stool. If one is off, the whole thing wobbles. Get them all right, and the transfer ink will bond beautifully with the fabric fibers for a finish that stands up to wash and wear.
Nailing It with a Heat Press
For results you can count on every single time, a heat press is your best friend. Start by setting your temperature based on the transfer paper's instructions, which is typically somewhere between 350-375°F.
Here’s a pro tip that many people skip: always pre-press your garment for 5-10 seconds. This little step makes a huge difference by zapping any hidden moisture and smoothing out wrinkles, giving you a perfect canvas.
When you lay down your transfer, you're looking for firm, even pressure. If your press has a pressure gauge, aim for a medium to high setting. That consistent pressure is what ensures every last bit of your design sticks, preventing those dreaded peeling corners down the line. If you want to dive deeper, our complete guide to heat transfer shirt printing is packed with more advanced techniques.
Making It Work with a Home Iron
If a home iron is what you've got, don't worry—you can still get a solid result with the right approach. First things first: turn off the steam and crank your iron up to its highest setting, usually labeled "Cotton" or "Linen."
Crucial Tip: Do not use an ironing board. Its soft, padded surface is your enemy here because it absorbs the pressure you need for a good bond. Instead, find a hard, heat-resistant surface like a countertop (protected with a tea towel) or a wooden cutting board.
Press down with your full body weight and keep the iron moving in slow, steady circles for the time specified by the paper’s instructions, usually around 60-90 seconds. Give extra love to the edges and corners of your design, as these are the spots most likely to give you trouble.
Hot Peel vs. Cold Peel: The Final Touch
The last piece of the puzzle is knowing exactly when to peel the backing paper off. This all depends on whether your paper is a "hot peel" or "cold peel" type.
- Hot Peel: Just like it sounds, you peel the backing off immediately after pressing while everything is still piping hot. This tends to leave a softer, more matte finish that feels like it’s part of the fabric.
- Cold Peel: You have to play the waiting game. Let the garment and transfer cool down completely to the touch before you even think about peeling. The result is often a glossier, slightly thicker-feeling design.
Sticking to the correct peel method is non-negotiable if you want a clean, professional-looking transfer. Getting these small details right is what separates hobbyist work from high-quality custom apparel—a market that continues to boom. To give you some perspective, the related dye sublimation paper market is projected to be valued at around USD 830 million by 2025, all driven by the massive demand for personalized products.
Making Your Designs Last: Post-Press Care
You’ve pressed the design, and it looks fantastic. But the job isn't quite done yet. The final piece of the puzzle is knowing how to care for the garment to keep that print looking sharp for the long haul.
The single most important rule? Be patient. You absolutely have to wait at least 24 hours before that first wash. This is non-negotiable. That waiting period gives the ink the time it needs to fully cure and create a solid bond with the fabric. Jumping the gun and washing it too soon is a surefire way to see your hard work start peeling or cracking.
Your Laundry Game Plan
Once you've passed that 24-hour mark, a few simple tweaks to your laundry routine will make all the difference. Think of these as the golden rules for keeping that custom apparel looking like new.
Here’s what to do every single time:
- Turn It Inside Out: This is the easiest thing you can do to protect the print from getting roughed up by other clothes or the inside of your washer.
- Go with Cold Water: Hot water is the enemy of transfer prints. It can soften the adhesive and make your colors look washed out over time. Always stick with a cold, gentle cycle.
- Use a Mild Detergent: Skip the harsh stuff. Aggressive detergents, fabric softeners, and especially bleach will break down the transfer and fade the ink.
Pro Tip: Air-drying is your design's best friend. Throwing your custom shirt in a hot dryer is probably the second-worst thing you can do to it (right after washing it too early). That intense heat can mess with the adhesive, causing it to crack and peel.
If you absolutely have to use a dryer, tumble dry on the lowest possible heat setting or, even better, just run it on a no-heat fluff cycle.
And what about ironing? Never let a hot iron touch the design directly. The best practice is to turn the shirt inside out and iron the back of the design area on a low setting. If you need to iron the front, always cover the print with a sheet of parchment paper first.
Troubleshooting Your Transfer Prints: A Few Common Questions
Even when you follow the steps perfectly, you're bound to run into a few hiccups. It’s all part of the learning curve. Here are some of the most common questions I hear and how to solve them so you can get back to printing.
So, why is your design cracking or peeling after just one wash? This is a classic one, and it almost always comes down to three things: not enough heat, not enough pressure, or washing it too soon. You need to make sure your heat press is at the right temperature for your specific paper. And when you press, really lean into it.
Most importantly, you absolutely must wait at least 24 hours before that first wash. The ink needs that time to fully cure and bond with the fabric fibers. Be patient!
The Right Tools for the Job
A lot of people ask if they can just use their regular old home printer. The answer is... maybe. While most inkjet printers will work, the ones that use pigment-based inks are going to give you a much more durable, professional result. Dye-based inks are more prone to fading and running. Also, double-check that your transfer paper is designed for an inkjet, not a laser printer. Putting the wrong kind in can seriously mess up your machine.
Hot Peel vs. Cold Peel: What's the Difference?
You'll see "hot peel" or "cold peel" in the instructions for your transfer paper, and it’s a critical step to get right. It’s all about when you pull the backing paper off after pressing.
- Hot Peel: Just like it sounds, you peel the backing off immediately, while everything is still piping hot. This usually gives the design a softer, more matte finish that feels like it’s part of the shirt.
- Cold Peel: For this, you have to wait. Let the garment and the transfer cool down completely to room temperature before you even think about touching it. This method often leaves a glossier, slightly heavier feel on the fabric.
Once you start getting consistent, professional-looking results, you might start thinking about selling your creations. That’s a whole new ballgame, and a big part of it is figuring out how to price handmade products so you can turn a profit.
My Biggest Tip: If your transfers are peeling, the number one culprit is almost always not enough pressure. If you're using a home iron, you can't just glide it over the shirt. You need to put it on a hard surface (no ironing boards!) and press down with your full body weight to get close to the pressure a real heat press delivers.
At Cobra DTF, our goal is to give your business the tools it needs to succeed with top-tier, American-made DTF transfers. Get those vibrant, wash-resistant results your customers will love, backed by our same-day shipping guarantee. Check out our products today at https://cobradtf.com.