

V Neck Custom T Shirts: Fit, Fabric and Print Guide
You quote 60 shirts, the customer approves a mockup on a phone screen, and six days later the box lands. The design that looked centred on the flat preview now sits low on the chest, crowding the point of a deep V, and the fix means reprinting a size run at your own cost. Nobody was careless. The mockup was the problem.
A V neck isn't a crew neck with a notch cut out of it. The neckline is a production variable that changes where artwork can start, how much the fabric stretches under a press, and how the print behaves after ten washes. Settle the cut, the blank and the offset on one shirt, and the batch follows. Skip that step and you pay for the error across every size you ordered.
What follows is the sequence I'd use on any custom V neck t shirt job: choose the neckline, match the blank to the decoration, measure the offset from the actual opening rather than a template, then prove the whole thing on a sample before the gang sheet goes out.
V Neck Styles and Print Methods at a Glance
Pick the neckline before you pick the blank. That order decides where the artwork can start, how much chest the design has to work across, and which cuts will take a standard logo without crowding the seam.
A shallow V keeps the opening close to a crew and leaves a stable panel for a chest print, which is why it carries team, staff and promotional orders so well. A deep V is a fashion cut: the wearer expects the longer opening, and the graphic has to be smaller or sit lower to respect it. Fitted and relaxed versions of either move the drop by an inch or more between brands, so confirm shoulder, chest and drop on the supplier spec sheet instead of trusting the words "V neck" on the product page.
The caution is structural. A V exposes more upper chest than a crew and draws a hard boundary, so artwork placed too high overlaps the opening or reads as compressed. That constraint hasn't slowed the underlying product: T-shirts reached an estimated 22 billion units and roughly $85.9 billion in global consumption in 2024, with the same analysis forecasting about 25 billion units and $105.1 billion by 2035, according to IndexBox's T-shirt market overview. The United States was the largest importer that year and China the leading exporter, which is a reminder that your blank comes out of a global supply chain.
| Style | Approximate neckline drop | Best use | Placement note |
|---|---|---|---|
| Shallow V | About 2 to 3 in | Team, staff and everyday merch | Top of design about 2 in below neckline |
| Deep V | About 4 to 6 in | Fashion lines, women's cuts and events | Top of design about 1 to 1.5 in below neckline |
| Fitted or slim V | 3 to 4 in on most slim cuts | Boutique and lifestyle brands | Narrow artwork; measure the actual blank |
| Relaxed or boxy V | 4 to 5 in on most boxy cuts | Streetwear and vintage looks | Larger artwork possible; check collar seam clearance |
Style verdict: if you sell one V neck, sell a shallow one. It fits more body types, takes a standard chest print, and rarely produces the "this looks wrong" email that a deep V generates when a crew-neck layout is reused unchanged.
Then match the method to the job. DTF transfers handle full-colour art on cotton and cotton blends and make short runs viable, since there's no screen setup to amortise. Screen printing wins on large runs of one or two colours, where the per-shirt cost drops and the ink sits thin. Embroidery suits a small left-chest mark on a structured blank that will survive industrial washing. Write down style, quantity and design size before you touch fabric, because those three numbers decide which method is even available to you.
Fabric Weights and How They Change Your Print
Fabric is the first decision after style, because it controls three things at once: how the shirt drapes, how the print feels against the body, and how reliably a transfer bonds. Weight sets the baseline. A 5 oz and up cotton holds its shape and absorbs the stretch at a V neck, while a 4 oz blend feels airy and, on a deep V, shows every ripple at the apex. If a customer wants premium drape at a promotional price, expect to trade one for the other.
Heavier knits also hide the small stuff. A 5.5 oz ring-spun cotton forgives a slightly uneven press line, while a light 3.8 oz tri-blend telegraphs every variation in pressure. On a V neck, that difference shows up first at the point, where the fabric has the least support behind it.
| Fabric | Typical weight | Feel and drape | DTF print behaviour |
|---|---|---|---|
| 100% ring-spun cotton | 4.3 to 5.5 oz | Soft with slight texture | Excellent adhesion; bright colours on light and dark shirts |
| 100% combed cotton | 4.5 to 6 oz | Smooth and premium | Excellent adhesion with minimal fuzz under the print |
| Tri-blend | 3.8 to 4.5 oz | Very soft and heathered | Good on light colours; test tone-on-tone designs first |
| Polyester performance | 3.5 to 4.5 oz | Slick and wicks sweat | Test adhesion and heat sensitivity before a batch |
Where the prints actually differ
Ring-spun and combed cotton behave predictably because the fibre surface is uniform, so a transfer bonds evenly and the colour reads true. Tri-blends are the trap on a light colour: the heathered surface shows through a thin ink layer, and a tone-on-tone design that looked solid on screen can read as muddy on the shirt. Polyester performance knits need a test piece, because synthetic surfaces and their dyes react differently to heat than cotton does, and a setting that worked on a cotton tee can scorch or bond poorly here.
Fabric construction matters as much as weight, and our guide to T-shirt fabric and print behaviour walks through how each knit takes ink.
First order rule: choose a 100% cotton or 50/50 blend in a colour the customer already sells, and request a swatch of that exact blank before committing to a run.
Sizing and Fit for Custom V Neck Shirts
Sizing is where V neck orders fall apart. A customer orders 40 shirts in what they believe is a medium, half the staff can't wear them, and the reorder becomes a negotiation. Confusing size information is a leading cause of that outcome: in a UiTM study of 34 women on sizing and fit, more than 30% of respondents had abandoned online purchases because the size information confused them, and inconsistent sizing ranked among the leading market problems.
The fix starts with a distinction most charts blur. Body measurements are the wearer's chest, shoulder and torso length. Garment measurements are what you compare against: pit to pit across the chest, and body length from the high point of the shoulder to the hem. Only the second set tells you whether a shirt will fit someone who wears a medium elsewhere.
- Take a shirt the customer already wears and likes, lay it flat, and button or smooth it so it sits square.
- Measure pit to pit, straight across, and write the number down.
- Measure body length from the high point of the shoulder to the hem.
- Compare both numbers against the supplier's garment chart, not against the size letter, and allow for brand-to-brand drift of an inch or more.
Why the V apex decides the fit
A V neck concentrates stretch and seam stress at the apex, where two slanted edges meet instead of distributing it around a continuous curve. That's why construction guidance recommends marking the apex, attaching the neckband with a stretch stitch, and sewing to the point with the needle down to prevent puckering. For a buyer, the check is simple: fold the sample along the centre front and compare both slopes, then wash it once. A rippled edge or a V that widens after wear means poor recovery or weak sewing control, and a distorted neckline shifts the perceived vertical position of your artwork.
Fit also runs on body shape, not chest measurement alone. A deep V on a shorter torso can land the point at the bust, making a centred graphic read low. A shallow V on broad shoulders needs to sit on the shoulder edge rather than slide back. Check torso length against the hem the customer prefers, and stretch the neck gently to see whether it springs back. Our notes on how a T-shirt should fit cover the measurement set worth publishing on a product page, because buyers who can't find pit to pit and body length guess, then return.
Publish pit to pit, body length and a plain sentence on who the cut suits. That single paragraph prevents more returns than any size-finder widget, and a generic recommendation can create false confidence when the garment measurements underneath are thin.
Placing Artwork on Shallow and Deep V Necks
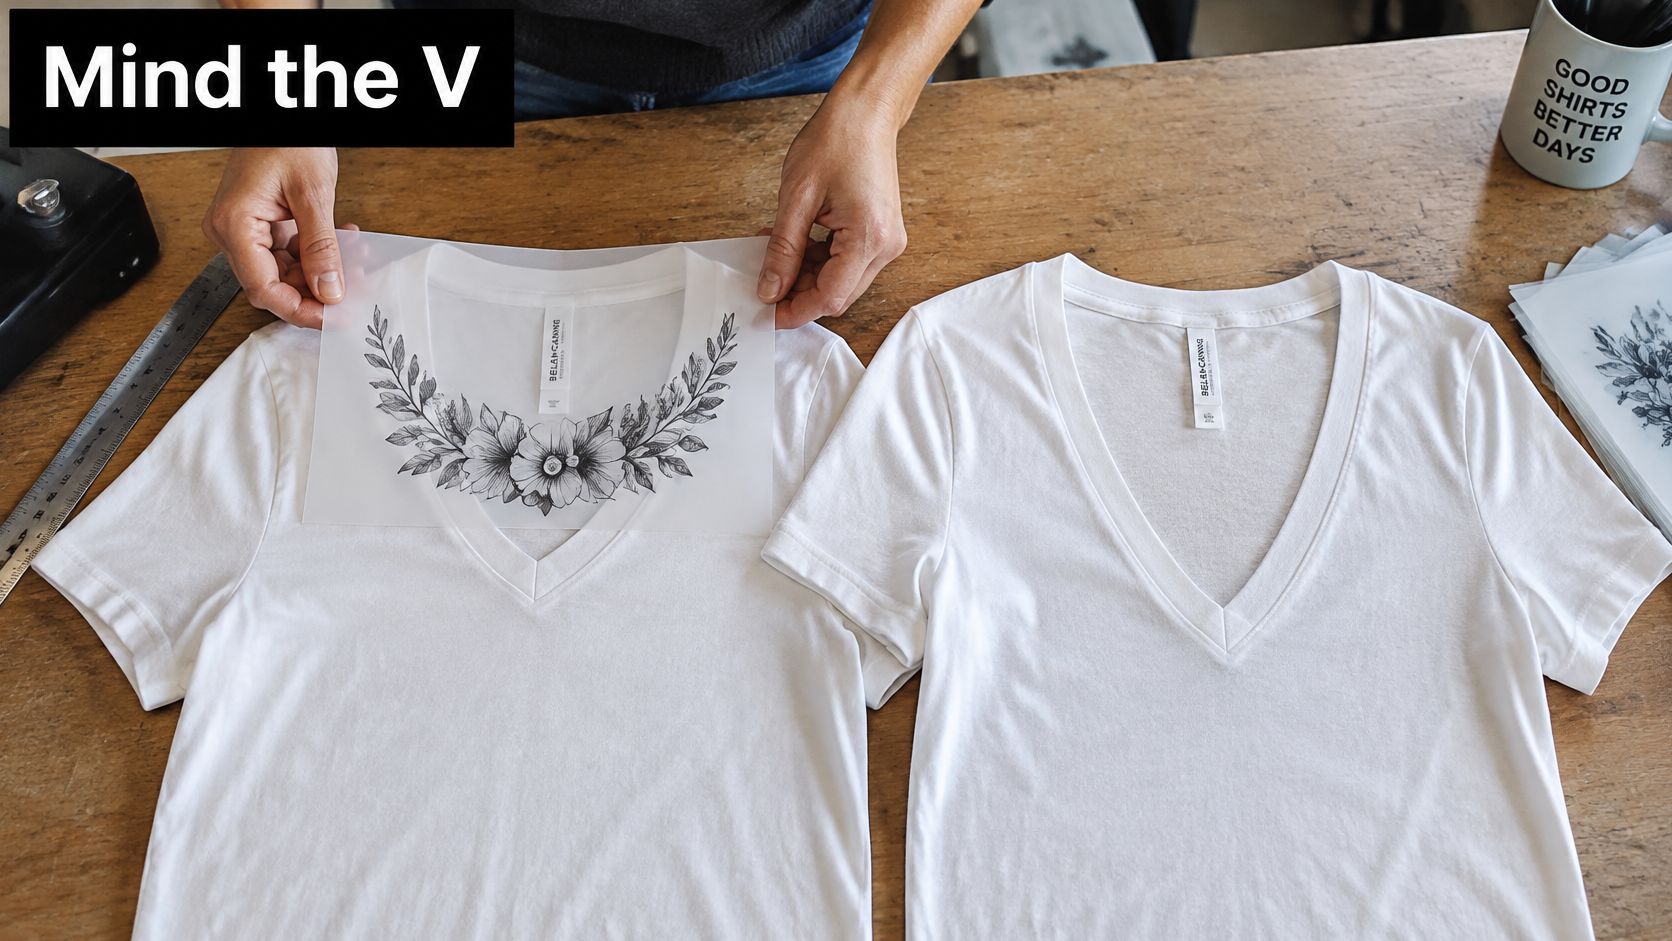
Copy a crew-neck placement onto a V neck and the design lands low, because the opening has already moved the visual anchor down the chest. Measure from the neckline geometry instead. Neutral placement guidance puts the top of a standard V-neck design about 2 inches (5 cm) below the neckline, and a deep V closer, at roughly 1 to 1.5 inches (2.5 to 3.8 cm), since the opening already extends farther down the chest, per Turn Ninety's placement and colour guide.
Here's the alignment step done on a live blank rather than a screen.
| Neckline type | Top of design below neckline | Placement risk |
|---|---|---|
| Standard V | About 2 in (5 cm) | Design can sit too close to the apex if the offset is skipped |
| Deep V | About 1 to 1.5 in (2.5 to 3.8 cm) | Design can look low if a standard offset is used |
| Oversized artwork on any V | Move the design lower and test on the blank | Can cross the collar seam or distort near the point |
The offset isn't a universal number either. Artwork width, shirt size and V depth all pull on it, so build a placement template per size rather than one master guide. Lay the blank flat, mark the apex and the centre line with a water-soluble marker, position a paper template, then look at it on a form or a body. A design that reads centred on a rectangle often reads tilted once a chest fills the shirt.
Print location changes the rule again. Centre-chest art uses the 2 inch or 1 to 1.5 inch offset. A small left-chest logo sits beside the V, clear of the sloping seam, and stays modest in width so it doesn't crowd the point. A back print can run larger because the neckline doesn't constrain it, but it still needs a size-specific template. One listed unisex V neck allows a front print area up to 320 by 400 mm, and other blanks differ in cut and construction, so measure the live panel on the shirt you'll press.
Keep the artwork clear of the V seam and the apex. Support is uneven near the point, so pressing there produces inconsistent adhesion and a graphic that looks visually tilted even when the file is square. Prove the placement on the actual blank before you run a gang sheet, and wash one pressed sample to confirm the print edge stays clear of the seam.
How DTF Printing Works on a V Neck Shirt
The practical advantage of DTF on a V neck is that the design prints onto film first, so the shirt never goes through a direct printer. That makes short runs on mixed blanks viable, and it means the same workflow handles a cotton staff shirt and a blended fashion cut without a setup change.
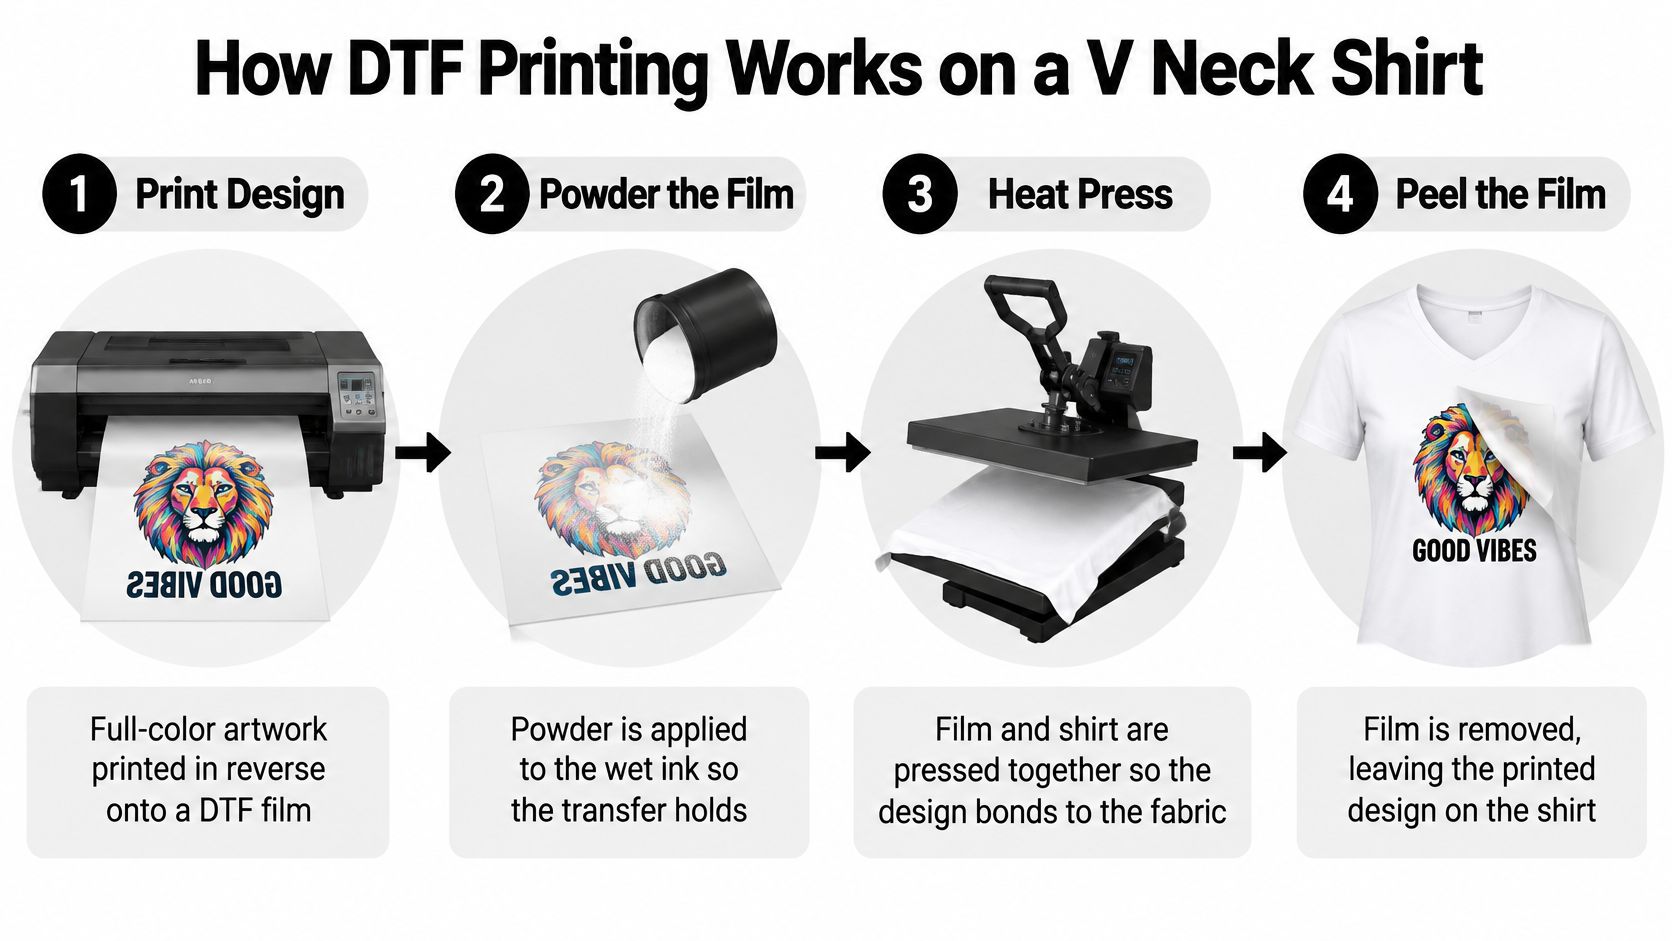
- Prepare and size the file. Set the artwork against the placement template for that neckline, at final print dimensions, so what you see on film is what lands on the shirt. The common slip is sizing to a screen preview and discovering the transfer is 15 mm out.
- Print in reverse with colour and white ink. The white layer is what makes a design read on a dark garment. Skipping or thinning it produces dull colour that looks nothing like the proof.
- Powder the wet ink and cure it. Hot-melt adhesive powder gives the transfer something to grip. Uneven powder is the usual cause of a patchy bond at the edges.
- Position on the garment using the neckline measurement. A V neck punishes haste, because there's no collar curve to eyeball against. Measure down from the point.
- Press at the temperature and time the film supplier specifies. Fabric weight and blend change the setting, so treat any number as a starting point rather than a law.
- Peel as the instructions state, hot or cold. Peel direction matters on fine detail and small text, and rushing it lifts edges that would otherwise have held.
Run one piece before the run. Our guidance is to test settings on a single garment first to find the right temperature and pressure for that specific shirt, because a 4 oz tri-blend and a 5.5 oz cotton don't want the same press. Keep the two product lines straight as well: DTF transfers are pressed onto fabrics, while UV DTF stickers go onto hard surfaces like tumblers and signage, so a V neck job is always the transfer, never the sticker.
A good result has three markers. The colours match the proof, the edge is sealed with no lifting at the corners, and the print still flexes once it has cooled rather than sitting like a plate on the chest.
Pricing Factors and Planning Your First Batch
Price per shirt is set by four or five variables, and the V neck isn't one of them. The neckline changes placement and risk, not cost. What moves the number is the blank you choose, the ink area you cover, the quantity per design and whether you paid for a test piece.
The market you're selling into is large and, more usefully, recurring. Forecasts put worldwide T-shirt revenue at $46.99 billion in 2025 and $52.8 billion by 2029, with U.S. revenue at $5.53 billion in 2025 growing 3.19% annually through 2029 and American buyers averaging 2.8 T-shirts each in 2025, according to Printful's T-shirt industry statistics release. The custom segment sits inside that: the U.S. custom T-shirt market was valued at USD 1.85 billion in 2025, per Ken Research's custom T-shirt market report, and the global custom market at USD 6.18 billion in 2025, per Growth Market Reports. Repeat buying is the norm, which is what makes a tested V neck worth the setup.
| Cost driver | How it changes cost | What to check before ordering |
|---|---|---|
| Blank fabric and weight | Heavier cotton costs more per shirt | Compare weight and blend against the target customer |
| Print size and colour count | Larger film area and more ink layers raise cost | Confirm the design fits the placement template |
| Quantity per design | Small runs carry higher cost per shirt | Decide whether a gang sheet or single run fits the order |
| Sample and test runs | Adds upfront cost | Weigh one test piece against a failed batch |
| Size mix | Uneven sizes leave stock unsold | Match the size run to the expected customer mix |
Build the size run from the customer list, not from an even spread. A 40-shirt hospitality order rarely wants ten smalls, and a school leavers' order skews the other way. Keep a short reorder plan for the two sizes that sell out first, because a V neck that works becomes a repeat order for seasonal designs and new staff.
Then run the arithmetic plainly. Take the blank cost, add the print cost for that design size, add a share of the sample cost across the batch, and compare the total with what the customer will pay. If the margin only works at 200 units and the order is 40, the design or the blank has to change. For help setting the sell price rather than the cost, this pricing advice for early-stage brands from Chicago Brandstarters is a sensible check on margin before you quote.
Caring for Printed V Neck Shirts So They Last
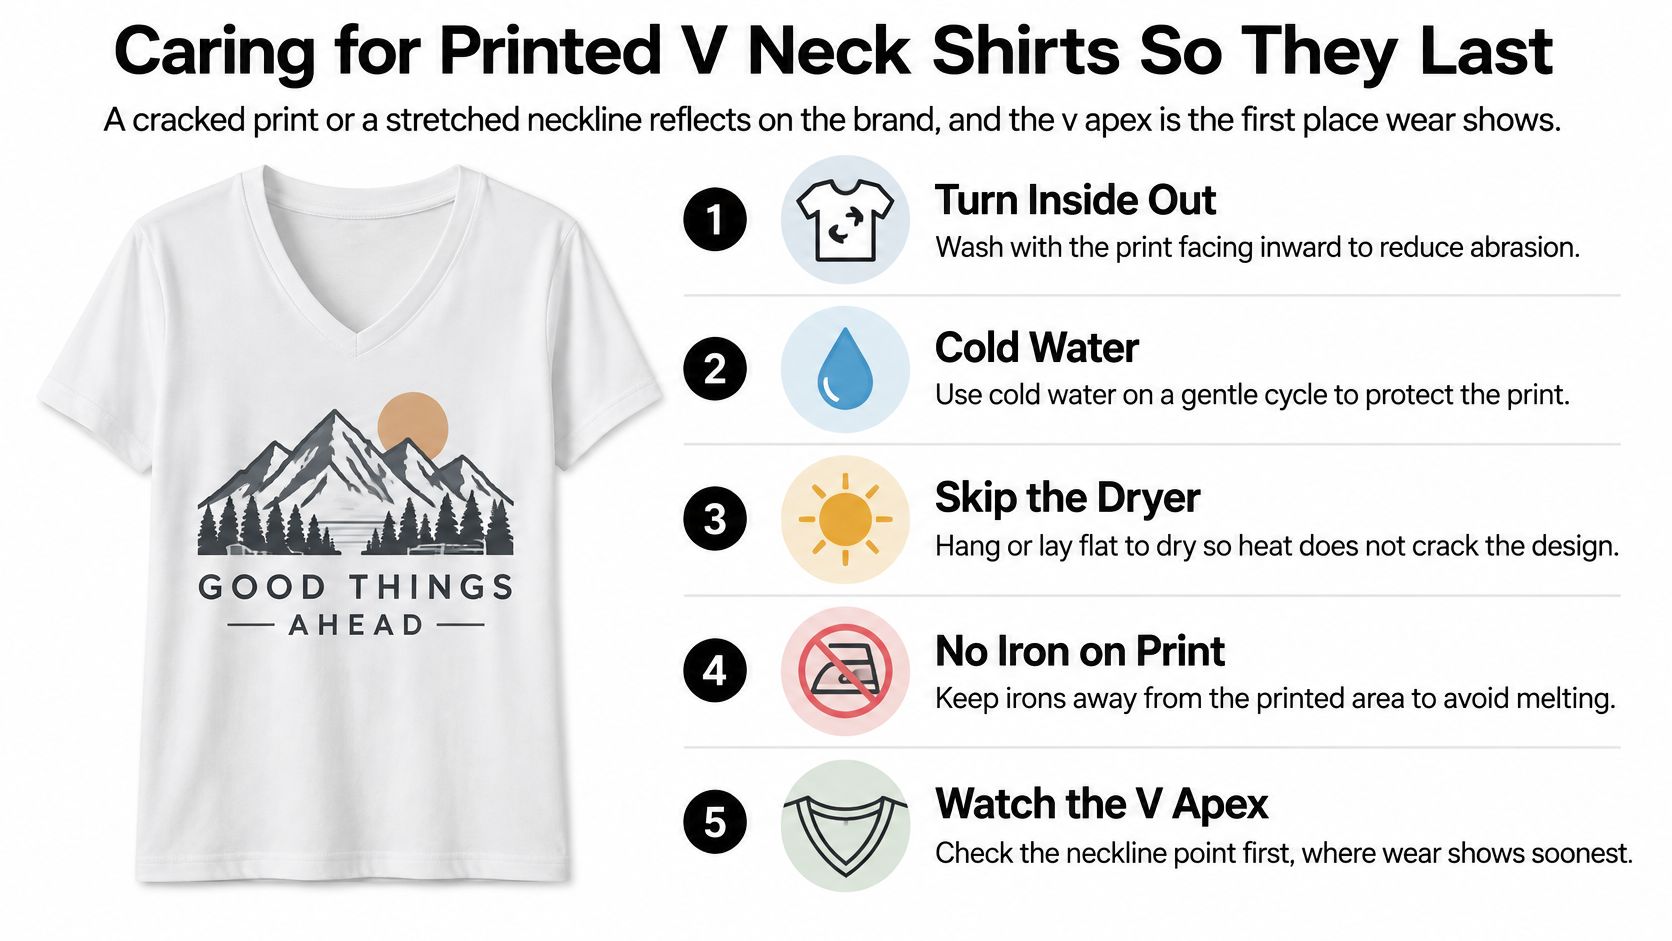
A cracked print or a stretched neckline reflects on the brand that sold the shirt, and the V apex is the first place wear shows. Care guidance is cheap to publish and prevents the support email that costs you a reprint.
Care checklist to print on the packing slip: wash inside out, cold water, gentle cycle, no bleach, low tumble or hang dry, and never iron directly on the print.
Each item earns its place. Turning the shirt inside out reduces the abrasion that dulls a print edge against other garments in the drum. Cold water limits shrinkage, which matters more on a V neck than a crew because uneven shrink pulls the two slopes out of symmetry. Heat is the enemy: high dryer settings weaken the bond between ink and fabric, and they crack the print along the edge where the transfer stops.
Machine washing inside out in cold water and tumble drying low, or hanging to dry, keeps both the print and the neckline intact. If a shirt needs pressing, iron it inside out or through a protective sheet, and keep the iron off the printed area entirely.
Before you ship a batch, wash one sample, dry it the way your customer will, and inspect two things: the print edge for lifting or crazing, and the V for symmetry. Our guide to washing graphic tees sets out the routine in customer-friendly language you can adapt for a product page.
Order a Sample Before Your First Batch
Order one finished sample in the sizes you plan to sell before you buy the batch. No flat mockup shows how neckline depth, fabric stretch and press settings interact, and the cost of one shirt is trivial next to a size run nobody wants.
The sample has to pass three checks.
- Neckline integrity. Fold it along the centre front and confirm both V slopes match. Wash and dry it once, then check that the apex hasn't rippled or widened.
- Placement accuracy. Confirm the top of the art sits at the offset you set for that neckline, clear of the seam, and still reads centred when the shirt is on a body or a form.
- Print quality on the fabric. Compare colour and edge seal against the proof, including a light heather or a dark cotton if that's what you plan to sell.
Press the same blank weight you intend to reorder, not a substitute from the shelf. Cobra DTF supplies the transfers for that test, so the film, the adhesive and the peel match what the production run will use, and free transfer samples let you check the bond before you commit to a stack of gang sheets.
If a check fails, change the offset, the fabric or the press before the error is copied across every size. When the sample passes, lock the placement template, the size mix and the reorder quantities from that one shirt, and treat it as the reference for every later batch.
When you're ready to test a V neck instead of guessing at it, Cobra DTF supplies USA-made DTF transfers for exactly this kind of job, with free transfer samples so you can check adhesion and placement on the blank you plan to sell before you buy a run. Our gang sheet builder handles mixed designs across a size run, orders over $59 ship free, and every order carries a satisfaction guarantee with a reprint if something isn't right. Visit Cobra DTF to order a sample and put one shirt through the three checks before your first batch.