

Mastering Transfer Designs for Shirts A DTF Printing Guide
When it comes to creating transfer designs for shirts, Direct-to-Film (DTF) technology has completely changed the game. It lets you produce vibrant, full-color custom apparel that's not only incredibly durable but also has a soft, premium feel. This process completely sidesteps the painstaking weeding of vinyl and the messy, complicated setup of screen printing, making it a perfect fit for everything from one-of-a-kind designs to large production runs.
Why DTF Is a Game Changer for Custom Shirt Designs
If you've ever felt boxed in by traditional ways of decorating apparel, you're in good company. For years, the custom shirt world has been dominated by methods that force you to make compromises. Screen printing is a workhorse for huge orders, but it’s just not practical or cost-effective for small batches or multi-color designs. On the flip side, Heat Transfer Vinyl (HTV) is solid for simple text and shapes but involves tedious weeding and can leave a thick, plastic-like feel on the shirt.
This is exactly where Direct-to-Film (DTF) comes in and rewrites the rules. It bridges the gap perfectly, giving you the best of both worlds. You get the stunning, photorealistic detail you’d expect from high-end printing, but with the simple, straightforward application of a heat press. Suddenly, creating complex, eye-popping transfer designs for shirts isn't just a possibility—it's easy and profitable.
Unlocking Your Creative and Business Potential
Think about an Etsy shop owner whose business was built on simple, single-color text shirts made with vinyl. Expanding into intricate floral patterns or printing customer photos was out of the question because of the sheer labor involved. By making the switch to DTF, they can now offer unlimited colors and incredibly detailed graphics without adding hours of weeding to their day.
This simple change opens up entirely new markets and can seriously boost profit margins. The demand for personalized gear is exploding, and DTF is the most efficient way to meet it. Its versatility is its superpower.
- Fabric Freedom: You can press incredible designs onto 100% cotton, polyester, 50/50 blends, and even tougher materials like canvas or denim without having to change your entire process.
- No Color Limits: Go wild. Print smooth gradients, photorealistic images, and complex logos with millions of colors all in one go.
- Built to Last: When applied right, DTF transfers stretch with the fabric and can handle dozens of washes without cracking, peeling, or fading.
- Absolutely Zero Weeding: This is the biggest time-saver, period. The design is printed right onto a film, and only the ink itself transfers to the garment.
For a deeper look at the nuts and bolts, check out our complete guide: https://cobradtf.com/blogs/guides/what-is-direct-to-film-printing. It breaks down the entire process from A to Z.
DTF vs Traditional Shirt Printing Methods
To really see where DTF shines, it helps to put it side-by-side with the old-school methods. This quick comparison shows why so many shops are making the switch.
| Feature | DTF Transfers | Screen Printing | Heat Transfer Vinyl (HTV) |
|---|---|---|---|
| Color Capability | Unlimited colors, gradients, and photos in one pass. | Limited colors, one screen per color. Complex setup. | Limited to single-color layers. Multi-color is difficult. |
| Best For | Small to large runs, complex and full-color designs. | Very large runs (100+) of simple, limited-color designs. | One-offs and simple text/shapes. Personalization. |
| Fabric Versatility | Excellent. Works on cotton, poly, blends, and more. | Best on cotton. Special inks needed for other fabrics. | Good. Works on cotton and poly, but can be tricky. |
| Feel on Shirt | Very soft, lightweight, and flexible. | Can be heavy, especially with many color layers. | Can feel thick and stiff, like a plastic patch. |
| Durability | Excellent. Stretches with fabric, resists cracking. | Very durable, but can crack over time. | Good, but can peel or crack if not applied perfectly. |
| Setup & Labor | Minimal setup. No weeding. Just print and press. | High setup cost and time. Screen prep is labor-intensive. | Very labor-intensive. Involves cutting and weeding. |
As you can see, DTF combines the quality and durability of screen printing with a process that's even easier than HTV for complex art, giving you a serious competitive edge.
A Market on the Rise
The industry's shift to DTF isn't just hype; the numbers back it up. The global DTF printing market was valued at USD 2.72 billion in 2024 and is expected to rocket past USD 4.5 billion by 2033. That growth, fueled by a compound annual growth rate of over 6%, shows a massive change in how businesses are thinking about apparel customization.
While DTF is an incredible tool, getting familiar with all the different types of t-shirt printing helps you truly appreciate its advantages. For any business looking to grow, DTF offers a clear path forward by blending top-tier quality, speed, and unmatched versatility into one powerful package.
Preparing Your Artwork for Flawless DTF Transfers
Great shirts start with great artwork. It’s that simple. Before you even think about hitting 'print', how you prep your digital file is the single most important factor in creating professional-grade transfer designs for shirts. Get this part right, and you're set up for crisp, vibrant results. Get it wrong, and you're looking at a blurry, pixelated mess.
Think of your digital file as the foundation. A shaky foundation means a flawed final product—the same rule applies here. You don't need to be a graphic design guru to get this right, though. Just follow a few key principles, and you'll nail it every time.
The Non-Negotiable Rules of File Prep
First things first: resolution. Your design file has to be 300 DPI (Dots Per Inch) at the exact size you plan to print it. This is the gold standard for high-quality printing, period. If you try to use a low-res file, like a 72 DPI image pulled from a website, it’s going to look jagged and pixelated on the shirt.
Next up is the background. This one trips up a lot of people. For DTF printing, your artwork absolutely must have a transparent background. If your file has a white background, the printer will print a solid white box around your design. It's a common and costly mistake, but thankfully, an easy one to avoid. You only want the design itself to print, nothing else.
Finally, let's talk file format. The only format you should be using is PNG. This is the universal standard for DTF because it supports high resolution and, crucially, it preserves transparency. A JPEG file, on the other hand, can't handle transparency and will automatically flatten your design onto a white background, which will ruin the transfer.
Getting Your Colors and Details Just Right
Color can feel tricky, but it doesn't have to be. Your computer monitor displays color in an RGB (Red, Green, Blue) profile, but printers operate in CMYK (Cyan, Magenta, Yellow, Black). While designing in CMYK is a good habit for print work, the reality is that modern DTF software is incredibly good at converting RGB files with high accuracy. The key is just to be aware of your design software’s color settings.
The tiny details in your artwork matter, too. I've seen plenty of designs fail because of lines that were just too thin or dots that were too small.
- Minimum Line Thickness: As a rule of thumb, make sure your lines are at least 2-3 pixels thick. Anything thinner than that won't grab enough of the adhesive powder, meaning it will likely wash away or just won't transfer properly.
- Soft Edges: If you're going for a design that seems to blend right into the fabric, try using a soft, feathered edge (sometimes called anti-aliasing). This creates a much more premium look compared to a hard, chunky outline and helps the design feel like part of the shirt.
Pro Tip: Before you finalize anything, zoom in and view your artwork at its actual print size on your screen. This gives you a real sense of how large or small certain elements will be. For a deep dive into choosing the right dimensions, check out our complete guide on https://cobradtf.com/blogs/guides/dtf-transfer-sizes.
Streamlining Your Design Creation
Coming up with fresh, unique artwork is a constant challenge for any shirt business. If you're looking to generate new ideas quickly, an AI T-Shirt Design Generator can be a game-changer for creating custom artwork. These tools can really speed up the creative process, letting you test out concepts without spending hours on them.
At the end of the day, spending a few extra minutes getting your artwork ready will save you from wasting film, powder, and time. By making sure your file is 300 DPI, has a transparent background, is saved as a PNG, and has properly-sized details, you're setting yourself up for a perfect DTF transfer that will impress your customers every single time.
The Art of the Heat Press: Applying Your DTF Designs
This is the moment of truth. All your design work and printing prep comes down to this single step: the heat press. This is where your printed film transforms into a professional, wearable piece of art. Getting this right is what separates an amateur print from a durable, retail-quality garment.
It all boils down to a simple but crucial formula: the perfect balance of temperature, time, and pressure. Nailing these three variables ensures your DTF transfer bonds permanently into the fabric fibers, rather than just sitting on top. Get it wrong, and you’ll face peeling corners, a stiff and plastic-like feel, or worse, a scorched shirt.
The Essential Heat Press Workflow
A little prep work here goes a long way in preventing headaches later. Before you even think about placing your transfer, always pre-press your garment for 5-7 seconds. This quick hit of heat zaps any hidden moisture and smooths out wrinkles, giving you a perfectly flat, dry canvas to work with. Moisture is the enemy of a good bond; it can create steam pockets during the press and stop the adhesive from doing its job.
Once the shirt is prepped, carefully lay your DTF transfer down. Take your time here. Measure to make sure it's centered and straight. This is your last chance to get the placement perfect, so don't rush it.
Pro Tip: I never press without a Teflon sheet or a piece of parchment paper over the transfer. This simple sheet acts as a protective barrier, preventing any ink from migrating to your heat platen and shielding delicate fabrics from getting scorched by direct heat.
Understanding Hot Peel vs. Cold Peel
After that first press, you have to remove the clear film carrier. This is where you need to know if you're working with a hot peel or a cold peel transfer—your supplier will specify this. The distinction is critical, and trying to use the wrong method will ruin the design.
- Hot Peel: Just like it sounds, you peel the film away almost immediately after the press opens, while everything is still hot. This is a huge time-saver in a busy shop.
- Cold Peel: You have to wait. The transfer must cool down to room temperature before you can peel the film. If you get impatient and peel it warm, you’ll likely pull the design right off with it. Cold peels often leave a slightly more matte finish, which many people prefer.
No matter which type you have, the technique is the same: peel the film back in a smooth, low, and continuous motion. Don't just rip it off like a band-aid. A gentle, rolling peel encourages the design to release cleanly.
Once the film is off, you’re not quite done. The final touch is a second press for 5-10 seconds with your protective sheet back on top. This finishing press is non-negotiable—it locks the design in for good, dramatically improves wash durability, and gives the print that soft-hand feel by pushing the ink deeper into the fabric.
This quick infographic shows the simple but vital artwork prep steps that get you to this stage.
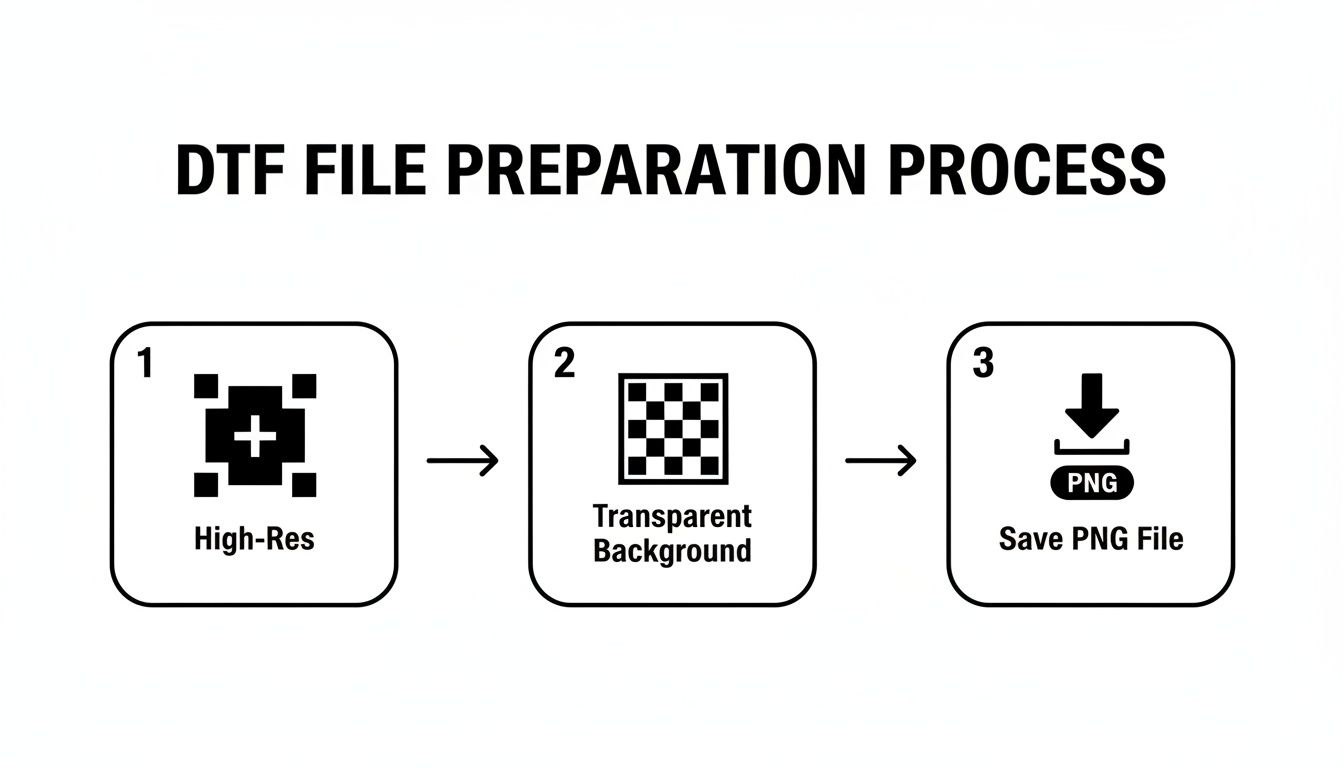
Following these three file prep rules ensures your design is technically perfect for a flawless press every time.
Dialing in Settings for Different Fabrics
You can't use a one-size-fits-all approach to heat pressing. Different fabrics react to heat in completely different ways. Pressing polyester with the same settings you use for cotton is a recipe for a melted, shiny disaster. Synthetics are sensitive and scorch easily, while a rugged fabric like cotton needs that higher heat to properly cure the adhesive.
For a deep dive, check out our complete guide to DTF transfer heat press settings, but the table below is a fantastic quick-reference guide to get you started.
Recommended Heat Press Settings by Fabric Type
This table provides a solid starting point for the most common materials you'll be working with. Think of these as your baseline settings before you fine-tune for your specific machine.
| Fabric Type | Temperature (°F/°C) | Press Time (Seconds) | Pressure Level | Peel Type |
|---|---|---|---|---|
| 100% Cotton | 300-325°F / 149-163°C | 10-15 | Medium-Firm | Hot or Cold |
| 50/50 Blends | 280-300°F / 138-149°C | 10-12 | Medium | Hot or Cold |
| 100% Polyester | 260-275°F / 127-135°C | 8-10 | Medium | Hot or Cold |
| Tri-Blends | 260-275°F / 127-135°C | 8-10 | Light-Medium | Hot or Cold |
Remember, every heat press is a little different and can have hot or cold spots. It's always a smart move to do a quick test press on a scrap piece of fabric or in an inconspicuous area. And don't forget that pressure is just as important as heat—uneven pressure is the #1 cause of peeling edges after a few washes. By mastering these variables, you'll ensure every shirt you create is professional, durable, and feels fantastic.
Post-Press Care for Long Lasting Designs
Getting a perfect press is a great feeling, but the job isn't done when the heat press timer goes off. What you do in the minutes after pressing is just as critical for creating transfer designs for shirts that last. These final quality checks and the care instructions you pass on to your customers are what separate a homemade-looking print from durable, retail-quality apparel.
This is your last chance to spot any issues before a shirt goes out the door. It's also where you give your clients the knowledge they need to keep their new favorite shirt looking sharp. If you skip this part, a flawless design can quickly become a peeling, cracked mess after a couple of washes.
Immediate Quality Control Checks
Before you even think about folding that shirt, give it a once-over right off the press. A quick but thorough inspection can save you the headache of a customer complaint later on.
First, use your sense of touch. Run your hand across the design. You're looking for a smooth feel that seems bonded with the fabric, not like a thick plastic sticker sitting on top of it. If it feels unusually stiff or slick, your heat or pressure might have been too high.
Now, give the edges a closer look.
- Check the Edges: Gently tug the fabric around the transfer. The design's edges should be locked down tight, with absolutely no sign of lifting.
- Inspect Fine Details: Get in close and check out any tiny text or thin lines. These are often the first places an issue will show up, so make sure they've transferred completely.
- Look for Consistency: The finish should be uniform across the entire design. Any random glossy or dull spots could be a red flag for uneven pressure on your heat press.
These simple visual and tactile checks are your best defense against common application mistakes. It's far better to catch a slightly lifted corner now than to hear about it in a bad review.
The Science of Proper Wash Care
The long-term durability of a DTF transfer really comes down to how it’s treated in the laundry. Plain and simple, high heat is the enemy. Your heat press used a specific temperature to cure the ink and activate the adhesive; a hot washer or dryer can start to undo that process.
A standard dryer cycle can get hot enough to reactivate the transfer's adhesive. When that happens, the design becomes vulnerable to cracking, peeling, or even getting a weird, sticky texture. This is exactly why educating your customers is non-negotiable for their long-term satisfaction.
Providing clear, simple washing instructions is a small touch that adds huge professional value. Tuck a small printed card into each order, or add a sticker to the poly mailer. You're not just helping the customer—you're protecting your brand's reputation for quality.
Your Essential Care Instructions Checklist
These are the non-negotiable rules for making any DTF-printed garment last. I always find it helps to briefly explain the "why" behind each rule so customers take them seriously.
-
Turn the Garment Inside Out: This is the most important one. It puts a layer of fabric between the print and the rest of the laundry, protecting it from abrasion against other clothes, zippers, and buttons.
-
Wash with Cold Water: Always, always recommend a cold cycle. Hot water is a no-go. It can soften the adhesive and cause the ink to fade. Cold water is gentle on the transfer and the shirt itself.
-
Use a Mild Detergent: Harsh chemicals, bleach, and even some fabric softeners can break down the ink and adhesive over time. A basic, mild detergent is all you need.
-
Tumble Dry on Low or Hang Dry: This one is critical. The absolute best method is to hang the shirt to air dry. If your customer insists on using a dryer, it must be on the lowest heat setting. High heat is the fastest way to destroy a beautiful print.
-
Do Not Iron Directly on the Design: It might seem obvious, but you'd be surprised. If someone needs to iron the shirt, they must turn it inside out and use a low heat setting, completely avoiding the design area.
By running these final checks and arming your customers with the right info, you ensure every shirt you send out is a testament to your quality. These are the finishing touches that build trust and bring people back for more.
Dealing With Common DTF Transfer Problems
Even when you've got your process down to a science, things can still go sideways. There's nothing more frustrating than being in the middle of a big run and having your transfer designs for shirts suddenly start failing. But don't panic. The vast majority of DTF issues are surprisingly simple to fix once you know what to look for.
Instead of just tossing that messed-up shirt in the scrap pile, learning how to diagnose the problem is a skill that saves you money and makes your final product better. Nearly every issue you'll run into comes down to one of three things: temperature, time, or pressure. Let's walk through the most common headaches and how to get back on track.
"Why Isn't My Design Sticking to the Shirt?"
This is the big one. You peel back the film, and the design lifts right off with it, or maybe just a few stubborn parts are left behind. It’s easy to think the transfer is bad, but this is almost always a simple application error.
The number one cause? Not enough pressure, or pressure that's uneven. If your heat press isn't clamped down firmly, the adhesive just can't get a good grip on the fabric fibers. You should really have to put some muscle into closing it.
Another sneaky culprit is an inaccurate temperature. Your heat press might read 300°F, but if there's a cold spot on the platen, that part of the transfer is only getting 260°F. A cheap laser temperature gun is a fantastic tool for checking your platen for consistency. And don't forget the basics: always pre-press your shirt to get rid of any moisture that could kill the bond.
Solving Dull or Faded Colors
You spent forever getting the colors perfect in your design software, only for the finished shirt to look washed out and lifeless. This can be an issue with your art file or your press settings. First thing's first: pop open your artwork and confirm it's a high-resolution file, ideally 300 DPI. A low-res image will never give you a vibrant print.
If your file looks good, turn your attention to the heat press. Too much heat or pressing for too long can literally cook the inks, stripping them of their vibrancy. This happens a lot with polyester garments, which are extra sensitive to high heat. Try backing the temperature down by 10-15 degrees or shaving a few seconds off the press time.
The Transfer Feels Stiff and Plasticky
A great DTF transfer should feel soft, flexible, and like it's part of the fabric. If your design feels like a thick, rigid sheet of plastic, you've almost certainly over-pressed it. It’s a textbook case of too much heat combined with too much pressure.
When you over-press, the ink and adhesive get mashed so deep into the garment's weave that they form a dense, uncomfortable layer. Pull back on both your temperature and pressure settings. You're just trying to melt the adhesive enough to create a bond, not turn it into a liquid. A lighter touch often gives you that much softer, more professional-feeling result.
My Two Cents: Think of heat, time, and pressure as a balancing act. Nudging one of them just a little bit can solve a whole host of problems. Before you start a big job, always press a test on a scrap piece of the same fabric to dial in your settings.
"Why Are the Edges Peeling After I Wash It?"
When a design looks flawless right off the press but starts to peel after the first wash, you've got a weak bond. This is almost always caused by not enough—or uneven—pressure. The middle of your design might have been perfectly pressed, but the edges didn't get that same firm clamping force.
This is where the quality of your heat press really comes into play. Cheaper presses are notorious for having inconsistent heat and pressure, creating weak spots around the edges. Before you press, scan the platen for any obstructions like collars, thick seams, or zippers that would prevent it from closing flat. A heat press pillow can be a lifesaver here, helping to even out the pressure over those tricky spots.
Mastering these troubleshooting skills is valuable no matter where you are. As DTF grows, these same principles apply globally. In fact, Europe has become the leading market for DTF, holding a massive 36% market share in 2024. At the same time, the Americas, and the U.S. in particular, remain a huge hub for adoption as shops here take advantage of regional manufacturing to get materials faster. You can dig deeper into these global DTF printing trends to see just how quickly the industry is moving.
Answering Your Top Questions About DTF Shirt Transfers
Jumping into DTF printing always sparks a few questions. Whether you've been in the apparel game for years or you're just firing up your first heat press, getting the right answers is key. We've heard them all, so let's walk through the most common ones to get you creating with confidence.
Think of this as a quick chat with a pro, clearing up the details so you can get back to making incredible shirts.
What Makes DTF Better Than Heat Transfer Vinyl?
This is easily the question I get asked the most, and for good reason. For anyone looking to produce professional-quality apparel efficiently, DTF has some massive advantages over traditional Heat Transfer Vinyl (HTV).
First off, let's talk about complex designs. If your artwork has multiple colors, gradients, or fine details, HTV becomes a real chore. You have to cut, weed, and press each color as a separate layer, which is slow and creates a thick, heavy feeling on the shirt. DTF prints the entire full-color graphic in one go. No layering, no color limits—just a single, clean press.
The other huge win is the end of weeding. We've all been there, hunched over a design, picking out tiny, frustrating pieces of vinyl. It's a massive time-sink. With DTF, you only transfer the printed ink, which means weeding is completely eliminated from your workflow. This alone can save you hours of tedious labor. On top of that, DTF transfers feel much softer on the shirt and work beautifully on a wider range of fabrics that HTV often struggles with.
How Can I Make Sure My Colors Print Accurately?
Getting your colors to pop just right is what separates amateur work from professional results. It all starts with your artwork file. You absolutely must begin with a high-resolution design—300 DPI is the minimum—saved on a completely transparent background. Garbage in, garbage out, as they say. A low-quality file will always give you a blurry, pixelated print, no matter how great the equipment is.
While you might design in an RGB color profile on your screen, professional DTF printers use advanced software to handle the conversion to CMYK for printing, and they're incredibly good at it. The real secret to perfect color, though, lies with your supplier. A top-tier printer invests in meticulously calibrated machines and uses premium inks. That commitment is what ensures the colors you see on your monitor are the same ones that end up on the final shirt.
Got a specific brand color that has to be perfect? Just talk to your provider. A good partner will work with you on color matching to make sure your brand stays consistent and looks its best.
Why Choose a USA-Based DTF Supplier?
Going with a US-based supplier like Cobra DTF isn't just about patriotism; it’s a smart business move that directly impacts your workflow and profitability. The most immediate benefit is dramatically faster shipping. Forget waiting weeks for a package to clear customs from overseas. You can get your transfers in your hands in just a few days, which is a lifesaver when you're up against a tight deadline for a client.
You also get to sidestep all the headaches of international logistics—no surprise customs fees, tariffs, or frustrating delays that can bring your entire operation to a halt. Plus, customer support is in your time zone. When you need help, you can actually get someone on the phone. By choosing a domestic supplier, you're also getting a product made under stringent US quality and safety standards, which means you can count on getting a great transfer every single time.
Can I Use a Regular Home Iron for DTF Transfers?
I'll make this one easy: absolutely not. If you're creating products to sell or even just want them to last, a home iron is a non-starter. It might seem tempting for a one-off project, but you'll only end up with a ruined shirt and a wasted transfer.
A home iron fails at the two things that are most critical for a permanent application: consistent temperature and even, heavy pressure. The heating element in an iron is full of hot and cold spots, meaning the adhesive won't cure properly across the entire design. This guarantees that your beautiful transfer will start peeling, cracking, or washing off after its first trip through the laundry. A quality heat press isn't just a recommendation; it's a foundational piece of equipment for anyone serious about creating professional transfer designs for shirts that last.
Ready to create vibrant, durable, and professional-grade custom apparel without the hassle? Cobra DTF offers premium, American-made DTF transfers that ship the same day, so you get top-tier quality in just 1-3 days. Elevate your designs and streamline your production by ordering your custom transfers today.