

DTF Printing on a Stretch Pique Polo Shirt
You've pressed a clean logo onto a stretch pique polo shirt, peeled the film, and watched the design look acceptable for a few minutes. Then the customer stretches the chest, the knit opens across its raised texture, and the print starts cracking at the edges. A standard cotton T-shirt workflow often produces that exact disappointment.
The problem usually isn't the artwork alone. Pique texture, cotton absorbency, elastane recovery, moisture, pressure, and adhesive curing all affect the bond. A professional result comes from treating the polo as a three-dimensional, heat-sensitive substrate rather than as a flat cotton blank.
The Challenge of Printing on Textured Performance Blends
A customer ordering embroidered-style uniforms or premium corporate wear often chooses a stretch pique polo shirt because it looks more deliberate than a T-shirt while still allowing comfortable movement. The raised knit gives the garment structure and airflow, while the stretch helps the wearer reach, bend, and work without fighting the fabric. Those same qualities create complications at the heat press.
I've seen a logo appear firmly attached immediately after pressing, only to reveal thin lifted lines after the shirt is flexed. A transfer applied with light pressure has bonded mainly to the high points of the pique. The low points remain poorly connected, so the design breaks when the knit returns to its relaxed shape.
Practical rule: If the polo's surface feels visibly textured under your fingers, the adhesive must be pressed into the texture, not simply laid across it.
The commercial history of the polo helps explain why the surface behaves this way. René Lacoste's 1930s tennis design replaced stiff, long-sleeved tennis whites with breathable pique cotton, and Lacoste was manufacturing the shirt commercially by 1933. The raised weave later moved into golf, Ivy League clothing, and everyday casualwear, as described in this history of the pique polo shirt. Pique became popular because its textured construction balances airflow and structure, not because it offers a perfectly smooth printing surface.
Why the normal T-shirt workflow fails
A smooth jersey or ring-spun cotton tee gives a transfer broad, relatively even contact. A polo presents peaks and valleys. The film can bridge the peaks while leaving air pockets around the recesses, especially when the press pressure is too light or the garment is supported by a soft, uneven pad.
The elastane component adds another variable. The shirt stretches during loading, pressing, peeling, and testing. If the operator pulls the garment flat over the platen, the fabric may relax after decoration and compress the logo into a different shape. A straight wordmark can develop a slight wave, while a large solid print can show stress lines.
The right mindset for DTF
Direct-to-Film printing can work well on this substrate, but the process needs controlled preparation and testing. Choose the blank first, inspect the knit and placket, then tune the transfer and press method to that particular fabric. Don't assume that a setting that works on a cotton tee will activate the adhesive evenly on a stretch pique polo.
The goal isn't to overpower the garment with heat. It's to achieve even adhesive contact, sufficient curing, stable recovery, and a clean hand feel without damaging the elastane or distorting the collar and placket.
Understanding the Fabric Construction and Fiber Blend
Pique is a knitted construction with a raised, textured geometry. People often describe it as waffle-like or honeycomb-like because the surface forms repeating ridges and recesses rather than a flat plane. That texture gives the polo its familiar sporty appearance and supports airflow, but it also reduces the area where a transfer adhesive can make uninterrupted contact.
Stretch pique adds another layer. Commercial versions commonly use cotton with spandex or elastane, including compositions around 98% cotton and 2% spandex or elastane, as shown in this stretch polo product composition. The exact blend varies, so the label and supplier specifications matter more than the category name.
Read the surface before you press
Cotton contributes absorbency, softness, and the familiar pique hand. Elastane contributes stretch and recovery, allowing the fabric to move and return closer to its original shape. The adhesive has to attach to a surface that is both porous and mobile.
On a smooth shirt, the transfer can form a relatively continuous film-to-fabric interface. On pique, it must flow over the raised yarn structure and into the recesses. If the adhesive only grabs the top ridges, the print may look fine while flat and fail as soon as the wearer moves.
A midweight construction around 190–230 GSM is often practical for fitted or mobility-led stretch pique styles because it gives the garment enough body to resist excessive cling while retaining movement. The broader pique polo category can range from 150–280 g/m², according to this polo fabric GSM guide. Those figures are selection guidance, not a substitute for a test press. Two polos with similar weight can react differently because of knit density, finishing, dye, and elastane distribution.
Heat changes the risk profile
Pure cotton is comparatively forgiving under heat, while elastane is more sensitive to excessive temperature and prolonged dwell. An elastane blend can lose recovery, develop shine, or become unstable if the operator uses a setting designed for a heavier cotton garment. The danger isn't always obvious scorching. A shirt may leave the press looking normal but feel less resilient after repeated decoration tests.
The placket deserves special attention because it contains multiple layers and seams. A collar or button area can create uneven pressure, causing one side of a logo to receive more compression than the other. Load the body so the print area sits over a level portion of the platen, and avoid placing bulky seams beneath the transfer.
For a fuller construction explanation, use this guide to cotton pique knit. It's also important to separate garment transfers from hard-surface decoration. A service such as UV DTF Transfers Upload Your Gang Sheet is intended for surfaces such as glass, metal, wood, and plastic, not for bonding a garment transfer into a stretch knit.
Substrate Preparation and Moisture Management
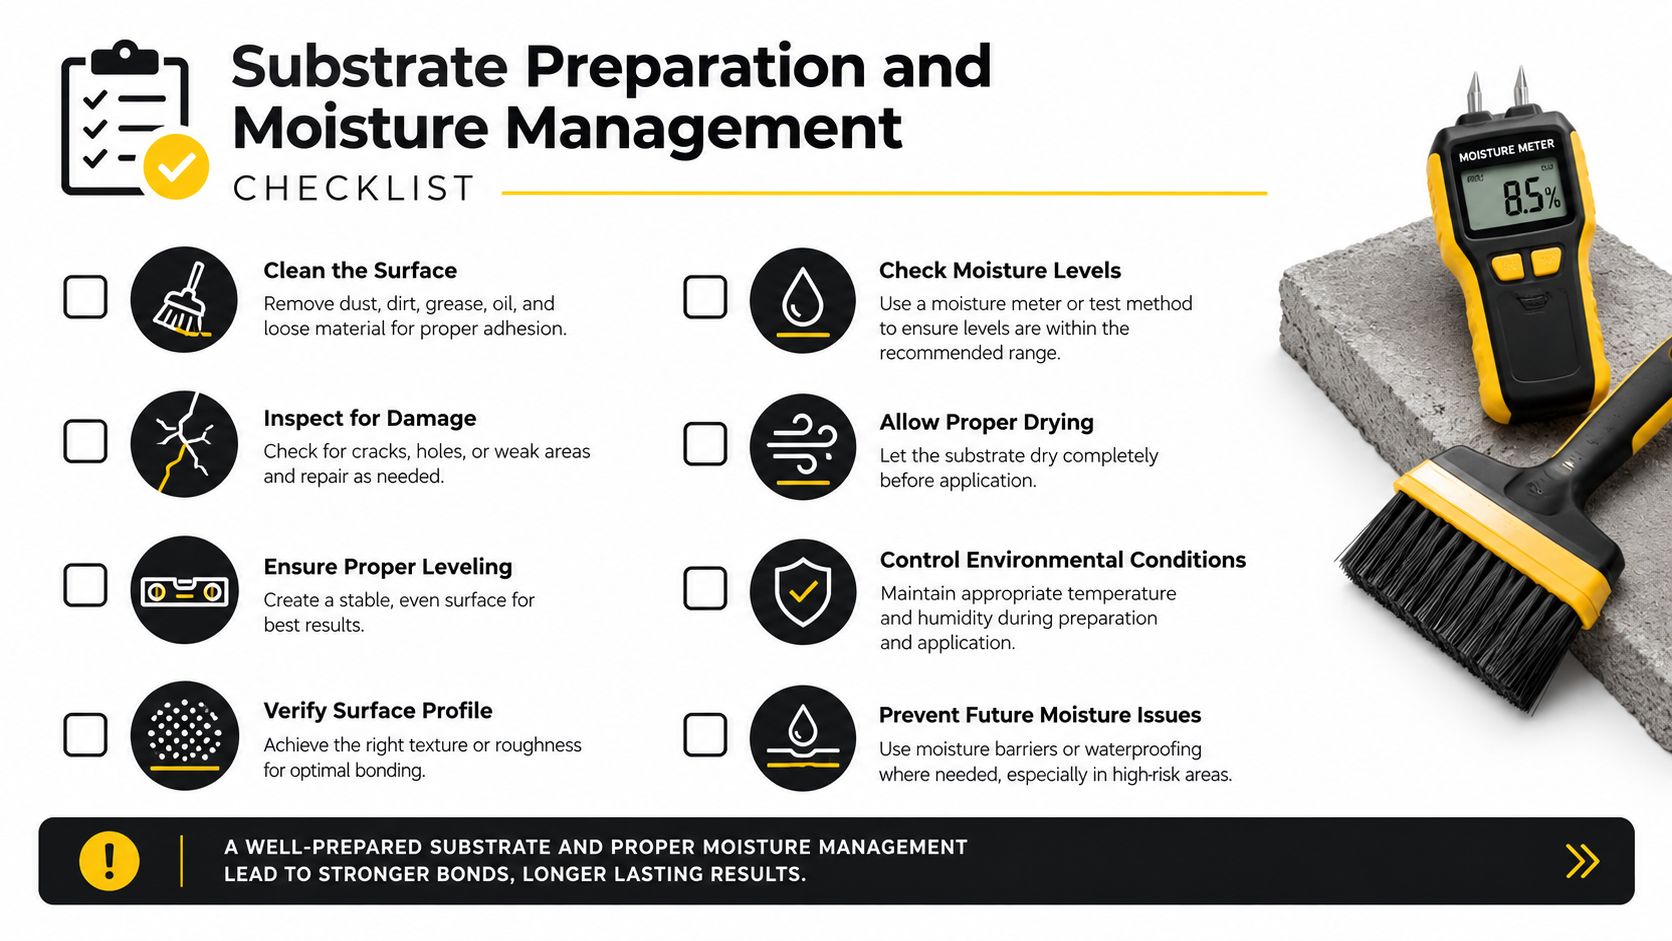
A reliable press starts with a dry, level garment. Pique can hold moisture between the raised knit channels, and factory finishing agents can affect how the hot-melt adhesive wets the fibers. Lint and loose fibers create another problem. They become trapped under the transfer, leaving small contamination points that can later look like pinholes or weak edges.
Use the same preparation routine for every test blank. Consistency matters more than speed.
A repeatable pre-press routine
- Inspect the decoration area. Check for loose yarns, lint, raised seams, and the edge of the placket. Brush the surface with a clean garment brush or lint roller. Don't drag the fabric sideways, because stretching it before pressing can change the final logo position.
- Load the polo without tension. Thread the body over the platen when possible, keeping the chest relaxed. Smooth wrinkles outward with your hand, but don't pull the knit tight. A relaxed garment gives you a more honest view of how the design will behave after pressing.
- Pre-press through a protective sheet. Use parchment paper or a compatible cover sheet and apply a short pre-press to drive out moisture and flatten the immediate print zone. The supplied infographic calls for 5–10 seconds for moisture removal. Treat that as a starting point, then verify the result on your equipment and blank.
- Let the surface settle. After pre-pressing, remove the cover sheet and allow the garment to lie flat briefly. If steam or visible moisture appears, repeat the preparation rather than applying the transfer over a damp surface.
- Check the platen. A hard, level platen gives the most predictable pressure over pique. A soft pad can help accommodate seams, but excessive softness lets the textured knit sink away from the transfer, reducing contact in the valleys.
Moisture is an adhesion variable
You don't need a complicated moisture meter for every shirt, but you do need a consistent shop standard. Store blanks in a dry area, avoid pressing garments straight from a cold delivery box, and don't stack warm, damp polos together before decoration.
A pre-press also reveals mechanical problems. If the fabric springs back immediately, the knit may be under tension from loading or the pad may be uneven. If the surface develops a glossy patch, reduce heat exposure and inspect the cover material. The aim is to prepare the garment, not to flatten its character.
Keep the transfer manufacturer's application instructions available at the press. Cobra DTF's DTF transfer instructions can serve as a reference, but the final setting still needs confirmation on the actual stretch pique blank, film, powder, and press combination.
Optimizing Heat Press Settings for Pique and Elastane
The transfer has to satisfy two competing requirements. It needs enough heat and dwell for the adhesive to flow into the pique texture, but it also needs controlled exposure so the elastane keeps its recovery and the garment doesn't develop shine or distortion.
Start with the transfer supplier's recommended range, then run a blank test. Don't copy a setting from a different film just because both products are called DTF. Powder size, adhesive formulation, film release, ink coverage, and curing method all change how the transfer reacts.
A practical starting matrix
| Parameter | Target setting | Why it matters |
|---|---|---|
| Pre-press | 5–10 seconds through a cover sheet | Removes moisture and relaxes surface wrinkles before bonding |
| Temperature | Use the transfer supplier's stretch-compatible range, beginning conservatively | Activates the adhesive while reducing unnecessary elastane exposure |
| Pressure | Medium-firm, even pressure | Pushes adhesive into the raised and recessed pique structure |
| First dwell | Use the supplier's recommended dwell, then test adhesion and recovery | Balances penetration against heat stress |
| Peel | Cold peel unless the film supplier specifically approves another method | Reduces edge lift and adhesive stringing on a moving, textured knit |
| Finishing press | Short secondary press through a cover sheet | Helps settle the surface and secure marginal edges |
The table deliberately avoids pretending that one universal temperature or dwell works for every transfer system. The most useful technical reference is this guide to DTF heat press settings, followed by a controlled test on your own equipment.
Pressure matters more than operators expect
Light pressure can leave adhesive attached only to the peaks. Excessive pressure can flatten the knit, emboss the film, or force adhesive beyond the design edge. Medium-firm pressure is usually the better starting point because it compresses the transfer into the fabric without crushing the garment.
Use a firm platen for the main chest area. If the polo has a noticeable side seam, placket edge, or pocket beneath the design, reposition the garment rather than trying to compensate with force. Uneven support produces uneven bonding.
Avoid stretching the transfer while positioning it. Align the film with the garment in its relaxed state, and use a ruler or placement guide when the design needs to sit consistently across a run. A logo that looks centered on a stretched blank can shift when the shirt returns to normal tension.
Peel and finishing discipline
A true cold peel is the safer choice for textured performance blends unless the transfer supplier specifies otherwise. Peeling while the adhesive is still soft can lift edges, pull fine details, or leave strings across open areas. Let the film cool fully, then remove it with a controlled, low-angle motion.
After peeling, inspect the perimeter and fine lettering. If the edge looks slightly raised, cover the design and apply a short finishing press using the supplier's compatible conditions. Don't keep adding heat to solve a pressure or moisture problem. Extra dwell cannot repair an adhesive layer that never made proper contact with the textile.
Press-room test: Stretch the decorated area gently in several directions, then allow it to relax. The print should move with the knit without opening obvious cracks or releasing at the perimeter.
Troubleshooting Adhesion and Stretch Recovery Issues
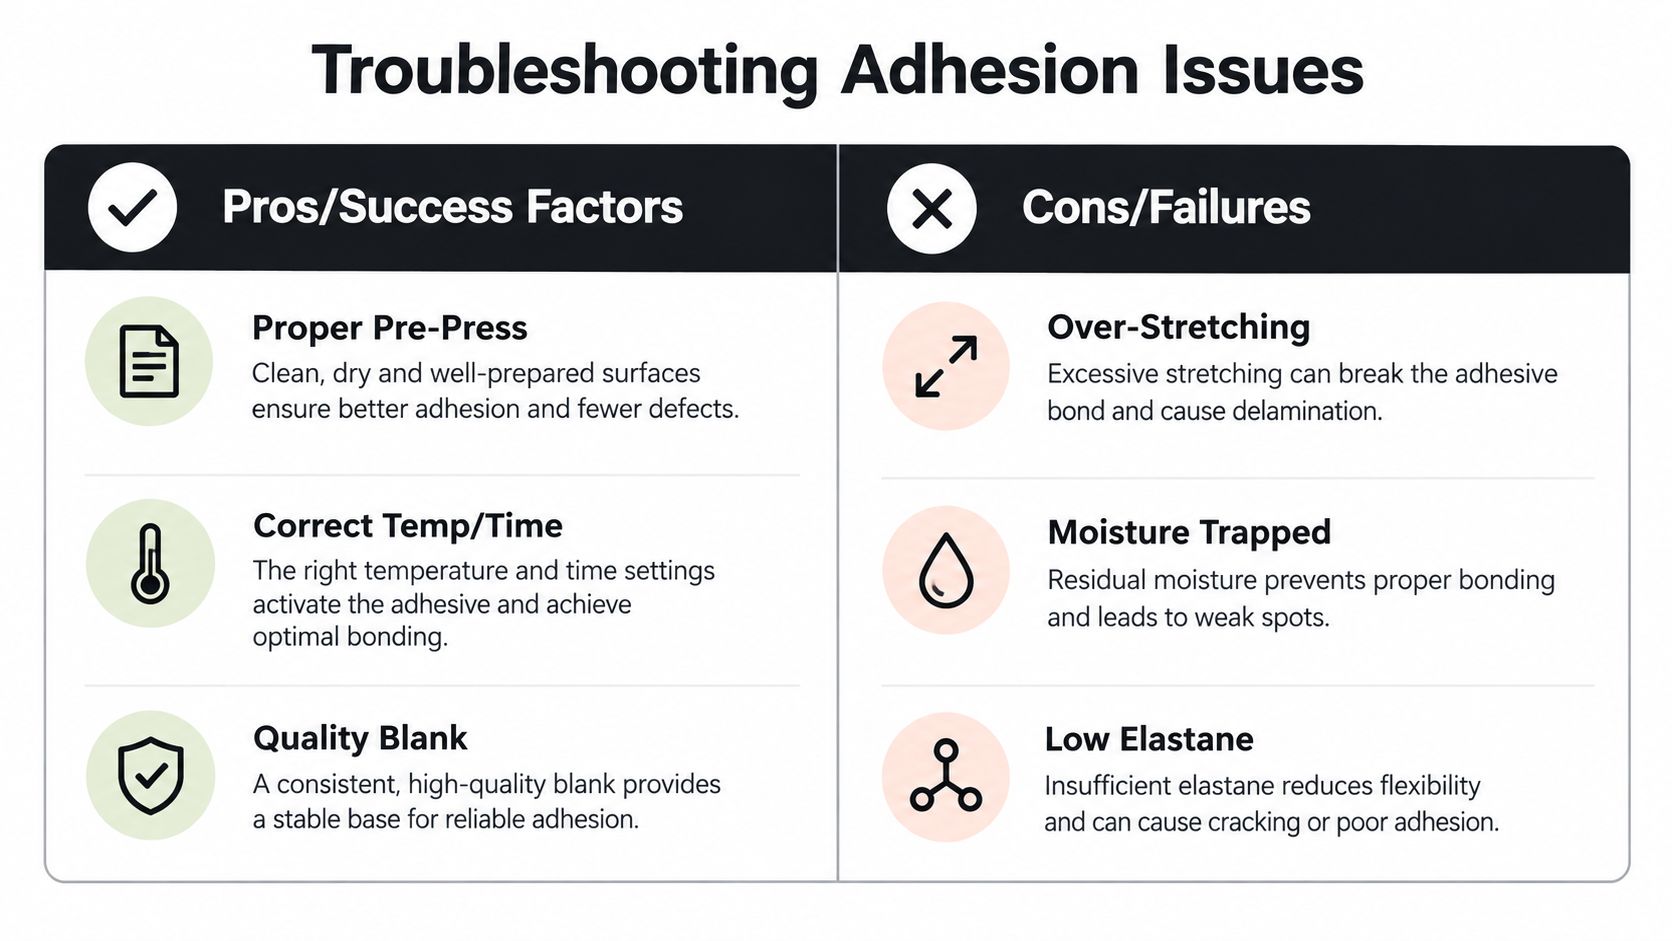
A failed stretch pique print usually leaves clues. The useful question isn't “Did the transfer fail?” It's “Where did the bond or fabric movement go wrong?” Diagnose the symptom before changing settings, because increasing heat can make a pressure, moisture, or blank-selection problem worse.
Edge lifting
Symptom: The design looks attached in the center, but corners or thin outer lines lift after peeling or stretching.
Likely causes: The edge sat over a deeper pique recess, the garment contained moisture, pressure was uneven, or the film was peeled before cooling.
Fix: Recheck the pre-press, support the print area on a firm platen, and increase contact consistency before increasing temperature. Use a cold peel and a controlled finishing press. If the same design repeatedly fails at the same edge, move it away from a seam or reduce the amount of fine perimeter detail.
Cracking across the print
Symptom: A solid logo develops breaks when the shirt is stretched.
Likely causes: The adhesive bonded mainly to the raised points, the transfer was overcured or undercured, or the blank was stretched during application.
Fix: Test medium-firm pressure and verify that the transfer adhesive is fully cured. A transfer can feel dry while remaining mechanically weak inside the textured surface. Review the garment loading method and compare a relaxed placement with a tensioned placement.
Placket waviness and logo distortion
Symptom: The placket waves, or a chest logo appears slightly skewed after the shirt cools.
Likely causes: The operator pressed across bulky placket layers, pulled the body flat, or placed the design too close to a structural seam.
Fix: Load the garment so the design area is flat and independent of the placket. Mark placement while the polo is relaxed. If the shirt changes shape after pressing, reduce tension during loading and inspect the platen pad for compression or unevenness.
Dye migration on dark polos
Dye migration can show as a colored cast entering the white areas or changing the appearance of bright artwork after heat exposure. Dark dyed garments deserve a separate test because the transfer's white underbase and the garment dye can interact under heat.
Use a transfer system designed for the color and fabric risk, including a blocking layer or specialized underbase where the supplier recommends it. Don't assume that a visually opaque transfer is automatically protected from migration. Cure and heat exposure still matter.
The release test before delivery
Hold the polo flat and inspect every edge. Stretch the printed area gently across the knit, then release it and look for whitening, cracking, edge separation, or permanent distortion. Flex the logo near the collar and placket because those areas experience different support than the center chest.
Compare the decorated blank with an undecorated blank from the same batch. If the finished shirt has lost recovery, developed shine, or changed shape, the process may be too hot or too long even if adhesion is strong. Keep a small record of blank, transfer, platen, temperature, dwell, pressure, peel method, and test result. That record turns troubleshooting from guesswork into repeatable production control.
Delivering a Premium Product That Lasts
A finished stretch pique polo should feel like a garment first and a printed product second. The customer notices whether the collar sits correctly, whether the chest logo follows the knit, and whether the print feels flexible rather than stiff. Those details determine whether a uniform order generates a repeat request.
Before packing, run a final quality check:
- Placement: Confirm the logo sits on a relaxed garment and clears the placket, pocket, and major seams.
- Surface: Look for pinholes, trapped lint, edge lift, film shine, and uneven texture.
- Recovery: Stretch the print gently, release it, and check whether the garment and artwork return cleanly.
- Hand feel: Compare the print with an approved sample. A heavy ridge or brittle surface can signal excessive film, pressure, or heat.
- Care communication: Include washing and drying guidance that matches the blank and transfer supplier's instructions.
Care instructions should be practical rather than vague. Recommend washing the polo inside out, using the gentlest suitable cycle, avoiding direct ironing over the print, and limiting high heat during drying. The exact blend matters because listings in this category can range from 96/4 to 94/6 cotton-elastane, with care guidance varying from standard machine washing to gentle cycles, inside-out washing, and low tumble drying, as shown in this stretch pique polo listing. Don't promise identical wash behavior across every blank.
The blank also affects decoration risk. Cotton remains the classic foundation of the polo category, while performance blends continue to influence buyer expectations. Market reporting places cotton polo shirts at USD 2,487.18 million and about 49.7% of global share in 2025, while polyester polos account for USD 1,600.01 million and about 32.0%, according to this polo shirt market report. The same source estimates the broader polo shirt market at USD 28.7 billion in 2025, with a projection of USD 36.8 billion by 2034. These figures are market context, not a reason to skip testing.
A durable product comes from matching the transfer to the knit, preparing the blank without tension, using even pressure, allowing the film to cool, and validating recovery before shipment. That discipline is what turns a difficult textured garment into a dependable premium uniform.
Cobra DTF provides Direct-to-Film transfers for custom apparel workflows, so you can order ready-to-apply artwork and test it on a stretch pique polo shirt before committing to a larger run. Visit Cobra DTF to review the available transfer options and build a repeatable decoration process around your blanks and press.