

Screen Print Heat Transfers: A Complete 2026 Guide
You're probably looking at a familiar fork in the road.
A customer wants shirts. Maybe it's a school booster order, a landscaping crew, a merch drop, or a corporate event. The art looks simple enough. The deadline is tight. You need something that presses clean, holds up in the wash, and doesn't wreck your margin when the order grows.
That's where screen print heat transfers still matter.
A lot of newer decorators jump straight to DTF because it's flexible and easy to order. That makes sense. But if you only think in terms of “what can print this design,” you miss the bigger business question. What gives you the best workflow, the fewest production headaches, and the healthiest per-shirt profit for this specific order?
Screen print transfers have been around for a reason. They solve a very particular problem well. They let small shops and solo operators produce a professional print result without running a full screen print setup in-house. Used in the right situations, they're fast, durable, and efficient. Used in the wrong situations, they're frustrating.
The Enduring Power of Screen Print Transfers
If screen printing were fading out, you'd expect the market to shrink. It isn't. The global screen printing textile printing market was valued at US$ 12,211.6 million in 2024 and is projected to reach US$ 18,841.0 million by 2030, with a 7.6% CAGR from 2024 to 2030, according to Grand View Research's screen printing market data.
That matters because screen print heat transfers aren't some side method hanging on by nostalgia. They sit inside a large, still-growing production ecosystem.
For a small business, the appeal is practical. You can buy transfers ready to press, store them, and apply them when garments need to be decorated. That changes your workflow. Instead of exposing screens, mixing ink, registering artwork, and cleaning up, you move straight to heat pressing. For many shops, that's the difference between taking the job and turning it away.
Where They Fit Best
Screen print heat transfers shine when the job has a few clear traits:
- Simple color count: Bold spot-color artwork, names, numbers, left chest logos, and straightforward back prints are strong candidates.
- Repeat demand: Team stores, staff uniforms, event reorders, and evergreen merch all benefit from keeping transfers on hand.
- Mixed garment timing: If shirts arrive in batches, transfers let you decorate as inventory lands instead of holding everything for one big production day.
Practical rule: Screen print transfers make the most sense when the art is stable and the order pattern is predictable.
Why They Still Earn Their Place
They also produce a familiar print character. The result feels closer to traditional screen printing than most budget decorators expect. That's important if your customer has handled printed apparel before and knows the difference between a professional ink deposit and a film-heavy decoration method.
None of this means screen print transfers are automatically the best option now. They aren't. DTF changed the market for good reasons. But screen print transfers still deserve a place in your decision process because they solve volume, consistency, and repeatability better than many shops give them credit for.
What Exactly Are Screen Print Heat Transfers
A new shop owner usually hits this question fast. The customer wants 24 left-chest logos today, 200 event shirts next month, and maybe reorders after that. The method you choose changes your setup time, your spoilage risk, and your margin more than the customer ever sees.
Screen print heat transfers are screen printed designs made onto a release sheet, then finished onto the garment with a heat press. The image is printed with screen printing ink, usually plastisol, onto transfer paper, gelled so it holds together, and later bonded to the shirt under heat, pressure, and the correct peel timing.
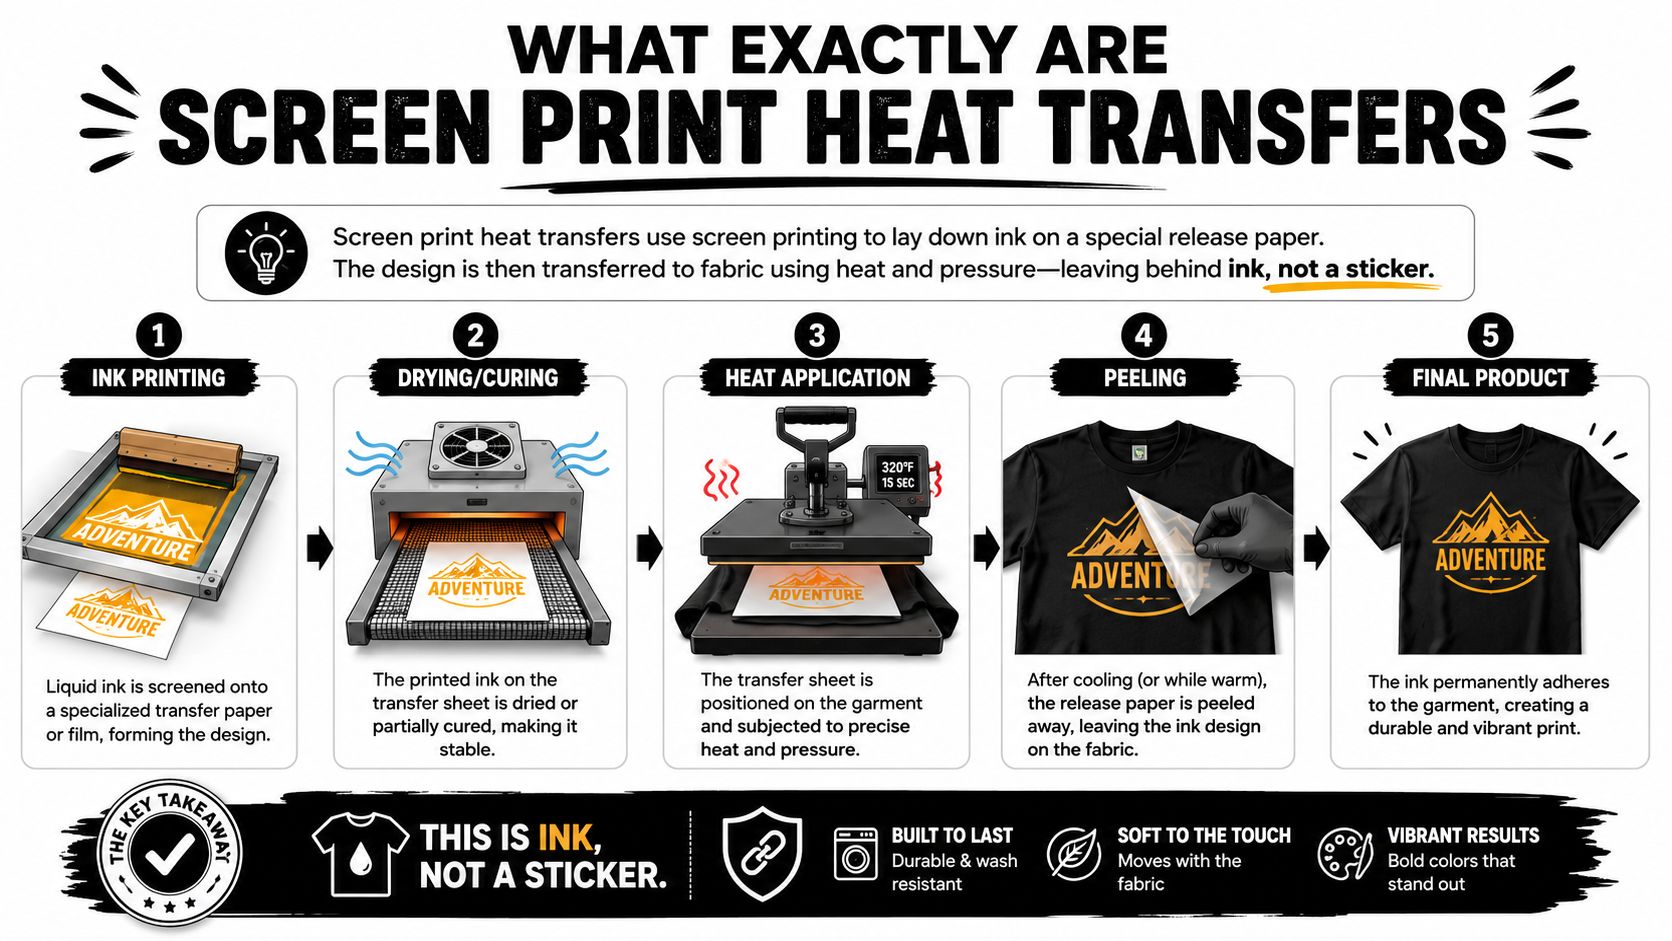
Transfer Express explains the production sequence clearly. The design is printed in reverse onto transfer paper, the ink is gelled on the sheet, and the final bond happens during heat application on the garment, which is what gives the finished print its screen printed character when the transfer is made and pressed correctly (Transfer Express screen printed transfer guide).
Here's the practical split in the workflow:
- The transfer maker handles the screen setup and printing
- The design is printed onto release paper
- The ink is gelled so it can be stored and shipped
- Your shop places the transfer on the garment
- The heat press completes the application
That division is the central point. You are buying pre-produced ink work, then handling only the final decoration step in-house.
For a small business, that changes the math. Direct screen printing ties up time in setup, registration, and cleanup. Screen print transfers shift those labor-heavy steps to the supplier, so your shop cost is mostly pressing labor, blank garment cost, and transfer cost. That can be a smart setup for repeat logos, staff uniforms, team names, and simple spot-color art. It gets less attractive on highly variable short runs where DTF often wins because you can order one-off designs without screen-related setup charges.
The distinction matters because beginners often group every heat-applied graphic into one bucket. In production, they behave very differently. Screen print transfers use deposited ink and a controlled finishing step, while HTV relies on cut material, inkjet transfer paper targets hobby use, and direct screen printing puts the ink straight on the shirt at press time. If you expect all of them to press, feel, price, and reorder the same way, you will misquote jobs.
One line sums it up well: the carrier sheet is temporary, but the ink deposit is the decoration.
That is why press settings matter so much. You are not just sticking a graphic onto fabric. You are finishing an ink layer that still needs the right combination of temperature, pressure, dwell time, and peel method to release cleanly and hold up in wear.
Exploring the Types of Screen Print Transfers
Not all screen print transfers behave the same, causing beginners to burn time and blanks.
The biggest mistake is assuming one press recipe works for every transfer. It doesn't. Hot-peel and cold-peel transfers are different products with different application behavior. If you run both at one “safe middle” temperature, you'll usually create either poor adhesion or fabric damage.
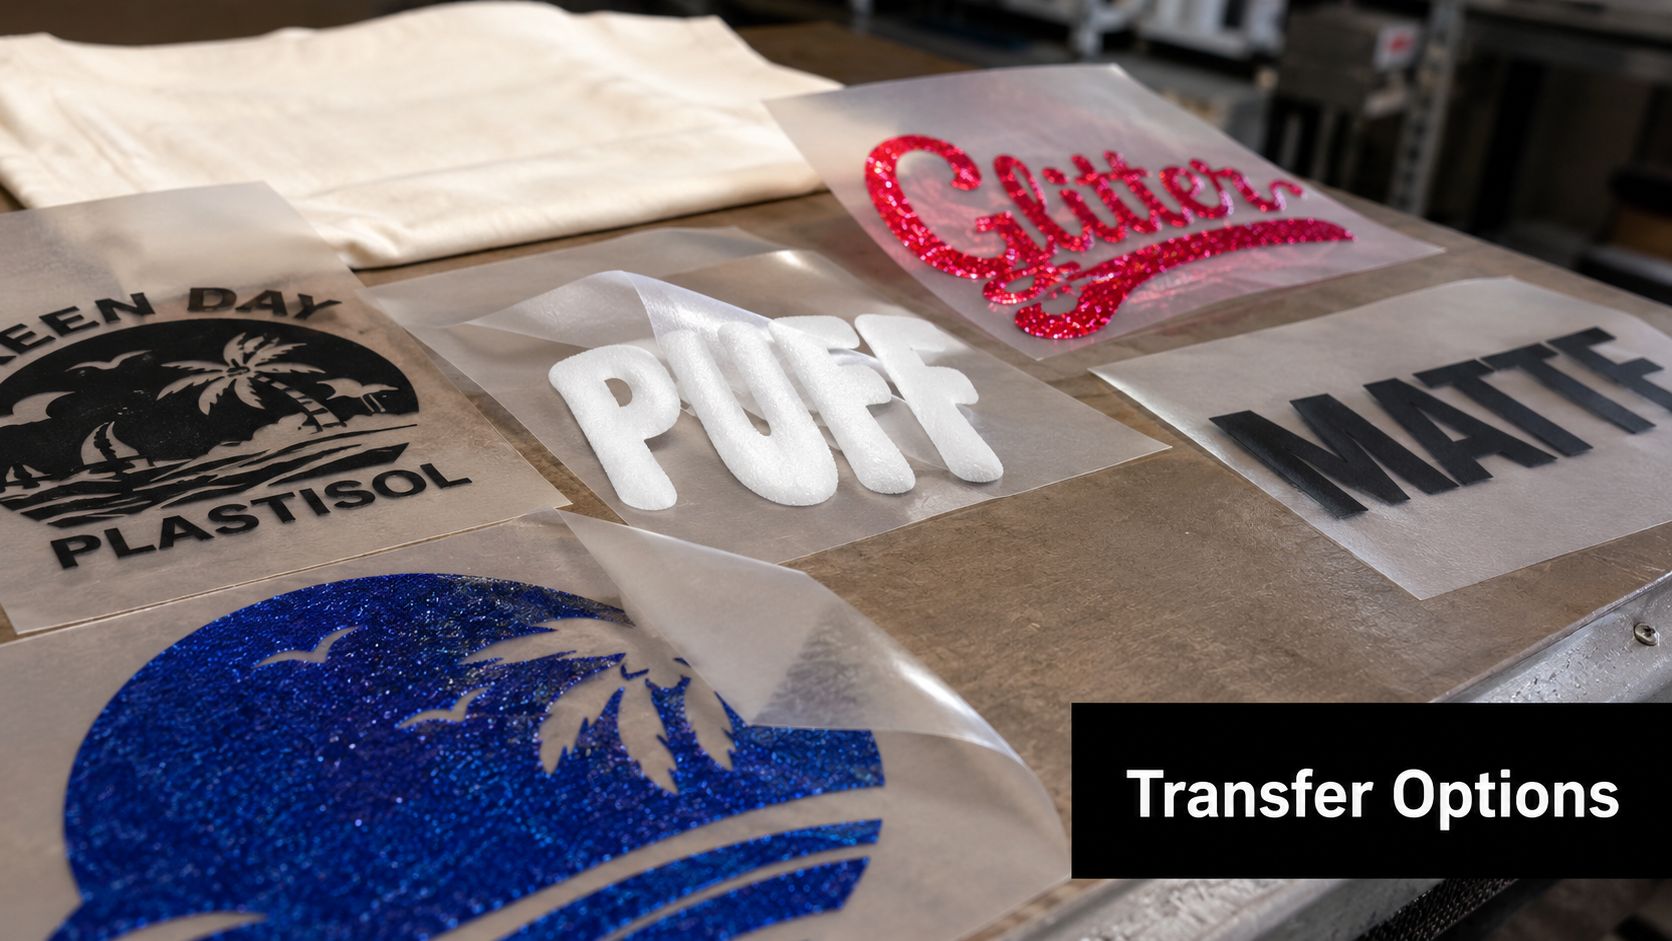
Hot-Peel and Cold-Peel
This is the distinction that matters most in daily production.
According to CSDS Vinyl's application guidance for screen print transfers, hot peels require 375 to 400°F with immediate removal, while cold peels need 335 to 350°F and a 20-second cooling wait. Using one standard setting across both types risks scorching or adhesion failure.
That sounds small on paper. In the shop, it's everything.
Hot-peel transfers
Hot peels fit a fast workflow. Press, peel immediately, move on. They're useful when you want speed at the press and you've got a transfer designed for that release behavior.
The downside is timing. If you hesitate or peel awkwardly, the release can fight you. New operators often freeze for a second after opening the press, and that's enough to change the peel behavior.
Cold-peel transfers
Cold peels give the ink time to settle before the carrier comes off. They can be forgiving in some setups, but only if you actually let them cool.
A common beginner error is treating a cold peel like a hot peel because the press cycle finished cleanly. Then part of the print stays on the paper, not the garment.
If the supplier says cold peel, believe the supplier. Don't improvise because you're in a hurry.
Plastisol as the Workhorse
Most screen print heat transfers in the wild are plastisol-based. That's why they're so common in team wear, workwear, and basic branded apparel. Plastisol gives you strong opacity, solid color hold, and a print feel customers already recognize.
For many businesses, that's the sweet spot. You don't need novelty. You need consistency.
Softer and Specialty Options
You'll also run into softer-hand options and effect-driven transfers. These can include water-based style looks or specialty finishes such as puff, glitter, metallic, and similar decorative treatments.
Those options are useful, but they need more restraint than beginners usually show.
- Puff: Great when the design is built for dimension. Bad when fine detail matters.
- Glitter or metallic: Good for boutiques, spirit wear, and promotional looks. Less useful for understated brand merch.
- Soft-hand styles: Better when the customer cares about feel more than aggressive opacity.
How to Choose the Right Type
Use the transfer that matches the order, not the one that sounds more advanced.
For a clearer understanding, consider this:
| Order type | Better transfer direction |
|---|---|
| Team names, staff uniforms, basic logos | Standard plastisol |
| Fast-paced production with trained press workflow | Hot peel |
| Shops that want a little more peel control | Cold peel |
| Boutique or fashion accent prints | Specialty effects |
| Premium soft-feel expectations | Softer-hand options if the supplier supports them well |
If you're new, standard plastisol in a transfer type with clear supplier instructions is the safest starting point. Fancy finishes are where profit disappears fastest when your settings aren't dialed in.
The Essential Equipment for Professional Results
The center of this workflow is the heat press. Not the artwork. Not the transfer itself. The press.
You can buy the best transfer on the market and still ruin it with bad pressure, uneven heat, or a platen that doesn't close consistently. That's why the press is the one place I never recommend trying to “get by” with hobby equipment.
The broader equipment market backs up how important this category is. In the global transfer printing equipment market, the market was valued at $4.2 billion in 2025 and is projected to reach $7.1 billion by 2034. Within that market, Heat Transfer Printing Equipment holds 38.5%, while Screen Transfer Printing Equipment holds 11.2%, according to Market Intelo's transfer printing equipment market report.
What Actually Matters in a Heat Press
Ignore flashy marketing language and focus on the basics.
- Even heat across the platen: Cold corners and edge drop-off create random failures that look like operator mistakes.
- Consistent pressure adjustment: Screen print transfers need real, repeatable pressure.
- Reliable temperature control: If the display lies, your settings don't matter.
- Stable closing action: You want the same lockup every press, not a fight every cycle.
If you're still shopping, this guide to the best heat press for beginners is a useful starting point for evaluating entry-level options without guessing.
Tools That Make the Process Smoother
The supporting gear is simple but important:
- Cover sheets or protective paper: Helpful when you need a barrier between the upper platen and the transfer.
- Alignment tools: Rulers, guides, or simple center marks reduce crooked placements.
- Quality blanks: A bad shirt can make a good transfer look bad.
- Clean work surface: Lint, moisture, and debris all show up in finished results.
What Doesn't Work
A home iron isn't a substitute.
It won't give you consistent pressure. It won't give you even heat across the design area. It also encourages bad habits because you end up “working” the transfer instead of applying one controlled press cycle. That's how you get partial adhesion, shiny press marks, and prints that fail after washing.
If you want to sell decorated apparel, a real heat press is not optional.
Applying Screen Print Transfers A Step by Step Guide
A small run can go sideways fast here. You press the first few shirts, they look fine, then one peels badly, another shifts, and now your profit on the job is gone. Application is the part that separates a clean, repeatable workflow from a pile of test garments.
Screen print transfers reward discipline. DTF is usually more forgiving on short runs and mixed designs, but if you already chose screen print transfers for the lower per-piece cost at volume, the press cycle has to stay consistent from the first shirt to the last.
Step One Start With the Garment
Load the shirt straight, smooth the print area, and pre-press it briefly to knock out moisture and wrinkles.
That one quick step saves a lot of avoidable failures. A damp shirt, a seam under the platen, or a wrinkle in the print zone changes how the transfer contacts the fabric. In a shop, that turns into random-looking problems that are not random at all.
For a broader baseline on building a repeatable pressing routine, this guide to heat press transfer application is a useful reference.
Step Two Place the Transfer the Same Way Every Time
Set the transfer with a consistent placement method. Do not eyeball one shirt from the collar and the next from the side seam.
For left chest prints, pick fixed reference points and stick with them for the whole run. For full fronts and backs, make sure the garment is supported on the platen so the print area stays level. If part of the shirt is hanging and pulling, placement can look right before pressing and finish crooked after pressing.
This is one of the workflow differences between screen print transfers and DTF. With DTF, shops often accept small placement variation because the transfer itself is quick to produce and reprints are easier to absorb. With screen print transfers, especially on larger runs, mistakes hurt more because the method only pays off when waste stays low.
Step Three Use the Supplier's Settings, Not a Guess
Match your temperature, dwell time, pressure, and peel method to the exact transfer you bought.
There is no universal setting for every screen print transfer. Hot peel, warm peel, and cold peel products can all behave differently, even from one supplier to another. Manufacturers such as Transfer Express in their application instructions publish specific settings by transfer type, and that is the right place to start before you touch the press.
Write those settings down for the job. Shops that make money on transfers usually run from a simple press sheet, not memory.
Step Four Peel on Schedule
Peel timing is part of the application. Treat it that way.
For hot peel
Open the press and peel immediately with one steady motion. A smooth diagonal pull often helps reduce stress across the full image, especially on larger prints.
For cold peel
Let the transfer cool fully, then peel cleanly. Testing a corner too early is a common way to ruin a print that was otherwise pressed correctly.
Beginners often blame the transfer here. In practice, the problem is usually timing. Screen print transfers can be less forgiving than DTF on the peel because the release window matters more.
Step Five Inspect Before You Stack the Next One
Check the print while the garment is still on the platen or immediately after peeling.
Look for:
- Clean release from the carrier
- Edges fully bonded
- Even ink coverage
- No scorching or excess shine
- Correct placement
If anything looks off, stop and correct it before you press the rest of the stack. That habit matters for cost control. One bad setup on a 24-piece order is annoying. One bad setup on 100 pieces can wipe out the margin that made screen print transfers the cheaper option in the first place.
A Simple Press Checklist
Use this before every run:
| Checkpoint | What you're looking for |
|---|---|
| Garment prep | Flat, dry, lint-free print area |
| Placement | Centered, level, and consistent |
| Temperature | Matches the transfer supplier's instructions |
| Pressure | Firm and repeatable |
| Time | Set for the specific transfer type |
| Peel | Hot, warm, or cold, exactly as specified |
| Final inspection | Full release and clean finish |
A repeatable routine protects margin. That is the practical case for screen print transfers. They can give you a lower cost per shirt on the right jobs, but only if your application process stays tight.
How to Troubleshoot Common Transfer Problems
Most transfer problems aren't random. The print is telling you what went wrong. You just need to read the symptom correctly.
The fastest way to waste money is to keep pressing more shirts with the same bad setting. Stop after the first bad one, diagnose it, and adjust deliberately.
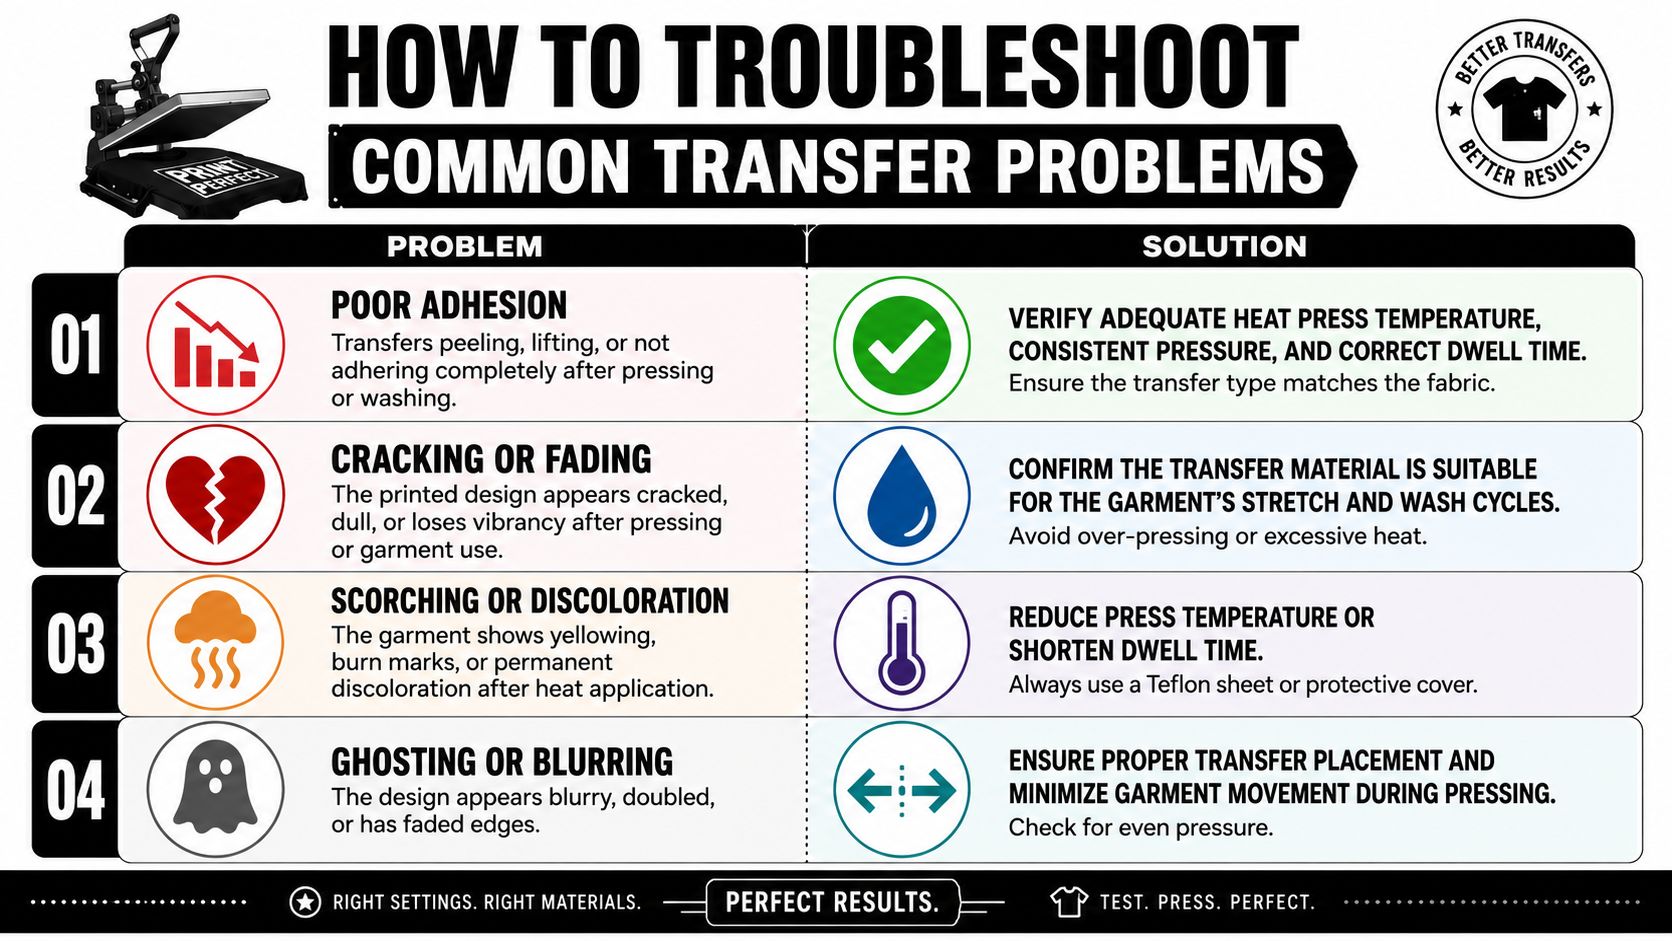
When the Transfer Won't Release Cleanly
If part of the design stays on the carrier, start with the obvious suspects: pressure, temperature, and peel timing.
According to Transfer Express troubleshooting guidance for heat transfers, the right fix for poor peeling is often repressing for 7 to 10 seconds and adjusting temperature by 10° increments. That's better than making huge swings and creating new problems.
Also check whether your press has pressure inconsistency. One low-cost method is the paper test at the platen corners. If the paper slips out too easily when the press is locked, pressure isn't even.
When the Print Looks Fine but Fails After Washing
This catches beginners because the shirt can look perfect on press day.
The same Transfer Express guidance notes a 24-hour curing process post-press, and skipping that leads to high return rates from first-wash fading. In plain shop terms, don't press it and treat it like it's fully settled the second the carrier comes off.
Some failures aren't press failures. They're handling failures after a good press.
When You See Scorching or Patchy Adhesion
Patchy adhesion often means uneven heat or poor contact. Scorching usually means the garment couldn't tolerate the setting you used, or you applied a hot-peel recipe to something that needed lower heat.
Try this order of operations:
- Check the transfer type first: Wrong peel category causes a lot of “mystery” problems.
- Inspect platen consistency: Cold spots create local failure areas.
- Adjust gradually: Change one variable at a time.
- Use a sacrificial blank: Test before you restart the whole order.
A Symptom and Fix Quick List
| Problem | Likely cause | First move |
|---|---|---|
| Carrier won't peel cleanly | Wrong temp, weak pressure, bad peel timing | Repress, then adjust temperature gradually |
| Print washes out too soon | Garment handled too early after pressing | Allow proper post-press cure time |
| One side adheres, one side doesn't | Cold spot or uneven pressure | Test corners and platen consistency |
| Shirt scorches | Too much heat for garment or wrong transfer recipe | Reduce temperature and verify transfer type |
Troubleshooting gets easier once you stop guessing and start changing one thing at a time.
Screen Print Transfers vs DTF A Small Business Guide
This is the core business question. Not “which one is better?” but which one is smarter for the order in front of you?
For small shops, the answer usually comes down to four things: artwork complexity, order size, workflow speed, and how much flexibility you need after the order is placed.
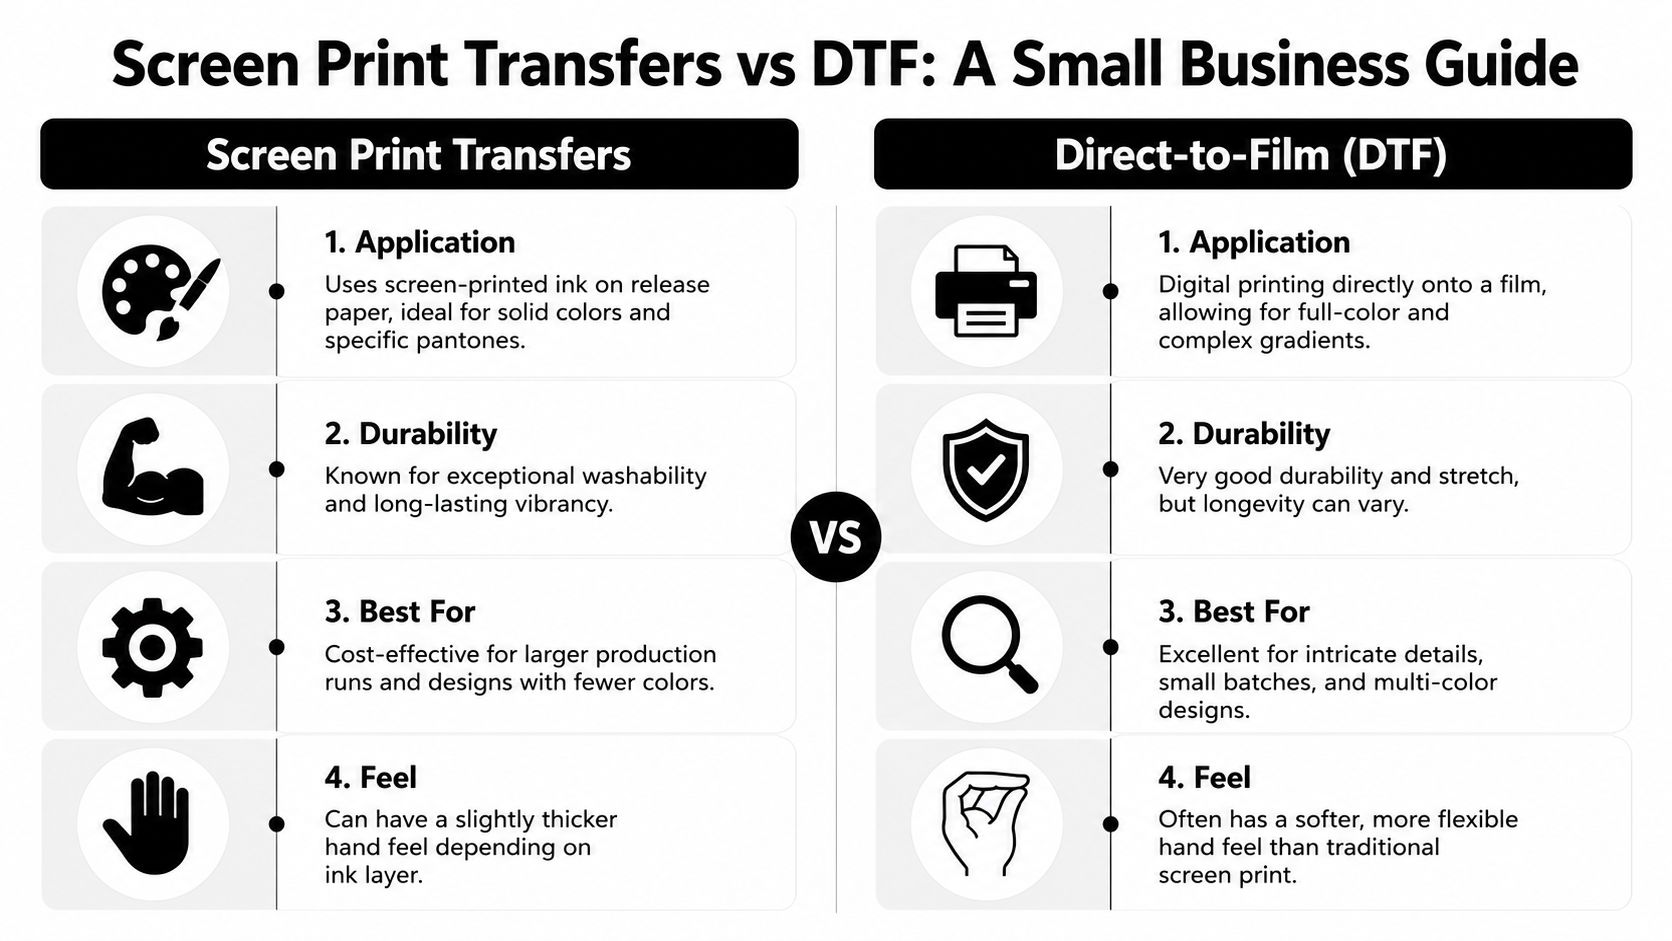
Where Screen Print Transfers Win
Screen print transfers are often the stronger choice when the design is simple and the job is repeatable.
They usually make the most sense for:
- Spot-color art
- Team and staff orders
- Reorders of the same logo
- Bulk runs where consistent placement and fast pressing matter
The workflow is clean. You order the transfers, keep them ready, and press as garments come in. That can be a major advantage if you don't want to print every order from scratch.
Where DTF Wins
DTF is the better fit when the art is messy in the best possible way. Full color, shading, gradients, tiny details, photo-style graphics, and low-quantity mixed jobs all lean toward DTF.
It's also the more forgiving option for businesses that don't want to think about color separations or design simplification. If the customer sends a complex image and wants a small quantity, DTF is usually the easier yes.
For a broader side-by-side breakdown, this guide on DTF vs screen printing is worth reading.
The Workflow and Cost Logic
Many new entrepreneurs get tripped up. They look only at transfer purchase price and ignore labor pattern.
Screen print transfers tend to work best when:
- the same design repeats
- the color count is limited
- you want to stock transfers for future use
- you need a classic printed look
DTF tends to work best when:
- every order is different
- customers send full-color art
- order quantities stay small or unpredictable
- you need maximum design flexibility
Because this article can't invent unverified per-unit pricing, the honest way to say it is this: screen print transfers usually become more attractive as artwork gets simpler and order volume gets more stable, while DTF usually becomes more attractive as artwork gets more complex and order quantity gets less predictable.
If you're running a small business, flexibility has value. But so does repeatability. The winning method depends on which one your order needs more.
A Straightforward Buying Mindset
Use screen print transfers when you know what the job is and expect it to repeat.
Use DTF when the customer wants freedom more than standardization.
A lot of successful shops don't pick one forever. They build a filter:
- simple and repeatable goes one direction
- colorful and custom goes the other
That's usually the most realistic way to protect margin without turning away business.
If your orders lean toward full-color graphics, short runs, and fast-turn custom work, Cobra DTF is worth a look. They're a Texas-based, family-owned company focused on USA-made DTF transfers, quick turnaround, and consistent quality for shops that need dependable film transfers without the overseas delays.