

Direct to Film Printing Process Explained Step by Step
At 7 a.m., a custom apparel shop can already have a familiar problem: a customer needs a full-color logo on a dark polyester hoodie, the order is small, and the deadline leaves little room for setup. An operator loads a transfer, checks the garment for wrinkles, and lowers the heat press. The design arrives on clear film, but the finished shirt depends on much more than that final press.
The direct to film printing process is a layered production system. Artwork, PET film, CMYK and white ink, hot-melt adhesive powder, curing, heat, pressure, and finishing all have to work together. A mistake at any one stage can appear later as peeling, cracking, rough texture, or inaccurate color, so reliable output comes from controlling the full chain rather than treating DTF as a single machine.
What Direct to Film Printing Is and Why It Took Off
A shop can receive one order for a dark polyester hoodie and another for cotton T-shirts, each with detailed, full-color artwork. Direct-to-film, usually called DTF, handles both by building the decoration away from the garment first. The printer places water-based pigment ink on PET transfer film, adds a white underbase when the design needs opacity, and coats the wet print with hot-melt adhesive powder. After curing, a heat press bonds the completed transfer to fabric.
The film is only the carrier. The finished decoration depends on several layers working together: artwork, CMYK and white ink, PET coating, adhesive powder, heat, pressure, and post-press handling. That layered setup gives a shop flexibility across cotton, polyester, blends, dark garments, and short runs. It also means a weak powder coat or incomplete cure can show up later as peeling, cracking, rough texture, or poor color.
Why operators compare DTF with other methods
DTG prints directly onto the shirt. It can produce a soft result on suitable cotton garments, but the garment needs correct preparation before printing. Screen printing uses stencils, separate screens and inks, plus registration between colors. It remains effective for large repeat orders, though setup takes more work before the first shirt.
HTV, or heat transfer vinyl, cuts designs from colored vinyl sheets and removes unwanted material by hand. It suits simple lettering and shapes, while detailed, multicolor artwork can require considerable weeding. DTF prints the complete image as a transfer, then moves it to the garment during pressing. That shifts much of the artwork handling away from the shirt and makes mixed orders easier to organize.
Sublimation has a different limitation: its dye process works best with suitable polyester garments and lighter surfaces. DTF gives the operator a broader fabric and color range, provided the transfer settings match the garment and adhesive system.
Why adoption accelerated
The modern commercial process grew from earlier experimentation. During the 2019 to 2024 period, modified inkjet systems, adhesive powders, curing equipment, and transfer workflows became more accessible to small and mid-size providers. Background on DTF's commercial development and market growth describes the method's movement from an emerging niche toward wider textile-decoration use in the early 2020s.
The business case was practical. Shops could accept short runs, mixed garment colors, and varied fabric orders without burning screens or pretreating every shirt. They could also produce transfers ahead of a pressing appointment, source US-made transfers when in-house capacity was limited, or add curing and pressing equipment as order volume grew.
Practical rule: Treat the film as one layer in a production chain. A durable garment decoration requires the powder, curing, pressing, and finishing stages to agree with one another.
How the Direct to Film Printing Process Works Step by Step
The process has four connected production stages. Each stage has a clear purpose, and the next stage can't compensate for a basic failure in the previous one.
1. Prepare the artwork
Start with artwork that the RIP software can interpret correctly. The operator may rasterize the design, mirror it so it reads correctly after transfer, and create a white underbase for dark garments. The RIP, or Raster Image Processor, converts the artwork into the printer's instructions, including color layers and white-ink placement.
The white layer matters because it gives CMYK colors an opaque foundation. Without it, color can lose strength when the garment shows through the transfer.
2. Print onto PET film
Load the coated PET film according to the film manufacturer's instructions. The printer deposits the color image and white ink in the configured sequence, with the wet ink remaining on the film for the next stage. The film's release coating must accept ink while still allowing the cured transfer to leave the film cleanly.
Keep the film surface free from fingerprints and debris. Oils or dust can interfere with powder coverage and may later appear as transfer defects.
3. Apply powder and cure it
Apply TPU hot-melt adhesive powder while the ink is wet. The powder must cover the printed area, while excess powder should be removed before curing. The adhesive is what allows the printed image to bond to fabric when heat activates it.
Cure the film before transfer. Industry workflows commonly report curing around 300 to 325°F for 12 to 15 seconds during pressing, while some curing and transfer instructions use approximately 165°C and 15 to 20 seconds, as described in this direct-to-film process reference. Follow the specifications for the particular ink, powder, film, and equipment combination rather than treating one setting as universal.
4. Press and finish the garment
Cut the transfer if needed, place it accurately on a flat garment, and press it with the recommended temperature, time, and pressure. Film may be hot-peel or cold-peel, so the operator must know when to remove it. Peeling at the wrong moment can lift edges or disturb the image.
After peeling, inspect the surface and complete any recommended finishing press. The garment should cool before packaging, and the operator should record the settings used for repeat orders.
Equipment and Materials Behind a Reliable DTF Workflow
A dependable DTF line is not just a printer beside a heat press. It is four subsystems sharing one production target: a transfer that prints cleanly, bonds evenly, and repeats from one batch to the next.
The four-part equipment stack
The print subsystem includes a DTF-capable inkjet printer, a white-ink circulation or recirculation path, and RIP software. Printer configurations may use heads such as Epson i3200 or XP600, but the head alone doesn't determine output. The RIP controls color profiles, white choke, ink limiting, and queue behavior.
The film and ink subsystem combines coated PET film with pigment DTF ink. Film may be specified for hot peel or cold peel, and its release layer affects how cleanly the transfer separates. Ink has to remain compatible with the printer, film, and powder. This guide to DTF printer ink is useful when evaluating ink behavior and maintenance requirements.
The powder subsystem uses TPU or PA copolyamide hot-melt adhesive powder. A finer grade can support small details, while a coarser grade may provide stronger mechanical grip on heavier textiles. The operator still has to apply the powder evenly, because the correct material can't fix incomplete coverage.
The curing and pressing subsystem includes a curing oven or shaker-curer, powder recovery equipment where appropriate, and a heat press with an even platen. Uneven heat creates uneven activation, even when the printer produces a perfect image.
| Subsystem | Key Components | Failure If Cut |
|---|---|---|
| DTF printer, white-ink circulation, RIP software | Clogged heads, weak white, inconsistent color | |
| Film and ink | Coated PET film, compatible pigment ink | Poor release, color drift, unstable adhesion |
| Powder | TPU or PA hot-melt powder, shaker or application tray | Bare spots, rough texture, peeling edges |
| Cure and press | Oven, recovery system, even heat press | Under-cured adhesive, incomplete bonding, wash failures |
Corners usually get cut on consumables, ventilation, calibration, or the press. Those savings can create waste through failed transfers, reprints, clogged heads, and customer returns. The cheapest film or powder isn't automatically the lowest-cost choice if it forces the operator to slow down and troubleshoot every batch.
A reliable shop also separates clean handling from powder handling. Keep the printer and film-loading area free of loose adhesive, and make maintenance part of the shift instead of an emergency response after quality drops.
Shop Floor Best Practices for Consistent DTF Output
A new operator should be able to follow the DTF workflow without guessing. Post a checklist near the printer and heat press, then make each item part of the handoff between shifts.
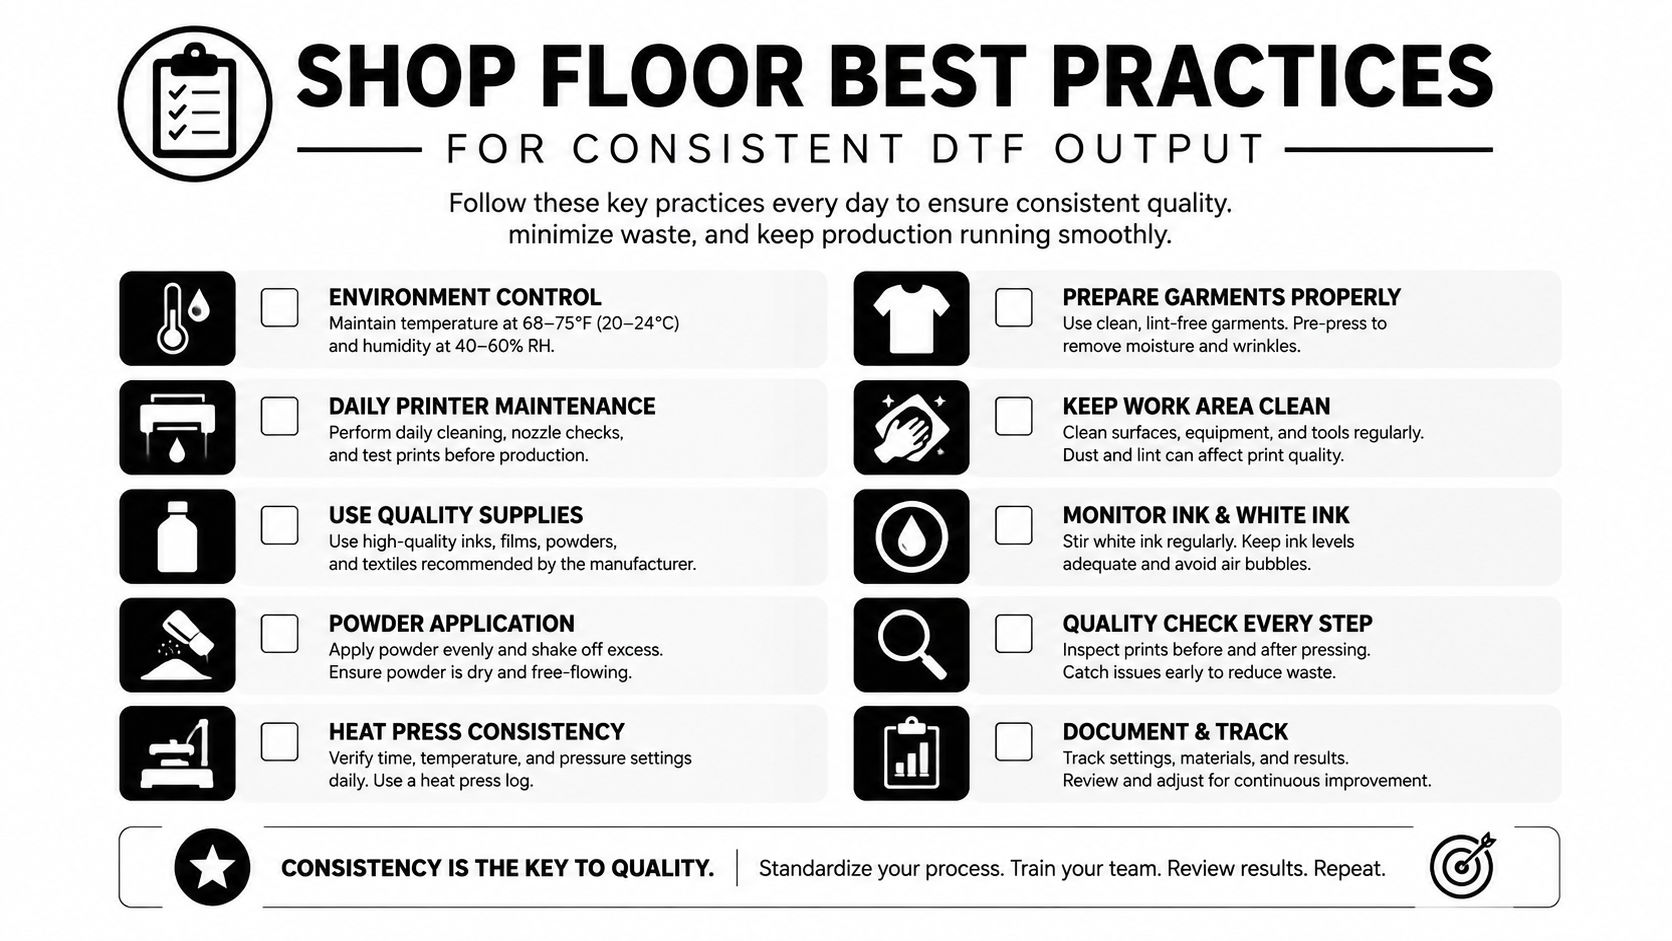
Before printing
- Check the artwork: Use a clean file at the shop's approved resolution, confirm the garment size, mirror the image, and verify that the white underbase is present where the garment requires it.
- Lock the RIP profile: Confirm the film and ink profile, white-ink settings, ink limits, and print direction. Don't change several settings at once because you'll lose track of the cause when the result changes.
- Inspect the film: Handle PET film by its edges. Finger oils, lint, and scratches can affect ink acceptance and powder coverage.
- Check the workspace: Keep humidity within the shop's validated operating range. Industry guidance commonly identifies 45% to 65% humidity as a useful working range for powder flow, as noted in this DTF heat press and production guide.
During powdering and curing
Shake or agitate powder containers before a run so the material flows consistently. Apply enough powder to cover the wet ink, then remove the excess without dragging it across the image.
Verify the curing surface temperature with an infrared thermometer or surface probe. A timer is only useful when the material reaches the required temperature, and a hot-looking film can still contain adhesive that hasn't melted evenly.
At the press
Flatten the garment and remove wrinkles before positioning the transfer. Confirm the design location, protect the press surface, and use consistent pressure. Record the actual temperature and dwell time rather than relying on the display alone.
Keep a small production log with the film lot, ink set, powder, temperature, pressure, and result. For repeat jobs, that record turns a successful batch into a repeatable recipe instead of a lucky outcome.
Quality Control and Troubleshooting Common DTF Problems
Treat each defect as evidence. The visible problem usually points backward to a particular stage, so the fastest operator doesn't guess at random. They inspect the transfer, identify when the defect first appeared, and change one variable at a time.
Read the defect before changing the settings
Cracking after washing often points to incomplete curing, insufficient pressing, or a weak bond between the powder and ink. Peeling at the edges can indicate incomplete powder coverage, contaminated film, or a pressing problem. Faded color may begin with clogged printheads, incorrect ink delivery, or an under-cured ink and adhesive layer.
White specks and rough texture commonly trace back to powder handling. Moisture can affect powder flow, while old or contaminated powder may fail to melt into a smooth layer. Start with humidity, powder condition, and coverage before assuming the printer needs replacement.
| Defect | Likely Stage | First Check |
|---|---|---|
| Cracking after washing | Curing or pressing | Confirm cure temperature, dwell, and pressure |
| Peeling edges | Powdering or transfer | Inspect coverage and film cleanliness |
| Faded colors | Printing or curing | Run a head check and review ink delivery |
| White specks | Powder handling | Check humidity, powder condition, and excess removal |
| Rough surface | Powdering or curing | Inspect powder layer and melt uniformity |
Use a short diagnostic rhythm
Inspect the printed transfer against a light box before pressing. Missing white ink, pinholes, streaks, or incomplete powder coverage are easier to correct on film than after the design has been bonded to a customer's garment.
Press a test swatch on scrap fabric before beginning a production order. Then wash-test one piece from a batch when the job requires durability validation. A small test costs less than discovering a process problem after packaging.
Operator habit: A 30-second inspection can prevent a reprint, but it can't rescue a transfer that has already been shipped.
Simple corrections include running a printhead clean, checking white-ink circulation, adjusting cure dwell, and rechecking humidity. Most recurring DTF failures are process failures before they're equipment failures. Replace a part only after the inspection trail points to the part.
Scaling DTF Production and Planning for Automation
Scaling DTF production starts with the station that limits completed orders, not with the largest printer available. A wide printer may produce film faster than one operator can powder, cure, inspect, and stage it for pressing. The extra film then forms a queue instead of increasing finished output.
Find the constraint first
Track the number of jobs each station completes during the same shift. Measure printing, powder application, curing, inspection, and heat pressing separately. If transfers pile up before curing, improve that stage before adding print capacity.
A small shop may gain more from a second operator, a better worktable, or a multi-tier drying rack than from a larger printer. A mid-volume operation may need a tunnel dryer or conveyor oven to maintain a consistent cure while the printer continues running.
Add automation in stages
Automated powder shakers can distribute adhesive more evenly and reduce repetitive handling. Reclaim systems collect excess powder for controlled reuse. Reuse only after confirming that the recovered material remains clean and that the process produces consistent results.
Bulk ink systems can help as volume grows, but they add plumbing, circulation, filtration, and maintenance requirements. White ink needs close attention because settled pigment can interrupt production when circulation and agitation are neglected.
Use production capacity planning for DTF to compare station output, staffing, and equipment utilization instead of judging capacity by printer width alone.
Labor belongs in the same calculation. Compare jobs per hour at each station with the cost of a second operator, overtime, reprints, and delayed fulfillment. If quality becomes unstable as volume rises, sourcing transfers may protect delivery performance better than rushing into automation.
New ink chemistry and software-assisted production may also affect future equipment choices. Industry coverage discusses UV-reactive and neon inks, eco-friendly water-based inks, and AI-driven calibration in connection with DTF's expected growth over 40% by the end of 2026, according to this 2026 industry discussion. Treat these developments as variables to test, not automatic upgrades.
In-House DTF Versus Sourcing Ready Made Transfers
The build-versus-buy decision depends on order flow, available labor, quality expectations, and how much operational complexity the shop wants to own. In-house production gives direct control over artwork timing and transfer inventory, but it also adds printer maintenance, powder handling, curing, testing, and consumable management.
Finished transfers remove much of that burden. The shop receives a ready-to-press product and concentrates on garment selection, placement, pressing, inspection, and fulfillment. That can make small or irregular orders easier to manage because equipment doesn't sit idle between jobs.
What in-house production requires
A single-printer station may include the printer, curing equipment, heat press, film, powder, ink, maintenance supplies, ventilation, and workspace. The owner-operator also supplies the labor, including file preparation, printer checks, powdering, curing, test pressing, cleanup, and troubleshooting.
In-house production becomes more attractive when transfer demand is steady enough to justify fixed costs and dedicated operating time. The decision should come from the shop's own order history, not a generic threshold copied from another business. Calculate the monthly transfer volume, the hours required per order, and the cost of rejected work.
What sourcing changes
Sourcing ready-made transfers reduces startup investment and makes per-unit pricing easier to forecast. It also avoids printer downtime and lets the shop test new artwork before committing to an entire production line.
For US-based apparel businesses, US-made transfers can simplify domestic fulfillment. Cobra DTF states that its transfers are made in the USA and offers same-day shipping for orders placed by 1 p.m. CST, with delivery within 1 to 3 days, as described in the company's information about ready-made DTF transfers. Those service terms can help a shop plan reorders and avoid customs uncertainty associated with overseas sourcing.
A hybrid approach often gives a new shop better information. Source transfers while validating demand, document which designs and sizes sell, then bring printing and powdering in-house when recurring volume justifies the equipment, space, maintenance, and labor. Keep sourcing available for overflow, unusual artwork, or periods when the in-house line is at capacity.
Putting the Direct to Film Printing Process to Work
Use this day-one checklist before accepting a customer order:
- Calibrate the RIP: Match the profile to the specific film and ink set.
- Run a test print: Print on inexpensive PET film and inspect color, white coverage, and registration.
- Verify powder coverage: Measure and record the shop's approved powder application method.
- Confirm curing: Check the actual surface temperature with a probe and validate the dwell time against the material specifications.
- Test the press: Transfer the design to scrap fabric before pressing a customer garment.
- Log the batch: Record humidity, temperature, film lot, powder, ink, press settings, and inspection results.
Follow a simple 30-day adoption path. During weeks one and two, run sample transfers on scrap garments and deliberately test light, dark, cotton, polyester, and blended fabrics. In week three, complete a small customer order with a written quality checklist and a retained sample.
By week four, make a decision based on observed demand and labor. Commit to in-house equipment if the shop can support the fixed costs and daily maintenance, or establish a relationship with a US-made transfer supplier and document turnaround expectations, reorder procedures, and quality requirements.
If you want to reduce equipment complexity while keeping your heat-press workflow moving, visit Cobra DTF to review ready-made DTF transfer options. Use the process checklist above to test transfers on your garments, record the results, and build a repeatable production standard before expanding.