
Your Guide to Custom Heat Transfers for Shirts
At its core, a custom heat transfer is like a high-tech, permanent sticker made specifically for fabric. It's a method that lets you take a pre-printed design and apply it to a shirt using heat and pressure. The result? Professional-looking custom apparel, but without the steep learning curve or messy setup of traditional screen printing.
What Are Custom Heat Transfers Anyway?
Imagine a heat transfer as the go-between for a digital design on your computer and a physical design on a t-shirt. It all starts with printing your artwork onto a special carrier material, which is usually a clear film or a type of paper.
You then place this printed carrier onto the garment and press it with a heat press. The heat and pressure work together to transfer the ink from the carrier directly into the fibers of the fabric. It's a simple idea that has become a cornerstone of the modern apparel industry, giving everyone from at-home creators to full-scale businesses a powerful tool.
The Rise of Personalized Apparel
People love unique clothing, and that demand has caused the custom apparel market to explode. The custom t-shirt printing market alone was valued at roughly USD 6.46 billion in 2024 and is expected to more than double, reaching USD 15.89 billion by 2033. Technologies like heat transfers are a huge reason why. They've made it possible for small businesses and individuals to jump in and meet this demand. You can explore more data on the custom t-shirt market and its projected growth.
The magic of a heat transfer is how it permanently bonds a design to fabric. Heat activates a special adhesive on the back of the print, while pressure pushes the ink deep into the material. This creates a finish that's not just sitting on top of the shirt, but is truly part of it.
Key Benefits of Heat Transfers
So why has this method caught on so quickly? The advantages are pretty clear, especially if you're just starting out or need to stay nimble.
- Versatility: You can press transfers onto a massive variety of fabrics. Cotton, polyester, blends, you name it. This flexibility opens up a world of creative possibilities.
- Cost-Effectiveness for Small Batches: Screen printing has expensive setup costs for each color. With transfers, those costs don't exist, making it the perfect choice for one-off designs or small runs.
- Full-Color, Detailed Graphics: This is where transfers really shine. They can reproduce incredibly complex, multi-color designs, photorealistic images, and fine details with amazing clarity.
One of the most popular types you'll hear about is heat transfer vinyl, which is fantastic for creating simple, bold graphics with a solid-color look. Think of this as your starting point for a journey into making some truly incredible custom shirts.
Choosing the Right Type of Heat Transfer
Stepping into the world of custom heat transfers can feel a bit overwhelming at first. There are so many options, and each one gives you a different look, feel, and level of durability on the final shirt. Picking the right one is the key to making sure the design in your head matches the shirt in your hands.
Think of it like picking the right tool for a job. You wouldn't use a sledgehammer to hang a picture frame, right? In the same way, the transfer you choose has to be the right match for your fabric, the complexity of your artwork, and how you want the finished product to feel.
Let's walk through the most common methods out there so you can figure out exactly what you need for your project. This quick decision tree is a great starting point, especially if you're trying to figure out if you need a solution for a small batch or a big run.
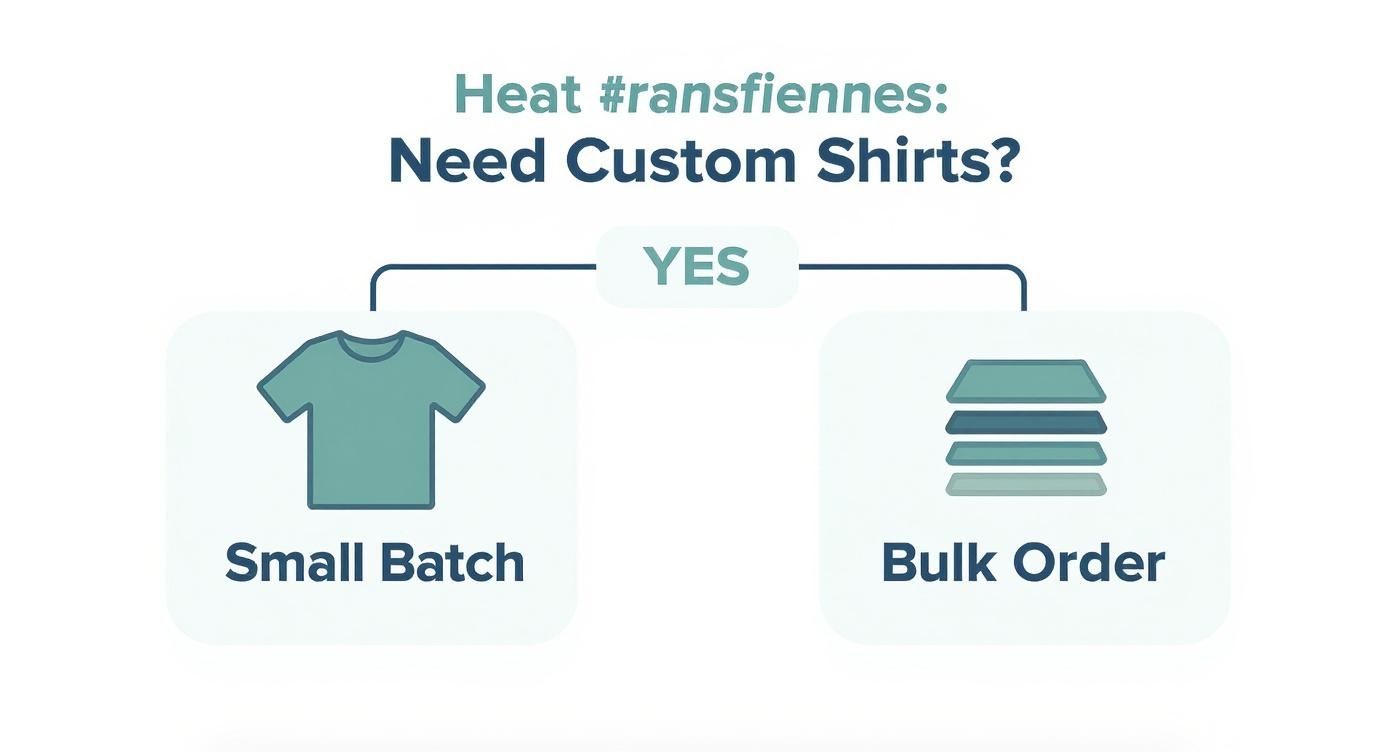
As you can see, one of the first questions to ask is how many shirts you're making. Your order size is a huge factor in what technology makes the most sense.
The Rise of Direct-to-Film (DTF) Transfers
Right now, Direct-to-Film (DTF) is the undisputed king of the custom apparel world. It’s pretty straightforward: a special printer puts your design onto a clear film, and you simply heat-press that film onto the garment. What you get is a stunningly vibrant, soft, and stretchy graphic that feels like it’s part of the fabric, not just sitting on top of it.
The real magic of DTF is its incredible versatility. It just works. You can press it onto almost anything, including:
- 100% Cotton: The go-to for classic t-shirts.
- Polyester: Awesome for athletic and performance gear.
- Blends (50/50, Tri-blends): Handles modern, popular fabrics with ease.
- Specialty Materials: You can even use it on tough stuff like leather, denim, and canvas.
This "press-on-anything" capability has made DTF the new standard for most custom apparel creators. In fact, industry forecasts predict DTF will make up over 90% of all heat transfer sales by 2026, which really shows you where things are headed.
Comparing Other Popular Transfer Types
Even with DTF leading the pack, other methods are still fantastic for certain jobs. Knowing their pros and cons will help you build a complete toolkit of options.
Choosing a heat transfer isn't just about the design; it's about the feel, durability, and fabric compatibility. The right choice ensures your apparel is not only beautiful but also comfortable and long-lasting.
Here’s a quick rundown of some popular alternatives to help you compare:
Comparing Popular Heat Transfer Methods
Use this side-by-side comparison to quickly decide which heat transfer type is the best fit for your specific apparel project.
| Transfer Type | Best For | Feel on Shirt | Durability | Color Capability |
|---|---|---|---|---|
| Direct-to-Film (DTF) | Versatile projects, full-color designs, all fabric types | Soft, stretchy, lightweight | Excellent, lasts 50+ washes | Unlimited colors, gradients |
| Heat Transfer Vinyl (HTV) | Simple, bold graphics (names, numbers), small runs | Thicker, slightly raised layer | Very high, great for jerseys | Limited to solid colors |
| Screen Printed (Plastisol) | Large bulk orders (50+), limited color designs | Classic screen print feel | Excellent, industry standard | Limited, best for 1-4 colors |
| Sublimation | All-over prints, photorealistic images | Zero feel, dyes the fabric | Permanent, will not crack/fade | Unlimited, but only on white/light polyester |
Each of these methods has a sweet spot. DTF is your all-around workhorse, while HTV, screen printed transfers, and sublimation are specialists that shine in specific situations.
Here’s a little more detail on what makes them tick:
Heat Transfer Vinyl (HTV)
You've probably heard of this as "iron-on vinyl." HTV is perfect for simple, bold graphics like names on the back of jerseys or single-color company logos. It comes in pre-colored sheets that you cut with a vinyl plotter and then press onto the shirt. It has a distinct, slightly raised feel and is incredibly durable, which is why it's a favorite for team sports apparel.
Screen Printed (Plastisol) Transfers
Think of this as screen printing, but on paper instead of directly on a shirt. Plastisol ink is printed onto special release paper, and that design is then heat-applied. This is your best bet for large orders—we’re talking 50+ shirts—with just a few colors. It delivers that classic screen-printed look and feel while being more cost-effective in bulk.
Sublimation Transfers
Sublimation is a totally different beast. Under heat, the solid ink turns directly into a gas and permanently dyes the fibers of the fabric. The result is a design with absolutely zero feel that will never, ever crack or fade. The big catch? It only works on light-colored, 100% polyester fabrics.
All of these methods use some kind of carrier, whether it's a film or a special paper, to get the design from the printer to the shirt. To get a better handle on how that core component works, check out our guide on what is transfer paper. Understanding that piece of the puzzle is fundamental to getting great results every time.
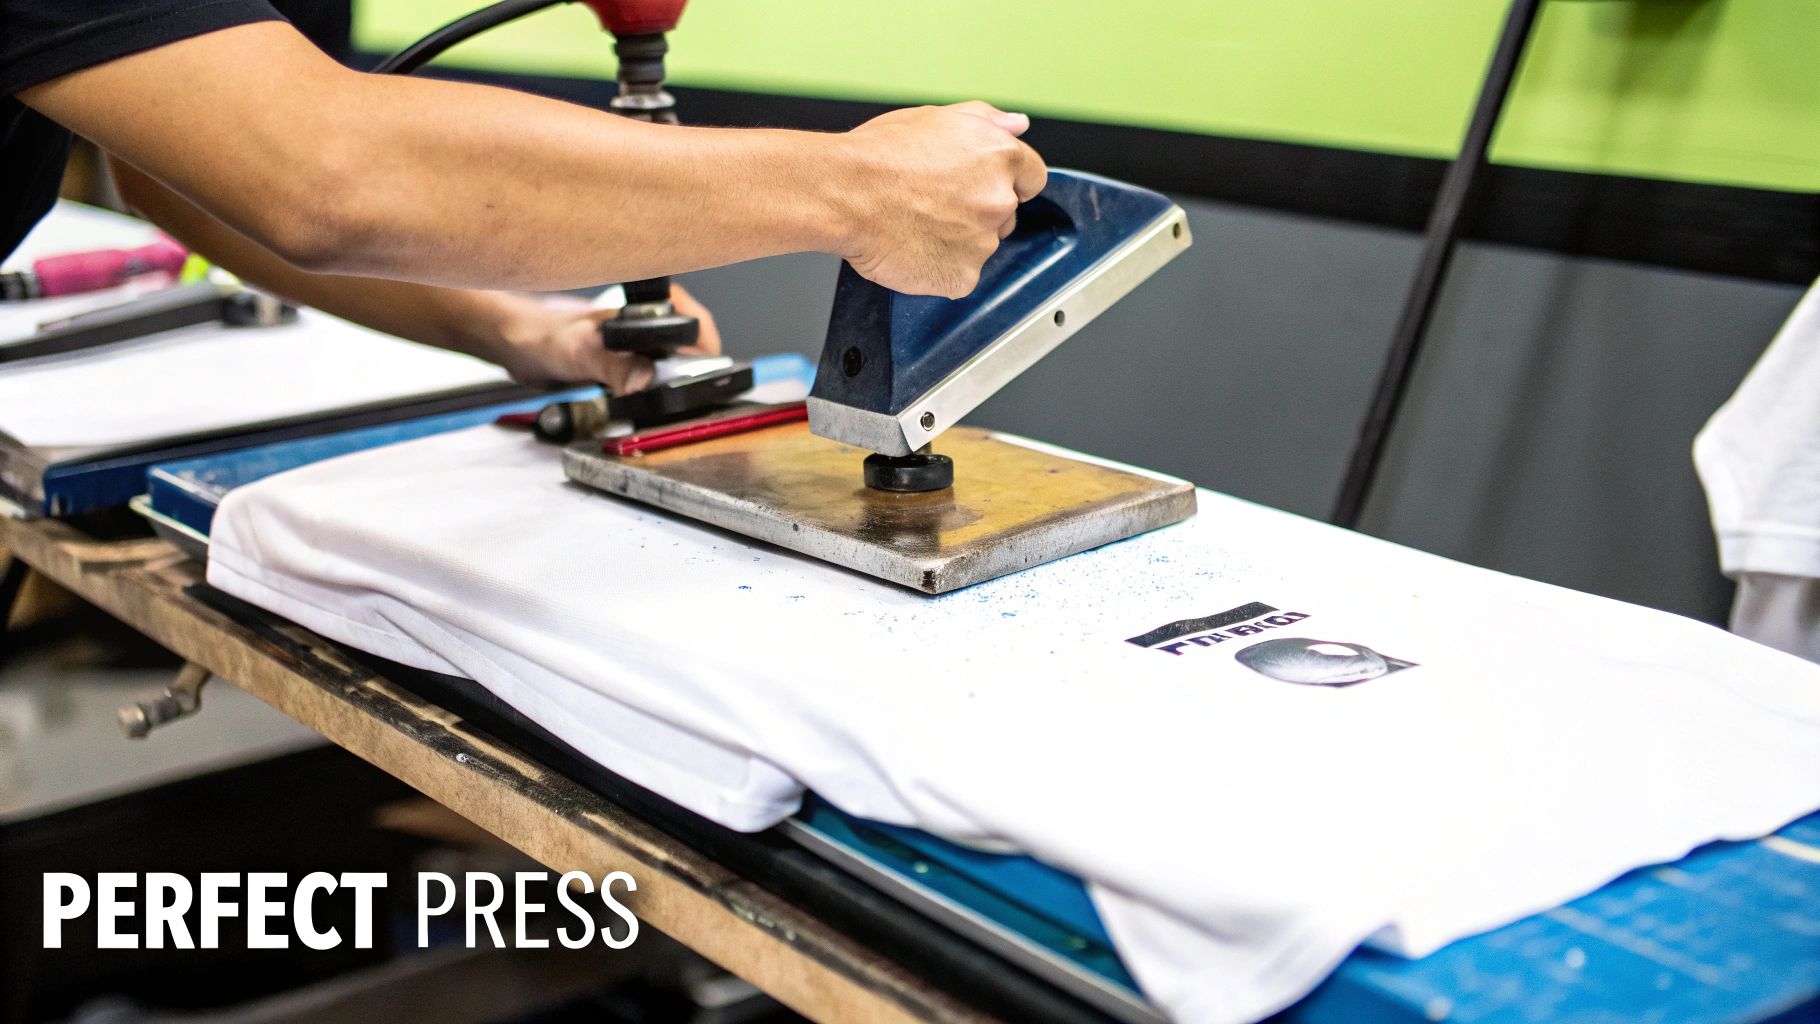
Your Step-by-Step Heat Press Application Guide
Alright, you've got your transfer picked out and a blank shirt waiting. Now for the fun part: making your design a reality. Getting a professional, long-lasting print that looks great wash after wash all comes down to a consistent application process.
This guide breaks everything down into simple, easy-to-follow stages. If you master these steps, from prep to the final peel, you’ll sidestep common headaches like cracked and peeling designs later on.
Step 1: Prepare Your Workspace and Garment
First things first, get your heat press dialed in. Set it to the exact temperature and time your transfer supplier recommends. These settings can be wildly different depending on the transfer type (DTF, plastisol, etc.), so don't guess—always check the instructions.
While the press is heating up, get your shirt ready. The single most important thing you can do here is the pre-press. Just lay the shirt on the press and clamp it down for about 5-10 seconds. This little step is a game-changer. It zaps any moisture hiding in the fabric and flattens out every last wrinkle, both of which can ruin your transfer's bond.
Step 2: Position and Press Your Transfer
With the shirt pre-pressed and still warm, it’s time to get your design lined up. Carefully place the heat transfer onto the garment, design-side down. I highly recommend using a t-shirt alignment tool or at least a ruler to make sure it's perfectly straight and centered.
Once you’re happy with the placement, cover the transfer with a protective layer like a Teflon sheet or some parchment paper. This creates a barrier between the hot metal plate of the press and your transfer film.
Now, close the press and lock it. The key here is firm, even pressure for the specified time. It’s this trifecta of heat, pressure, and time that melts the adhesive and permanently fuses the ink into the fabric. If you want to get into the nitty-gritty, our complete guide to heat transfer shirt printing breaks down the science behind it all.
Step 3: Master the Art of the Peel
This is the moment of truth. How you remove that clear carrier film—the peel—is just as crucial as the press itself. There are three ways to do it, and using the wrong one can tear your design right off the shirt.
- Hot Peel: You rip the film off immediately after the press opens, while it's still piping hot. This is pretty common for newer DTF and many screen printed transfers.
- Warm Peel: You wait just a few seconds (5-10 is typical) for things to cool down a bit before peeling. It’s a nice middle ground that works perfectly for certain types of transfers.
- Cold Peel: You have to wait for the shirt and transfer to cool completely to room temperature. Don't touch it until then! This is mandatory for specialty transfers, especially those with glossy or metallic effects.
Always follow the instructions that came with your transfers. Trying to hot-peel a transfer that's meant to be a cold peel is a surefire way to pull the whole design off, wasting your time, your shirt, and your transfer.
Once the film is off, a lot of pros (myself included) do a quick post-press for another 2-5 seconds, with the protective sheet placed back over the bare design. This final press helps to really lock the ink into the fabric, which boosts durability and gives the print a much softer feel. Follow these steps, and you'll be knocking out flawless applications every single time.
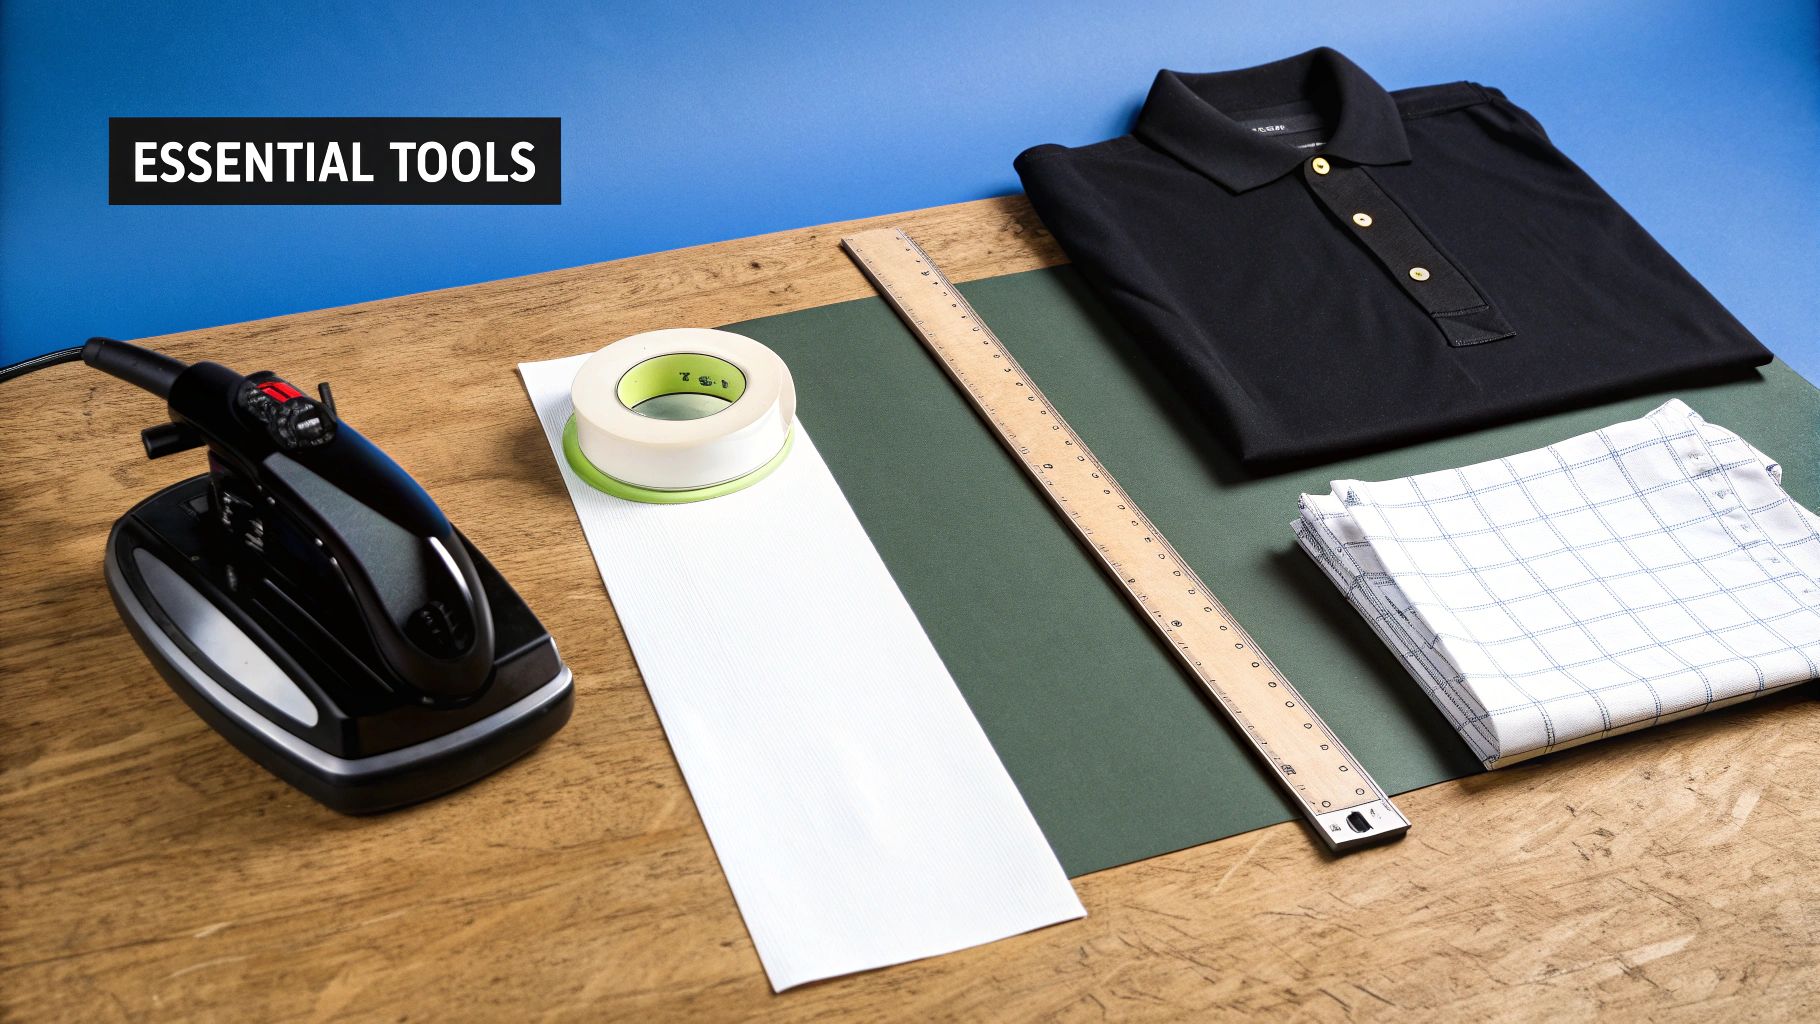
The Tools You Need for a Professional Finish
Let's be honest: the right equipment is what separates a DIY hobby from a professional business that churns out incredible, sellable products. While your custom heat transfers are the star of the show, the tools you use to apply them are what guarantee that flawless, durable finish customers expect.
Here's a breakdown of the must-have gear.
The single most important piece of equipment you'll buy is a heat press. I can't stress this enough. A standard home iron just won't cut it—it simply can't provide the consistent, even pressure and stable temperature needed for the transfer's adhesive to properly fuse with the fabric fibers.
If you use an iron, you're setting yourself up for peeling, cracking, and ultimately, unhappy customers. A quality heat press isn't just a recommendation; it's non-negotiable for professional work.
Choosing the Right Heat Press
Heat presses aren't a one-size-fits-all deal. The main difference comes down to how the top platen—the part that gets hot—opens and closes. Knowing the different types will help you pick the perfect one for your space and how you like to work.
- Clamshell Press: This is the style most people start with. The top platen is hinged at the back and lifts up like, you guessed it, a clamshell. They're great because they don't take up much room, but placing transfers on thick garments like hoodies can be a little awkward since your hands are close to the heat source.
- Swing-Away Press: With this design, the heated platen swings out horizontally, completely away from the bottom plate. This gives you a wide-open, unobstructed view of your shirt, making it super easy to line up your design perfectly. The trade-off? They need a lot more table space to operate.
- Drawer Press: A smart hybrid of the two. The bottom platen slides out towards you like a drawer. You can lay out your garment and transfer safely away from the heat, then slide it back in to press. It combines the safety of a swing-away with a more compact footprint.
Think of your heat press as the engine of your apparel business. A reliable machine that delivers even heat and consistent pressure is the single best investment you can make for producing high-quality products that stand the test of time.
My Go-To Application Accessories
Besides the press itself, a few other inexpensive tools make a huge difference. They’ll streamline your workflow, protect your gear, and ensure every single shirt comes out perfect.
Teflon Sheet: This is a reusable, non-stick sheet you place over your transfer before pressing. It’s a lifesaver. It keeps any stray ink from getting on your heat platen and protects the garment from scorching. Don’t press without one.
Heat-Resistant Tape: This isn't your average office tape. It’s designed to handle high temperatures without melting or leaving behind a gunky residue. Use a couple of small pieces to lock your transfer in place on the shirt so it doesn't budge when you close the press.
Alignment Tools: Consistency is king in this business. Something as simple as a t-shirt placement ruler or as sophisticated as a laser alignment system ensures your designs are perfectly centered and straight every time. This is one of those small details that scream "professional."
Common Mistakes and How to Avoid Them
Even the highest-quality custom heat transfers for shirts can fail if they aren't applied correctly. Honestly, learning from the common pitfalls is the fastest way to save yourself time, money, and a pile of ruined garments. Let's walk through the frequent errors I see beginners make and talk about simple, actionable ways to get it right.
I like to think of the application process like baking a cake. If your oven temperature is off or you pull it out too soon, you know it's not going to turn out right. The same logic applies here—precision is everything.
Getting Temperature and Pressure Wrong
One of the first hurdles people run into is simply using the wrong heat press settings. Every single type of transfer has a specific recipe of temperature, pressure, and time needed for a perfect bond. Guessing or using a "one-size-fits-all" approach is just asking for trouble.
- Symptom of Low Temperature: The transfer looks amazing right after pressing, but it starts peeling off after just one or two washes. This happens because the adhesive never fully melted to properly grab onto the fabric fibers.
- Sympt-om of High Temperature: You'll see a design that looks scorched, melted, or discolored. The intense heat can also burn the fabric itself, leaving a shiny or faded box around your transfer.
The solution couldn't be simpler: always follow the manufacturer’s instructions. Reputable suppliers give you the exact settings for their products. Write them down and keep them near your press until you know them by heart.
Your heat press settings aren't suggestions; they are requirements. A difference of just 10 degrees or a few seconds can be the difference between a shirt that lasts for years and one that peels after the first wash.
Uneven Pressure Application
Another sneaky reason for peeling transfers is uneven pressure. This is a huge problem if you're trying to use a home iron, which just can't distribute firm, consistent pressure across the whole design. But even with a professional heat press, you can still run into trouble.
Think about it—thick seams, collars, zippers, or buttons can prevent the top platen from making full, even contact with the transfer. This means some parts of your design get pressed perfectly while others barely get any pressure at all, creating weak spots that will inevitably lift and peel.
The Fix:
- Avoid Pressing Over Obstructions: Try to arrange the shirt on your press so that bulky seams and collars hang off the edge of the lower platen.
- Use a Heat Press Pillow: These foam-filled, heat-resistant pillows are a total game-changer. You just slip one inside the shirt, which raises the print area above any seams. This guarantees the platen makes direct, even contact with your transfer, every single time.
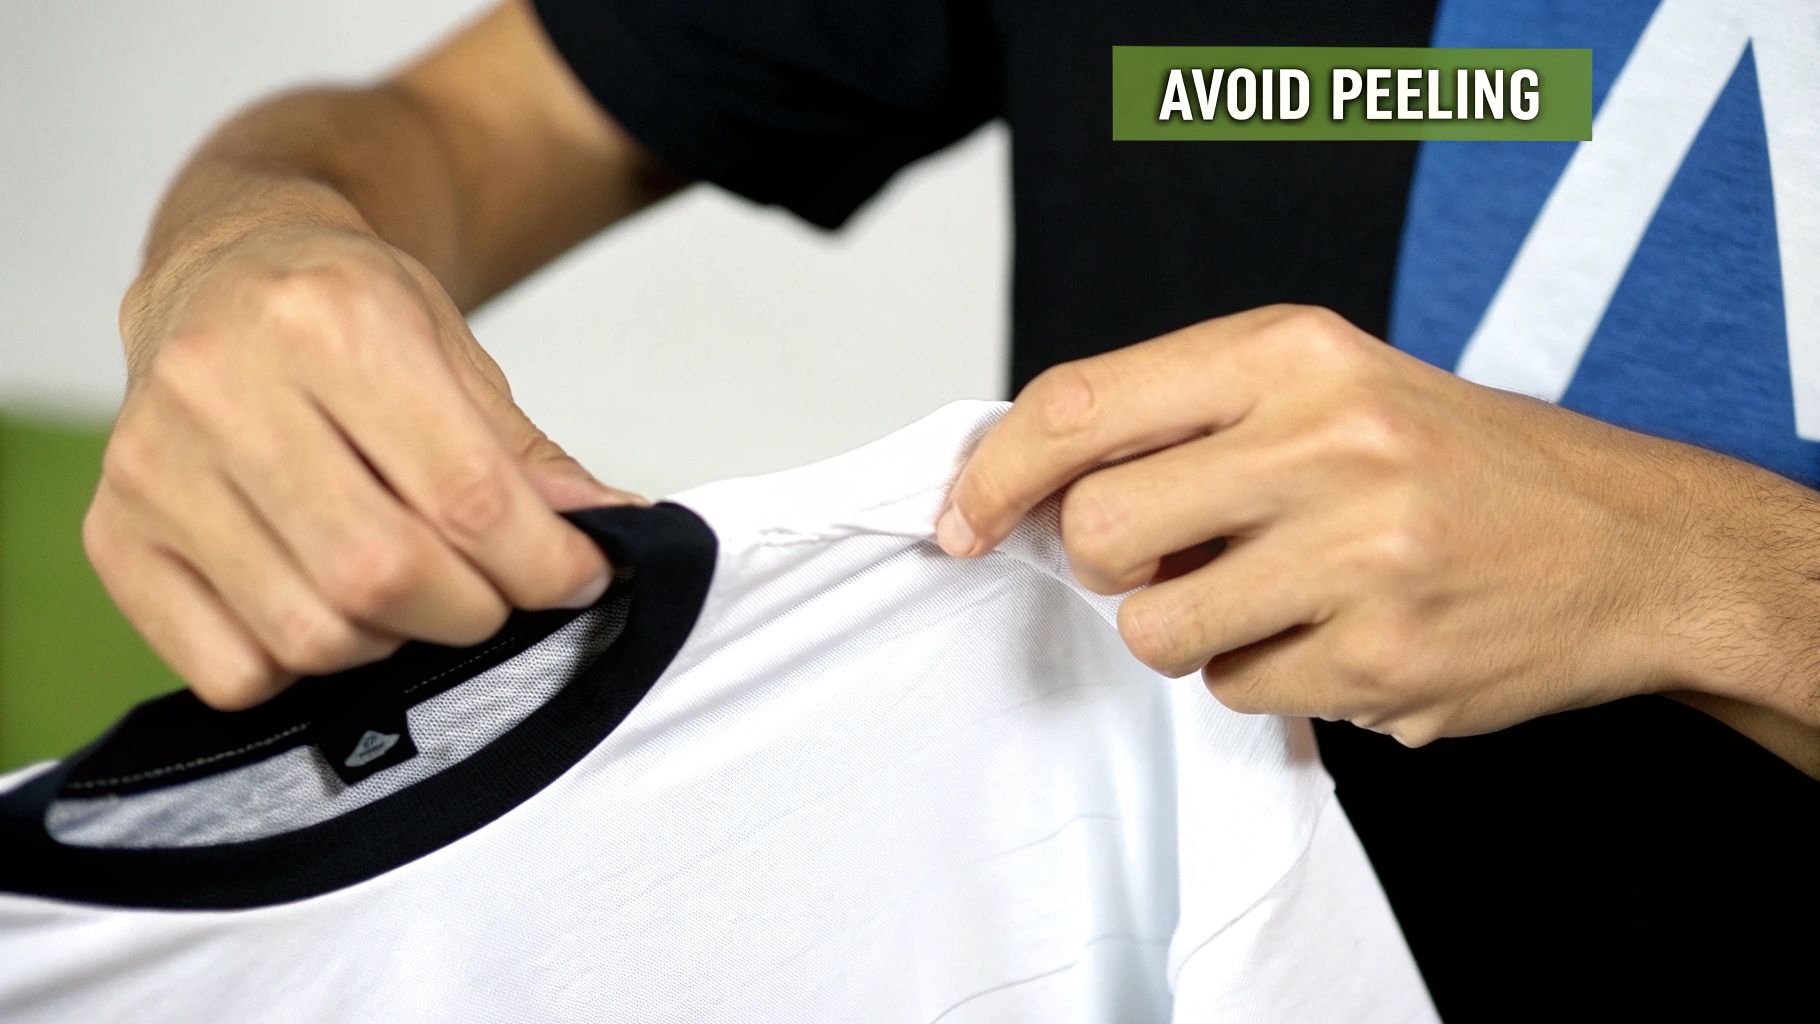
Peeling the Carrier Sheet Incorrectly
And now for the grand finale—the peel. This final step can literally make or break your shirt. Transfers are specifically designed to be either hot, warm, or cold peel. Peeling at the wrong time completely messes up the bonding process and can pull the entire design right off the garment.
For example, if you try to peel a cold-peel transfer while it's still hot, the adhesive hasn't had a chance to cool and set. The ink will just stick to the carrier film instead of the shirt. It’s a super frustrating mistake that is 100% avoidable by just taking a moment to read and follow the instructions that came with your custom heat transfers.
Got Questions? We've Got Answers
Stepping into the world of custom heat transfers for shirts can feel a bit overwhelming at first. To help clear things up, here are some straight-shooting answers to the questions we get asked most often by creators just like you.
How Long Do Custom Heat Transfers Last on Shirts?
This is the big one, right? The durability of a heat transfer really boils down to two things: the quality of the transfer itself and how well you apply it.
When you're working with professional-grade transfers, like the ones made with Direct-to-Film (DTF) or screen printing, you're getting something built to take a beating. If you press them correctly with a good heat press, these designs can easily handle 50 or more washes without cracking, peeling, or fading. Honestly, a well-made transfer will often outlive the shirt it's printed on.
A little pro-tip for care: always tell your customers to wash the shirt inside out in cold water and tumble dry on low. That's the secret to making it last.
Can I Use a Home Iron for Heat Transfers?
Look, while you technically can use a home iron for some craft-store vinyl, we strongly advise against it for any project you want to last. A regular iron just can’t provide the two things that are non-negotiable for a permanent transfer: consistent heat and even pressure.
Those hot and cold spots on an iron are the main reason why designs start to lift and peel after just one or two washes. If you’re serious about making quality shirts you can actually sell or wear proudly for years, a heat press isn't a luxury—it's a must-have tool.
What Is the Difference Between DTF and DTG?
This is a great question. Both Direct-to-Film (DTF) and Direct-to-Garment (DTG) are fantastic digital printing methods, but they get the ink onto the shirt in very different ways.
-
Think of Direct-to-Garment (DTG) like your desktop inkjet printer, but for fabric. The machine sprays water-based ink directly onto the shirt, which soaks into the fibers. This gives it a super soft feel, but it works best on 100% cotton.
-
Direct-to-Film (DTF) is a two-step dance. First, the design is printed onto a special film, and then you use a heat press to transfer that entire design from the film to the garment. This simple difference makes DTF incredibly versatile. It sticks to almost anything—cotton, polyester, blends, nylon, even leather!
The bottom line is all about flexibility. DTG is a solid choice if you're only printing on cotton t-shirts. But DTF's superpower is its ability to work with virtually any fabric, making it the clear winner for anyone needing to print on a variety of apparel.
Where Can I Order Custom Heat Transfers?
It’s easier than ever. These days, you can order professional-quality custom transfers from specialized online suppliers. The whole process is designed to be simple: you just upload your design file, pick the type of transfer you want (like DTF), and tell them the size and how many you need.
A few days later, a roll or stack of ready-to-press transfers shows up at your door. This model is perfect for small brands, side hustles, and creators because it gives you access to top-tier printing technology without the massive upfront cost of buying the equipment yourself. Just search for "custom DTF transfers," and you'll find plenty of great companies ready to get your project started.
Ready to see the difference for yourself and create some killer custom shirts? At Cobra DTF, we specialize in top-tier, American-made DTF transfers that are incredibly vibrant, soft to the touch, and made to last. Get your next project going with fast, reliable shipping. Check out our custom DTF transfers.