
What Does DTF Transfer Mean A Complete Creator's Guide
At its core, a Direct-to-Film (DTF) transfer is a modern way to get a full-color design onto fabric. We print your design onto a special film, and you then apply it to the garment using a heat press.
Think of it as a high-end, custom-printed graphic for clothing. The result is a print that feels remarkably soft, stretches with the fabric, and holds up wash after wash. It’s the technology that makes vibrant, super-detailed designs on a massive range of materials not just possible, but easy.
Your Quick Guide to Understanding DTF Transfers
So, what does this actually mean for you and your projects? It means you're using a system where three key elements come together to create a durable, beautiful print. The big difference with DTF is that we build the design on a carrier film first, not directly on the shirt. This small step is the secret to its versatility and power.
The whole process feels a bit like making a high-quality temporary tattoo, but for fabric. We print the design onto the film, apply a special adhesive powder, and then you use heat to permanently bond it to your item.
The Three Key Components of DTF
To really get a feel for how DTF works, you just need to know about its three main ingredients:
-
PET Film: This isn't your average sheet of plastic. It's a specialized Polyethylene Terephthalate (PET) film with a coating that’s engineered to hold the ink perfectly and then release the design cleanly under heat. It’s the temporary home for your graphic, carrying it from our printer to your heat press.
-
DTF Inks: These are specially formulated pigment inks designed for brilliance and durability. The most important color here is white. We print a base layer of white ink first, which is what allows your colorful designs to look bright and opaque even on a black t-shirt—a common headache with other printing methods.
-
Adhesive Powder: This fine powder is the unsung hero of the whole operation. Once the design is printed onto the film, this powder is spread over the wet ink. When it's heated, it melts and transforms into a strong adhesive layer that fuses the ink right into the fabric's fibers during the final press.
Key Takeaway: The magic trio of film, ink, and adhesive powder is what gives DTF its incredible flexibility. It’s why these transfers can stick to just about anything—cotton, polyester, leather, nylon, you name it—often without any special pre-treatment.
This simple but effective process makes DTF a go-to choice for apparel decorators, small businesses, and brands.
To make things even clearer, here’s a quick summary of what makes DTF transfers stand out.
DTF Transfer At a Glance
| Feature | Description |
|---|---|
| Material Versatility | Works on cotton, polyester, blends, leather, nylon, and more. |
| Color Vibrancy | Achieves full-color, photorealistic prints with an opaque white base. |
| Durability | Resists cracking, peeling, and fading for 50+ washes. |
| Print Feel | Softer and more flexible than traditional heat transfer vinyl (HTV). |
In short, DTF combines the best of all worlds: brilliant color, a soft feel, and the ability to work with almost any fabric you can throw at it.
From Digital File to Physical Print: How a DTF Transfer Is Made
Ever wonder how a design on a computer screen becomes a vibrant, press-on graphic? It’s a pretty neat journey that takes a digital file and turns it into a tangible, ready-to-use transfer. It all starts with a good quality digital file—think a high-resolution PNG with a transparent background or a vector file—which is basically the blueprint for the print.
From there, a specialized DTF printer takes over. This isn't your average desktop printer; it's a purpose-built machine designed to work with specific inks and films to get the job done right.
Step 1: Printing the Color and White Ink Layers
First things first, the printer lays down all the colors of your design directly onto a sheet of PET (polyethylene terephthalate) film. This is where your artwork’s reds, blues, and every shade in between appear. Right after that color pass, the printer lays down a layer of brilliant white ink directly on top, perfectly aligned with the design.
This white layer is the magic ingredient in the DTF recipe. It does two critical things:
- It creates a solid, opaque base so the colors pop on any fabric, especially dark ones.
- It gives the adhesive powder something to grab onto in the next step.
Without that white underbase, a colorful design on a black t-shirt would look muddy and washed out. If you want to get into the nitty-gritty of the machinery and a full breakdown, you can learn more about the complete DTF printing process in our detailed guide.
Step 2: Applying and Curing the Adhesive Powder
While the ink is still wet, the printed film gets a generous dusting of a fine, granulated thermoplastic adhesive powder. Think of it like superfine sugar. The powder sticks only to the inked parts of the design, and any excess is shaken off, leaving a clean, precise coating.
Next, the powdered film is sent through a curing oven. The heat melts the powder, fusing it with the ink and turning it into a smooth, flexible adhesive backing.
Why Curing Matters: This step is absolutely crucial. Proper curing locks everything together, making the transfer stable and ready for pressing (or shipping). If it’s under-cured, the design won’t stick well to the shirt. Over-cure it, and it might not release from the film cleanly during application.
The process really comes down to three core components working in perfect harmony.
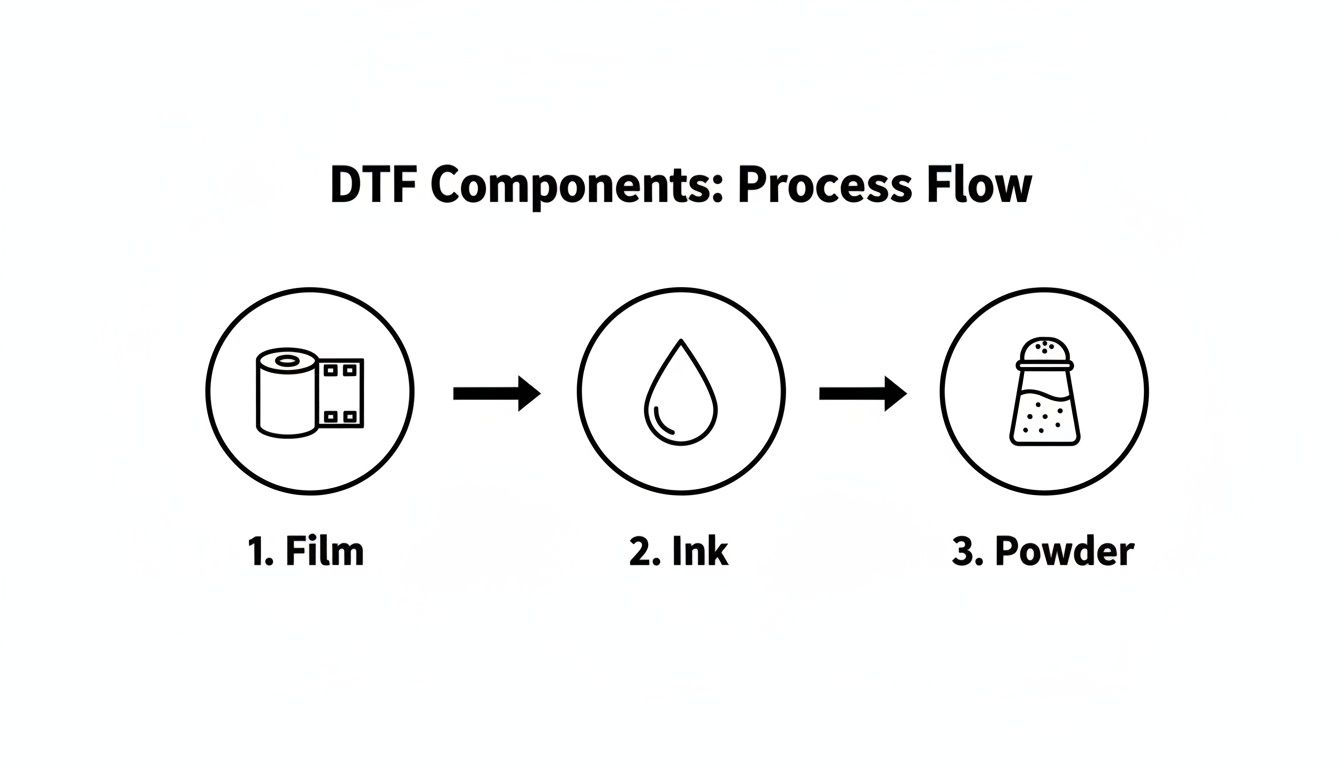
This simple visual shows how the film, ink, and powder combine to create the finished product.
Once it’s cured, the transfer is officially complete. You’re left with a self-contained graphic on a clear carrier sheet, ready to be heat-pressed onto just about anything—a t-shirt, a hoodie, a hat, you name it.
A Step-by-Step Guide to Applying Your DTF Transfer
Alright, this is the fun part—actually bringing your design to life. Applying a DTF transfer is pretty simple once you get the hang of it, but nailing it every time comes down to getting a few key details right. Follow these steps, and you’ll end up with a professional, long-lasting print that feels amazing on the shirt.
We'll walk through everything from prepping your garment to that final press that locks the design in for good.
Prepping Your Garment and Press
Before you even touch that transfer, you need to get your canvas ready. Fabrics, especially cotton, hold more moisture than you’d think. If you don't get that moisture out, it turns to steam under the press and can ruin the adhesive's bond, leading to a failed transfer. It’s a classic rookie mistake.
To avoid this, always do a pre-press. Just lay your garment on the heat press and press it for 5-10 seconds at your application temperature. This quick step steams out the moisture and flattens any wrinkles, giving you a perfect, smooth surface to work with.
With the garment ready, let's dial in the heat press settings. The right temperature and pressure are what create that permanent bond with the fabric.
- Temperature: Aim for a range between 300-320°F (149-160°C).
- Pressure: You’ll want medium to firm pressure. Think of it as enough force to embed the adhesive into the fabric without completely crushing the fibers.
- Time: Get ready for a press time of 10-15 seconds.
These are solid settings for most common fabrics, but they can vary. For a full breakdown, check out our detailed DTF press instructions for various fabrics.
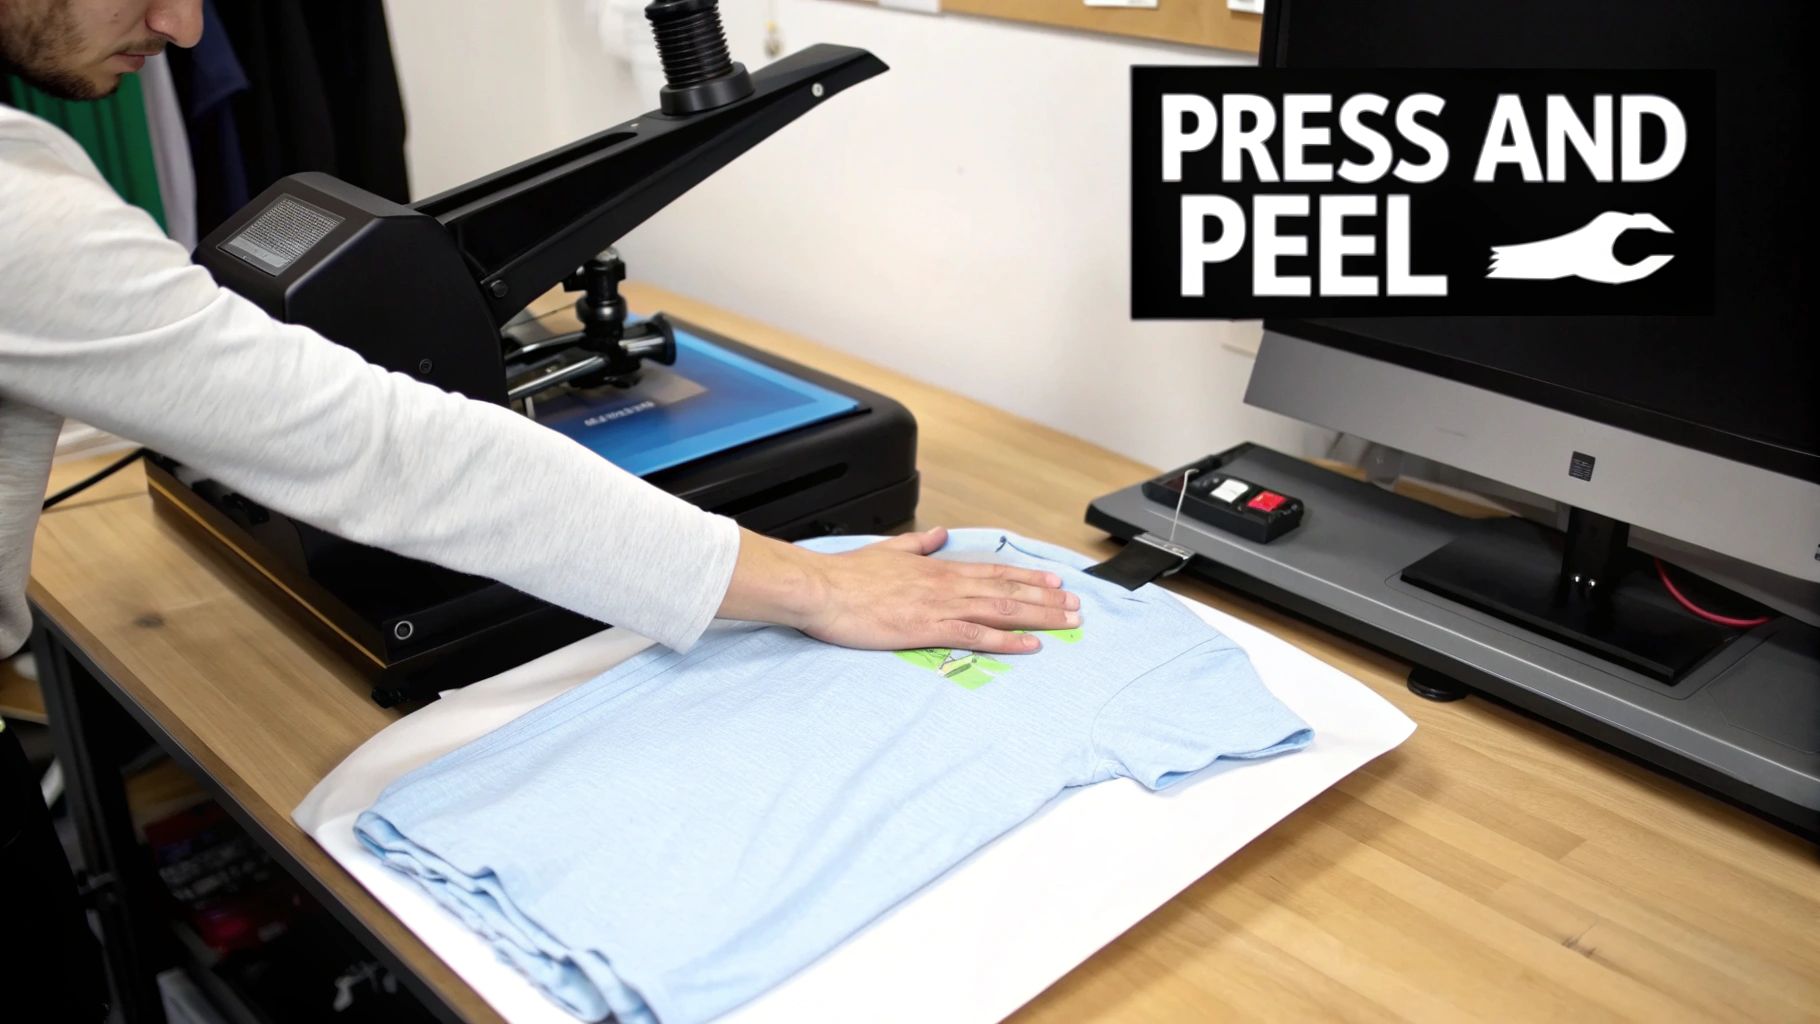
Pressing and Peeling Your Transfer
Once your press is hot and the garment is prepped, it's time to place the transfer. The film is clear, which makes lining up your design exactly where you want it incredibly easy. To protect both your press and the transfer, it’s a good idea to lay a Teflon sheet or a piece of parchment paper over the top.
Now, press it for 10-15 seconds. When the timer beeps, open the press.
Patience is Key: The single most important part of this process is the cold peel. I can't stress this enough—do not try to peel the film off while it’s hot. Let the garment cool down completely until it's cool to the touch. If you get impatient and peel it hot, you risk pulling up parts of your design with the film.
When it's fully cooled, find a corner and start peeling the film back. Keep it low and pull slowly and smoothly. You'll see the design stay perfectly on the fabric.
For a professional finish and maximum durability, do one last final press. Cover the design with your Teflon sheet again and press for just 5-7 seconds. This final touch helps fuse the ink into the fabric fibers, giving it that soft-hand feel and ensuring it holds up wash after wash.
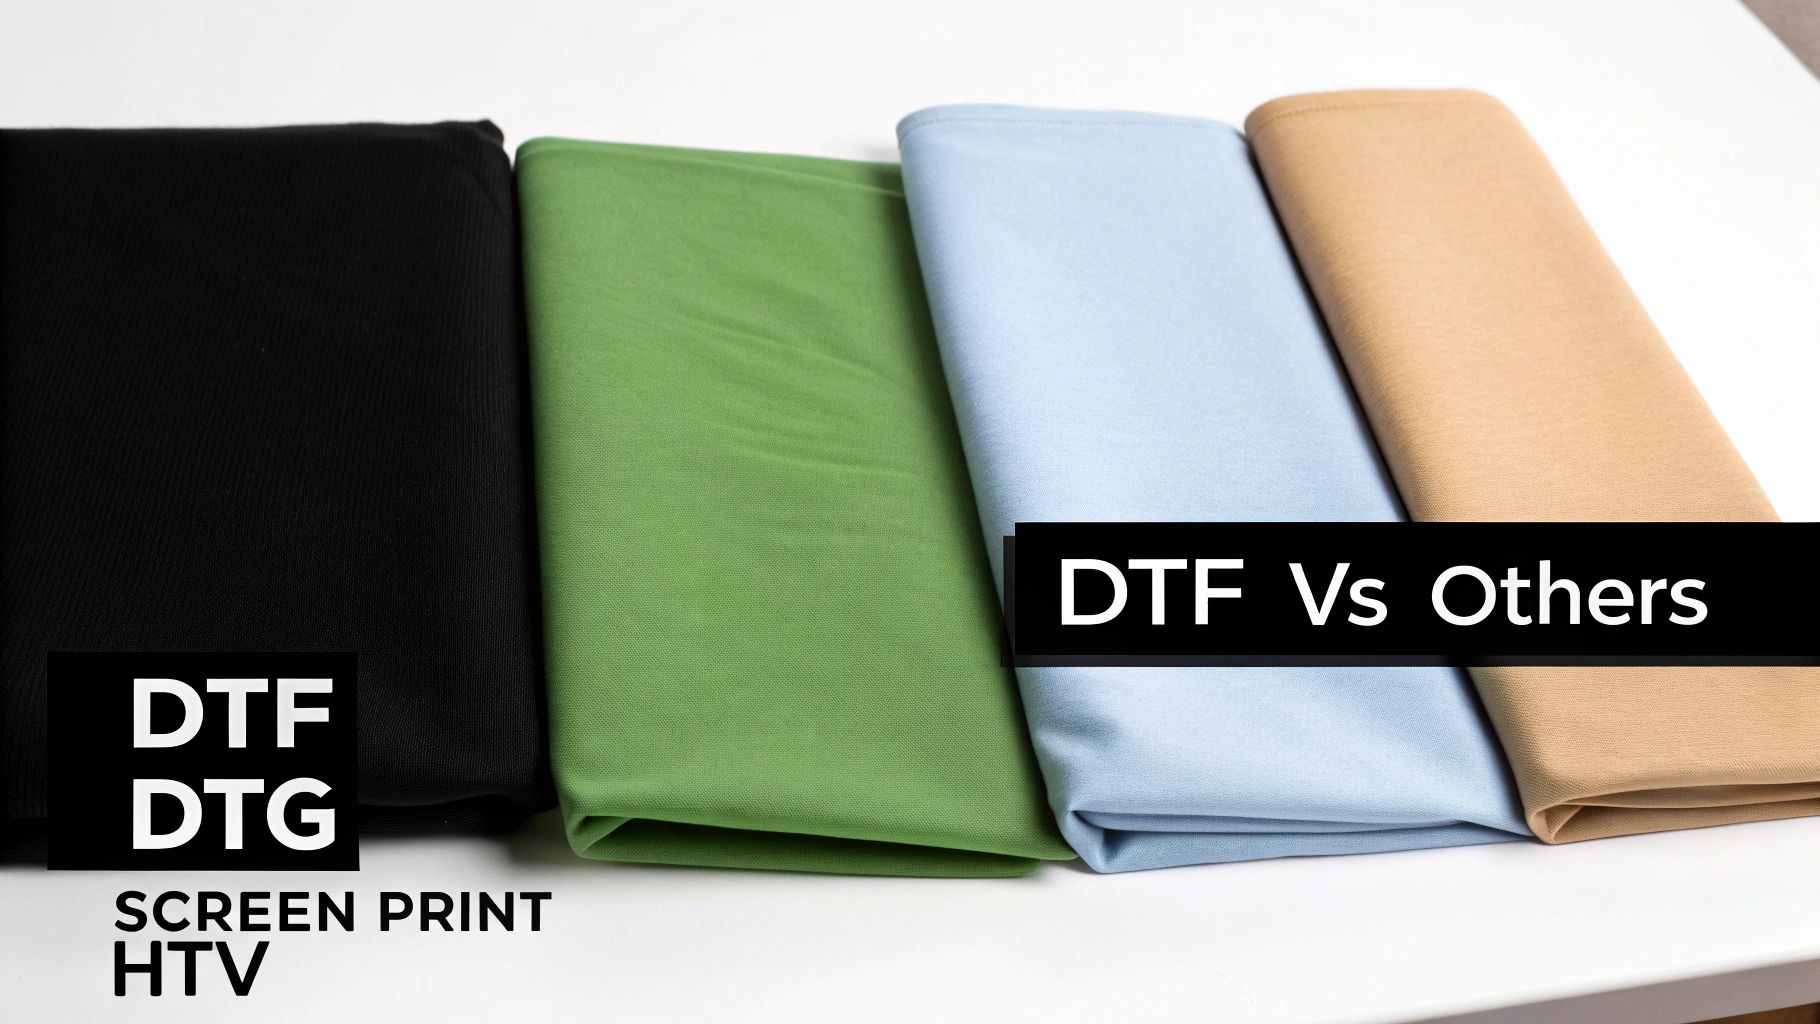
How DTF Compares To Other Printing Methods
If you’ve been in the custom apparel game for a while, you know there are a few tried-and-true ways to get a design onto a shirt. To really get what DTF is all about, you have to see how it stacks up against the old guards of printing. Each method has its own personality, its own strengths and quirks.
Choosing the right one really boils down to your specific project—what fabric are you using? How complex is the design? And how many pieces are you making? Let's put DTF side-by-side with the main players to see where it really shines.
DTF vs Direct To Garment (DTG)
Think of Direct-to-Garment (DTG) printing as a sophisticated inkjet printer designed just for fabric. It sprays water-based inks that soak right into the cotton fibers, giving you a print that’s incredibly soft and breathable—you can’t even feel it. This makes it perfect for those vintage-style designs on 100% cotton shirts.
But DTG has its kryptonite. It just doesn't play well with polyester or other synthetic fabrics. Printing on dark garments also means applying a special pre-treatment liquid first, which adds time and cost to the whole process.
This is exactly where DTF steps in. A DTF transfer couldn't care less what it's being pressed on—cotton, polyester, blends, leather, you name it. No pre-treatment needed. That versatility is a game-changer. For a closer look at this matchup, check out our full guide comparing DTF vs DTG printing methods.
DTF vs Screen Printing
Screen printing is the undisputed heavyweight champion of big jobs. The process involves pushing ink through a mesh screen stencil onto the garment, laying down one color at a time. The result is a super durable, vibrant print that gets incredibly cheap per piece when you’re ordering in huge quantities—think 100+ shirts of the same exact design.
The catch? The setup is a beast. You need to create a separate screen for every single color in your design, which is both expensive and time-consuming. That makes it a total non-starter for small orders or designs with a ton of colors and gradients. DTF, on the other hand, was built for full-color, photorealistic images. It handles them with zero fuss and has no minimum order, making it a dream for small businesses and on-demand jobs.
DTF vs Heat Transfer Vinyl (HTV)
Heat Transfer Vinyl (HTV) is a staple for simple jobs. You cut your design from a sheet of colored vinyl with a machine, then press it onto the shirt. It’s the go-to for putting names and numbers on the back of team jerseys or for basic, single-color logos.
The big headache with HTV is a little thing called "weeding"—the painstaking process of peeling away all the tiny bits of excess vinyl around your design. For anything intricate, it can take forever.
DTF completely eliminates weeding. A complex, multi-color masterpiece is just as easy to press as a simple word. Plus, the final print is way softer and more flexible than the stiff, plasticky feel you often get with vinyl.
The Bottom Line: DTF takes the best of all worlds. You get the full-color, detailed printing of DTG, the fabric versatility that beats everyone, and the simple application of HTV without any of the tedious weeding.
To really put it all in perspective, here's a quick cheat sheet comparing these methods on the factors that matter most to your business.
Printing Method Comparison DTF vs DTG vs Screen Printing vs HTV
Here’s a side-by-side analysis of the most popular apparel printing techniques, breaking down how they perform across key business and quality factors.
| Attribute | DTF Transfer | DTG Printing | Screen Printing | Heat Transfer Vinyl (HTV) |
|---|---|---|---|---|
| Best For | Full-color, complex designs on any fabric; small to medium runs. | Soft, breathable prints on 100% cotton. | Large bulk orders with simple, limited-color designs. | Simple text, numbers, and one-color logos. |
| Fabric Compatibility | Excellent (Cotton, Poly, Blends, Leather) | Limited (Best on Cotton) | Good (Most Fabrics) | Good (Most Fabrics) |
| Feel of Print | Soft & Flexible | Very Soft (No Feel) | Medium Feel | Stiff & Thick |
| Color Vibrancy | Excellent | Good (Can Fade on Dark Fabrics) | Excellent | Very Good |
| Durability | High (50+ Washes) | Moderate | Very High | High |
| Cost-Effectiveness | Great for small-to-medium batches. | Good for single items; expensive for medium runs. | Excellent for very large batches; expensive for small runs. | Good for single items; not scalable. |
As you can see, while every method has its place, DTF carves out a powerful niche by offering unparalleled flexibility, color vibrancy, and ease of use, especially for businesses that need to be agile and cater to diverse customer demands.
Why So Many Creators Are Switching to DTF
The buzz around DTF printing isn't just hype—it's a direct answer to the real-world headaches that custom apparel makers and small businesses have dealt with for years. This technology simply works, solving a ton of the old frustrations found in other printing methods. It gives you the power to say "yes" to more projects, more types of fabric, and more creative designs without blinking.
So, what's the big deal? First and foremost, its incredible material versatility. This is where DTF really shines, especially compared to something like Direct-to-Garment (DTG) printing, which basically locks you into cotton fabrics.
With DTF, you can print on almost anything:
- Cotton and Blends: Your bread-and-butter for t-shirts and hoodies.
- Polyester: The go-to for performance wear and athletic apparel.
- Nylon and Leather: Think custom jackets, unique bags, and even hats.
This flexibility means one printing method can cover almost any request that comes your way, streamlining your whole operation and opening up a ton of new creative doors.
Smart Economics for Growing Brands
Beyond just working on more stuff, DTF makes a ton of financial sense, particularly for smaller shops and growing brands. It completely skips the expensive and slow setup that comes with screen printing. You don't have to burn screens or deal with messy color separations, which makes it perfect for small runs or even one-off custom jobs.
The real game-changer here is the use of gang sheets. This is just a fancy way of saying you can arrange a bunch of different designs—for different orders—onto one big sheet of film. By printing everything at once, you use every last inch of the material, which cuts down on waste and seriously lowers your cost for each individual print. It's a simple, brilliant way to make those smaller orders much more profitable.
The proof is in the numbers. The global market for direct-to-film printing hit an estimated $2.72 billion in 2024. It's expected to rocket to nearly $3.92 billion by 2030, which tells you everything you need to know about how quickly people are embracing it. You can see the full breakdown in the market analysis on Grand View Research.
Quality and Detail That Actually Lasts
Let's talk about the final product. DTF is a rockstar when it comes to print quality, especially in areas where other methods stumble. It can handle photorealistic images, super fine details, and smooth color gradients without the weeding nightmares of vinyl or the color count limits of screen printing.
Thanks to a solid white ink base that goes down first, colors pop on any fabric, even black or navy blue. Everything stays bright and true to your original design.
Once you’ve created your awesome apparel, showing it off is the next critical step. Knowing how to start photographing clothes professionally can be the difference between a product that flies off the shelf and one that collects dust.
The final print feels great, too. It’s not a thick, heavy plastic patch; it's soft, flexible, and moves with the fabric. Best of all, it holds up, surviving dozens of washes without cracking or fading. This mix of versatility, affordability, and quality is exactly why so many creators are making DTF their go-to method.
Got Questions About DTF? We've Got Answers.
Jumping into any new printing method brings up a lot of questions. It's one thing to see the amazing results, but it's another to understand the nuts and bolts. How long do these things really last? What kind of art files do I need to send? Can I get by with my home iron?
We hear these questions all the time from designers, small shop owners, and seasoned pros alike. So, let's clear the air and give you the straightforward answers you need to get started with confidence.
How Durable Are DTF Transfers?
This is usually the first thing on everyone's mind, and for good reason. The great news is that DTF transfers are built to last. When applied correctly, they are exceptionally durable and can easily outlive the garment they're printed on. We're talking about a print that holds up against cracking, peeling, and fading for 50 washes or more.
What's the secret? It’s all in the thermoplastic adhesive. During the heat press process, this adhesive melts and literally fuses with the fabric's fibers, creating a permanent bond that's both tough and flexible.
To get the most life out of your prints, just follow a few simple care guidelines:
- Turn the garment inside-out before washing. Use cold water and a gentle cycle.
- Skip the bleach and harsh fabric softeners, as they can break down the print's integrity over time.
- Tumble dry on low. For maximum longevity, hanging it to dry is always the best bet.
Follow these rules, and you'll have a vibrant, resilient print that your customers will love for years to come.
What Kind of Artwork Works Best for DTF?
This is where DTF really shines. One of its standout features is its incredible flexibility with artwork. It handles the kind of complex designs that are a nightmare—or just plain impossible—for methods like vinyl or traditional screen printing.
DTF is your go-to for:
- Intricate, full-color designs packed with gradients, shadows, and photorealistic elements.
- Designs with super-fine lines and tiny text that would be impossible to weed.
- Brand logos and graphics that demand spot-on color accuracy.
Since the entire image is printed onto the film at once, there is zero weeding involved. That means a highly detailed, multi-color masterpiece is just as easy to apply as a single-color logo. For perfect results, your best bet is to provide a high-resolution raster file, like a PNG with a transparent background saved at 300 DPI. Vector files like AI or EPS work beautifully, too.
Pro Tip: DTF printing automatically lays down a white underbase behind your design. This means your colors will pop just as brightly on a black t-shirt as they do on a white one. You don't have to tweak your artwork for different garment colors, which is a massive time-saver.
Can I Use a Home Iron for DTF Transfers?
Look, I get the temptation to find a shortcut, but using a home iron for DTF is one corner you just can't cut. For professional, sellable results, it's a hard no. A successful DTF application hinges on three things: precise temperature, even pressure, and consistent time. A household iron fails on all three counts.
A quality heat press is an absolute must-have because it delivers:
- Consistent Heat: The platen maintains an exact, stable temperature across its entire surface.
- Even Pressure: It clamps down with uniform force, ensuring every inch of the transfer bonds perfectly.
An iron, on the other hand, is riddled with hot spots and relies on you pushing down, which is impossible to do evenly. This leads to a weak, patchy bond, and you'll see the transfer start to peel and crack after the very first wash. If you want a durable, professional finish you can be proud of, a heat press isn't just a recommendation—it's essential.
Ready to see what American-made DTF quality is all about? At Cobra DTF, we deliver vibrant, tough-as-nails prints right from our facility in Texas, with a super-fast turnaround. Explore our custom DTF transfers today!