
How to Transfer Photo to Shirt: Easy Step-by-Step Guide
Before you even think about putting that photo on a shirt, you need to get your gear in order. This isn't just about printing; it's about creating a vibrant, durable finish that looks professional. Think of it as building your toolkit for creating top-notch custom apparel.
Gathering Your Essential Printing Gear
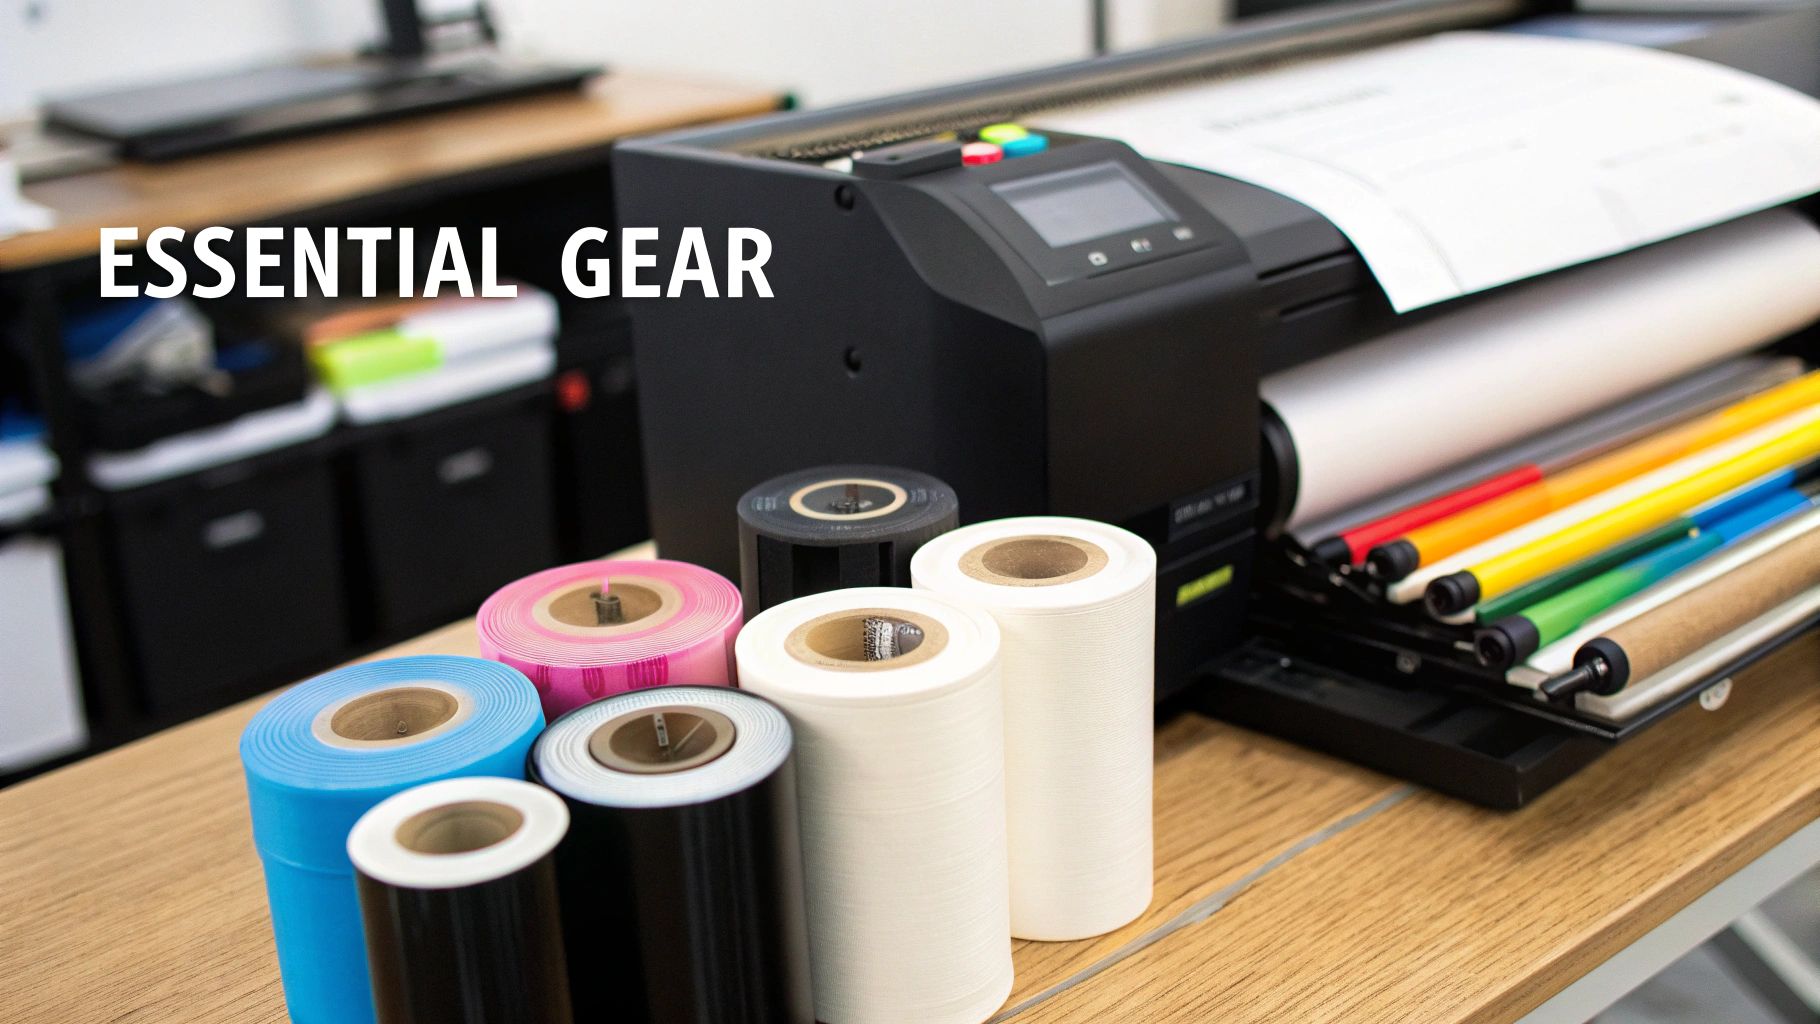
Jumping into a custom apparel project without the right equipment is like trying to paint a masterpiece with a toothbrush. Sure, you might get something on the canvas, but it won't be the professional result you're aiming for. The quality of your gear has a direct impact on your final product, so this isn't just a shopping list—it's the foundation for making shirts that look incredible and survive dozens of washes.
The demand for high-quality custom t-shirts is exploding. The market was valued at around USD 6.09 billion in 2025 and is projected to more than double to about USD 13.72 billion by 2032. That's a powerful annual growth rate of 12.3%. If you want a piece of that action, your setup needs to be on point.
The Core Components of Your DTF Setup
Let's get into the non-negotiables. The heart and soul of your operation is a dedicated DTF printer. Don't confuse this with your standard office printer; these machines are engineered to handle the unique thickness of DTF inks and print onto a special film, laying down that all-important white ink base that makes colors pop on dark fabrics.
Then you have the consumables—the materials that actually bring your design to life.
- DTF Film: This isn't just any old transparent sheet. Quality DTF film has a special coating designed to hold ink perfectly without letting it bleed, then release it cleanly onto the garment when you press it.
- DTF Inks: These aren't your everyday inks. They're specialized textile inks formulated to be flexible and stand up to the washing machine. Using premium, USA-sourced inks is your best bet against cracking and fading.
- Adhesive Powder: This fine white powder is where the magic happens. After printing, you'll coat the wet ink with this powder. When heated, it melts and creates a super strong adhesive layer, literally bonding the ink to the fabric fibers for good.
Why a Heat Press Beats a Home Iron
I know it’s tempting to grab a standard home iron to save a few bucks, but trust me, it’s a recipe for disaster. A quality heat press is non-negotiable for one simple reason: consistent heat and pressure. A home iron has hot spots and can't provide the even, firm pressure you absolutely need to cure the adhesive properly.
A heat press ensures every single square inch of your transfer gets the exact temperature and pressure required for a permanent bond. This is what separates a shirt that lasts for years from one that starts peeling after its first wash.
Finally, don't overlook the smaller accessories. A Teflon sheet is a must-have to protect both your heat press and the shirt from direct contact, preventing scorch marks and giving you a smooth finish. Good ventilation is also critical, especially when you're working with adhesive powders and curing the transfers.
If you want to go deeper into the world of transfers, check out our comprehensive guide on heat transfer shirt printing.
Prepping Your Photo for a Flawless Transfer

The secret to a stunning photo shirt has less to do with the heat press and more to do with what happens on your computer first. A great print always starts with a great digital file. This is where you lay the groundwork for a professional-looking result, not something that looks like a blurry, homemade iron-on.
Before you even think about printing, check your image resolution. A crisp, vibrant photo transfer absolutely requires a high-resolution file. Aim for the industry standard of 300 DPI (dots per inch) at the actual size you plan to print. If you just grab a low-res photo from social media, it's going to look pixelated and fuzzy when blown up on a shirt.
Think of it like this: a 300 DPI image is like building with tiny LEGO bricks—you can create a smooth, detailed picture. A 72 DPI image is like using a handful of big DUPLO blocks. The result will always be blocky and unclear.
Sizing and Adjusting Your Image
Once you’ve confirmed your photo is high-res, it's time to size it for the shirt. Open the image in your design software of choice, whether that's Adobe Photoshop or a great free alternative like GIMP. Figure out where you want the design to go—a big print across the chest? A smaller logo on the pocket? Then resize your digital canvas to match.
For a standard adult t-shirt, for example, a design might be around 10-12 inches wide. You’ll want to set your file dimensions to that size while keeping the resolution locked at 300 DPI. This crucial step ensures that what you see on your screen is exactly what you'll get on the fabric.
Crucial Tip: You must mirror your image before printing. Since you're printing onto the DTF film in reverse, flipping the design horizontally ensures it will face the correct way when pressed onto the garment. Forgetting this is probably the most common (and frustrating) mistake, especially if your design has any text.
Cleaning Up and Enhancing Your Photo
Now, let's make your photo truly pop. A raw photo file rarely translates perfectly to fabric, so a few quick adjustments can make a world of difference. The goal is to create a design that stands out, not one that gets lost in the shirt.
Here's what I recommend:
- Remove the Background: A photo with a clean, transparent background almost always looks more professional. Learning how to remove a background from a picture is a game-changer, allowing the shirt’s color to become part of the design and making your subject the true focus.
- Boost Brightness and Contrast: Colors often print a little darker on fabric than they appear on a bright, backlit monitor. I usually bump up the brightness and contrast just a bit to compensate for this. It keeps the colors from looking muddy and ensures they stay vibrant.
- Save as a Transparent PNG: When you're all done with your edits, save the file as a PNG. This is non-negotiable. PNG is the file format that supports transparency, which is essential for preserving the clean, background-free design you worked on. JPEGs don't, and you'll end up with a big white box around your image.
Bringing Your Transfer to Life: Printing and Curing
Alright, your digital masterpiece is prepped and ready to go. Now for the exciting part—transforming that file on your screen into a tangible transfer that's ready to press. This is where the magic really happens, blending a bit of art with some solid technique. Once you get the feel for it, you'll be able to knock these out consistently.
First things first, you'll send your mirrored PNG file over to your DTF printer. Getting your printer settings dialed in is absolutely crucial. You need to lay down enough ink to get those colors to pop, but not so much that it starts to bleed or pool on the film. Most DTF software comes with presets for different materials, which are a great starting point. I usually begin with a high-quality setting to make sure both the color layer and the white underbase are nice and opaque.
As the film starts to feed out of the printer, just let it do its thing. The ink is going to be wet and incredibly easy to smudge. Trust me, I've learned this the hard way—the temptation to touch it is real, but even the slightest bump can ruin the whole thing and send you right back to square one. Let the printer finish its cycle, and be sure to handle the film only by the clean, unprinted edges.
The Secret Sauce: Applying the Adhesive Powder
With your photo beautifully printed, it's time to add the adhesive powder. This stuff is essentially the glue that permanently fuses your design to the fabric during the heat press stage. Getting a perfectly even coat is the key to a transfer that not only looks professional but also lasts through countless washes.
The best way to do this is to lay your print inside a shallow tray or bin, with the wet ink facing up. Then, go ahead and generously sprinkle the DTF adhesive powder over the entire printed area. You really can't use too much at this stage; you want to make sure every last drop of wet ink is completely covered in a blanket of white powder.
After it's covered, gently pick up the film by the corners and give it a little rock back and forth. This helps the powder settle into all the nooks and crannies. Next, give the edge of the film a few firm taps to shake off all the excess. The powder is designed to stick only to the wet ink, so the unprinted areas of the film will come out perfectly clean. What you're left with should be a sharp, powdered silhouette of your design.
This print, powder, and cure workflow is the heart of creating a solid DTF transfer.
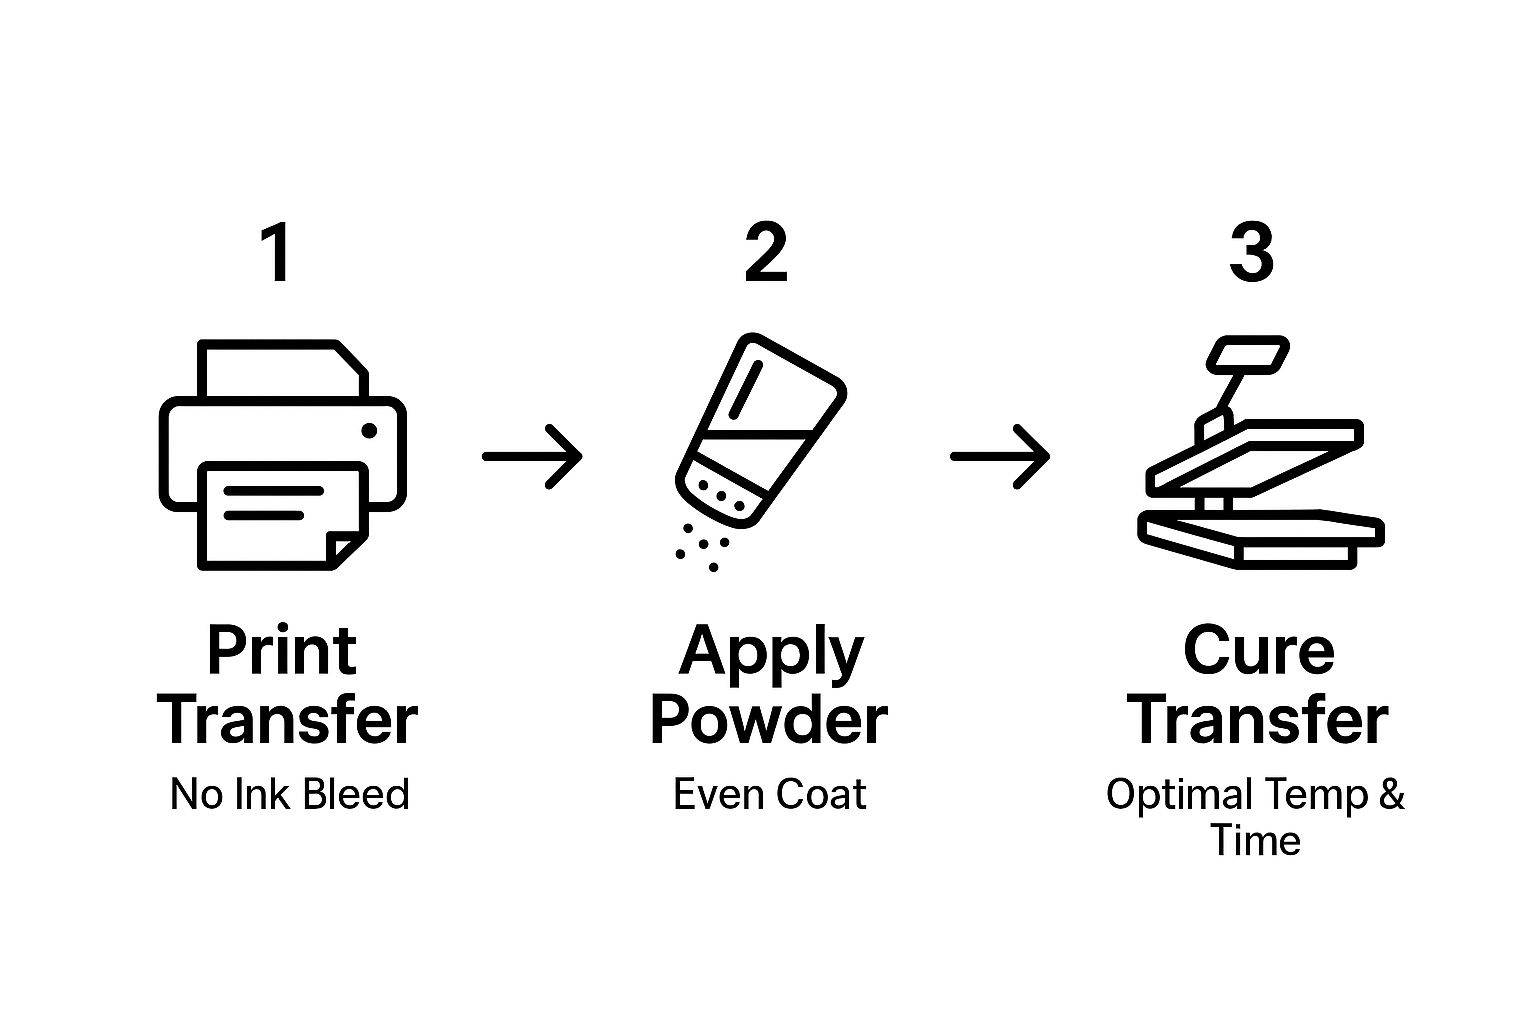
This simple graphic really drives home how each step builds on the last. Control your ink, get that powder coverage just right, and cure it perfectly—that's the formula for success.
Curing the Transfer for the Perfect Melt
Curing is the final and, in my opinion, most critical step in preparing your transfer. This is when you melt that fine powder, turning it from dust into a smooth, solid adhesive layer bonded directly to the ink. The goal is to get a uniform melt without scorching the film or burning the ink underneath.
A perfectly cured transfer will have a slightly bumpy, "orange peel" texture. It should look and feel like a single, flexible sheet. If you can still see loose, grainy powder, it needs more time. If it looks overly glossy or has bubbles, you've overdone it with the heat.
You've got a couple of options for curing:
- Heat Press (Hover Method): Set your heat press to about 375°F (190°C). Place your powdered transfer on the bottom platen, then lower the top platen until it hovers roughly an inch above the film—make sure it doesn't actually touch! Let it cure for 2-4 minutes, keeping a close eye on it until you see that signature orange-peel finish.
- Curing Oven: If you have a dedicated DTF curing oven, you'll get more consistent and even heat. Just set it to the recommended temperature and pop the transfer inside until it's fully melted.
This process is a fundamental part of the direct-to-film method, which has quickly become a go-to for so many apparel decorators. If you're new to the concept, you can learn more about what is direct-to-film printing in our comprehensive guide.
Once your transfer is cured, it’s stable, durable, and ready for the final step: pressing it onto your shirt.
Applying Your Photo with a Heat Press

You’ve got your cured transfer ready to go, which means you've reached the most satisfying part of the process. This is where your digital design becomes a real, wearable piece of art. Getting the heat press stage right is what ensures your photo becomes a permanent part of the garment, so let’s nail the details.
The demand for custom apparel is absolutely booming. The global market for photo printing and merchandise, which includes DTF, was valued at around USD 23 billion in 2023 and is projected to hit USD 28.2 billion by 2032. Mastering this final step is how you create professional-grade products that people want.
Preparing the Garment and Positioning the Transfer
First things first: always pre-press your shirt. Don't skip this. Set your heat press to the final pressing temperature and give the empty shirt a quick press for about 5-10 seconds. This simple move zaps any hidden moisture and flattens wrinkles, creating a perfectly smooth canvas for your transfer.
With the shirt prepped, it's time to place your transfer. Lay it on the garment with the design facing down. For a classic centered look on a t-shirt, I find that placing the top edge of the design about three inches below the collar is the sweet spot. A t-square ruler is great for this, but in a pinch, you can just fold the shirt in half to find your center line.
A perfectly centered and straight design is what separates a professional-looking shirt from a homemade one. Take an extra minute to measure and align it properly—it's always worth the effort.
Dialing In the Perfect Press Settings
The magic formula for a great transfer comes down to three things: temperature, time, and pressure. These settings aren't one-size-fits-all; they change depending on the fabric you're working with. Getting them wrong can lead to a weak bond or, even worse, a scorched shirt.
Here are some go-to starting points I use for common materials:
- 100% Cotton: Aim for 300-320°F (149-160°C) and press for 10-15 seconds with medium-to-firm pressure. Cotton is tough and handles the heat well, which helps create a solid bond.
- Polyester Blends (50/50): Drop the heat to 275-300°F (135-149°C) for 10-12 seconds. This helps you avoid scorching or melting those synthetic fibers.
- 100% Polyester: Be gentle here. Use a lower temperature of 260-275°F (127-135°C) for just 8-10 seconds. Too much heat can cause dye migration, where the fabric's color bleeds into your design.
The Final Peel for a Flawless Reveal
Once the press timer beeps, open it up and carefully move the shirt to a cool, flat surface. Now for the moment of truth. Most DTF transfers are a cold peel, which means you have to let everything cool down completely before you even think about removing the film. I've seen so many people rush this part and end up with parts of the design lifting right off. Be patient.
When it's cool to the touch, pick a corner and start peeling the film back slowly and smoothly. Keep it at a low angle to the shirt—don't just rip it off like a bandage. A steady, even motion will leave you with a vibrant, perfectly applied photo.
For those curious about other methods, this helpful DIY iron transfer paper guide gives some great insights into a simpler alternative.
Finishing Touches and Long-Term Care
You've peeled back the film and your photo looks fantastic on the shirt. It's tempting to call it a day, but there’s one last trick that separates a good print from a great one: the finishing press. This is a step I never skip, and it only takes a few seconds.
After you’ve removed the transfer film, just lay a Teflon sheet or some parchment paper over the design. Press it again for just 5-10 seconds at the same temperature you used for the initial application. This quick press pushes the ink deeper into the fabric, which not only improves durability but also gives the design a much softer feel. It removes that shiny, plastic-like finish for a more professional look.
Simple Care Instructions for a Lasting Design
How you wash the shirt makes all the difference in how long that photo transfer will last. Whether you're making these for yourself or selling them to customers, clear care instructions are non-negotiable. This is your best defense against the print cracking or fading prematurely.
Here are the essential rules I always follow and recommend:
- The 24-Hour Rule: Don't wash the shirt for at least a full day. The ink and adhesive need that time to fully cure and create a permanent bond with the fabric.
- Inside-Out is Key: Always turn the garment inside out before tossing it in the wash. This protects the photo from rubbing against other clothes, which is a major cause of wear and tear.
- Cold Water Only: Hot water will absolutely destroy a custom print over time. Always use cold water on a gentle cycle to keep the colors bright and sharp.
- Air-Dry for the Win: While you can tumble dry on a low heat setting, hanging the shirt to dry is by far the best choice. It prevents any potential damage from the heat of a dryer.
Following these simple rules can make a massive difference. A well-cared-for DTF print can easily handle 50+ washes before you see any major signs of wear. That’s a huge improvement over older transfer methods. If you're curious about other techniques, you can also learn how to use heat transfer paper to see how they compare.
Troubleshooting Common Transfer Problems
Even when you do everything right, sometimes things just don't go as planned. Don't panic. Most DTF issues are surprisingly easy to fix once you know what you’re looking for.
- Dull or Faded Colors: This is almost always a heat or pressure issue. First, check that your heat press is actually at the temperature it says it is. If the temp is right, you likely need to apply more pressure to get the ink to bond properly.
- Transfer Won't Stick: If the design is peeling right off the shirt along with the film, the culprit is usually under-cured adhesive powder. You really need to see that "orange peel" texture on the powder before you move to the heat press.
- Cracking After Washing: A classic sign that the finishing press was skipped. That final, quick press is what truly locks the design into the fabric fibers, giving it the flexibility to survive the wash.
Got Questions? Let's Talk Photo Shirts
Even after walking through the whole process, you're bound to have a few questions pop up. It happens to everyone. Let’s tackle some of the most common ones I hear from people just getting started, so you can sidestep common pitfalls and get your technique dialed in.
Can I Just Use My Inkjet Printer and Iron-On Paper?
Technically, yes, you can. But honestly, the results you'll get are worlds apart from what DTF can do. Think back to those old iron-on shirts from the craft store; they often leave a stiff, plastic-feeling box around your design. That layer is notorious for cracking and fading, sometimes after only a few trips through the laundry.
DTF, on the other hand, is a different beast entirely. It uses specialized inks and an adhesive powder that literally fuses with the fabric's fibers. This gives you a print that’s soft, flexible, and looks like it’s part of the shirt. It’s the secret to getting that professional, durable finish that holds up wash after wash.
What Fabrics Work Best for Photo Transfers?
This is where DTF really shines—its versatility is a game-changer. You’re not locked into one type of material. You can get incredible results on a whole range of fabrics.
- 100% Cotton: The classic choice. Colors come out super vibrant.
- Polyester: Works like a charm, and you don't have to worry about the dye migration issues you see with other methods.
- Cotton/Poly Blends: A go-to for many because they're soft and tough.
- Other materials like canvas and even denim are fair game.
What's great is that DTF works just as well on dark garments as it does on light ones, all without needing any special pre-treatment. You have total creative freedom.
Why Did My Photo Crack After Washing?
Ah, the dreaded post-wash crack. If this happens, it's almost always a sign that the transfer didn't fully bond with the shirt. The issue usually boils down to one of three things: not enough heat, the wrong pressure, or skipping that final press.
Take a moment to double-check that your heat press is actually at the right temperature for your shirt. Firm, even pressure across the whole design is just as critical. And that final 5-10 second finishing press after you peel the film? Don't skip it. That single step makes a huge difference in how well your shirt holds up over time.
Do I Really Need to Mirror the Image Before Printing?
Yes. 100% of the time, no exceptions. Remember, you’re printing the design onto the film first, essentially face down. When you lay that film onto the shirt to press it, you're flipping it over. If you didn't mirror the image in your software, it's going to be backward on the final product.
Forgetting this step is easily one of the most common (and frustrating!) mistakes you can make, especially when your design includes any kind of text. Always, always mirror your image.
Ready to create some incredible photo shirts that actually last? Cobra DTF offers premium, USA-made DTF transfers that bring your designs to life with brilliant color and amazing durability. You can skip the printing and curing process and get perfect transfers sent right to your shop in just 1-3 days.