

How to Size Down a Pattern the Right Way
You've finished a blouse, dress, or pair of trousers that looks promising on the hanger but feels too generous once it's on. The waist floats, the shoulder extends past your arm, or the neckline seems wider than the pattern envelope suggested. Reaching for the next smaller size may solve the problem, but it can also create a tight armhole, a distorted dart, or a hip that no longer clears the body.
That's why how to size down a pattern is a decision problem before it's a cutting problem. You need to identify where the pattern has too much room, compare those areas with your measurements, and then remove paper proportionally. A pattern isn't a flat photograph of your body. It's a balance of landmarks, ease, grainlines, darts, curves, and seam relationships.
When Sizing Down Actually Fixes the Fit
A finished garment that almost fits can be more frustrating than one that fails immediately. The style may be right, the fabric may be suitable, and the construction may be clean, yet the garment still looks too loose. Before altering anything, decide whether excess volume is really the problem.
Sizing down usually helps when the garment is roomy across several connected areas, such as the bust, waist, and hip, while the overall silhouette still suits you. It can also help when one zone is consistently too large and the rest of the garment has enough ease to remain comfortable. If the shoulder sits correctly and the garment hangs evenly, reducing selected sections may be more sensible than redrawing the entire pattern.
A smaller size won't fix every fitting complaint.
- The wrong size: If the garment is too loose everywhere, a smaller nested size may be appropriate.
- A proportion mismatch: If the bust fits but the waist is loose, blend between sizes rather than reducing the whole piece.
- A style issue: A wide neckline, low sleeve cap, or generous ease allowance may be intentional. A smaller size won't automatically change the design feature in the way you want.
- A localized drag: Pulling at one point may indicate insufficient room, a misplaced dart, or a posture adjustment, not excess width.
Practical rule: Compare the pattern's finished measurements with your body landmarks before you choose a size. The nominal size alone doesn't tell you how the garment will fit.
Manufacturers use different base measurements and grading conventions, so a size down can vary from one brand to another even when the nominal change looks identical. Threads' explanation of pattern grading is useful background because it makes clear that there's no universal standard size across the apparel industry.
Make a quick sketch of the garment. Mark where the excess sits, such as “too much at waist, correct at hip” or “shoulder too wide, bust acceptable.” That small map prevents the most common mistake, cutting down every edge just because the garment feels oversized.
Measuring Body and Pattern the Smart Way
Good grading starts with comparable measurements. Use a flexible tape, stand naturally, and ask someone to help with shoulder and back measurements if possible. Keep the tape level without pulling it tight, and record the date beside your notes so you know which measurements belong to the current fitting session.
Measure the body at useful landmarks
For a bodice, record the high bust, taken under the arms and above the fullest part of the bust, then the full bust at its fullest point. Add the natural waist, full hip, across-back shoulder, and nape-to-waist length. For trousers or skirts, include the landmarks the pattern uses, especially waist, hip, rise, and finished length.
The high bust can help you decide whether the upper chest and shoulder area are already close to the right size while the bust needs more room. That often points toward blending or a targeted bust adjustment rather than dropping down across the whole pattern.
Measure the flat pattern
Lay the traced pattern pieces on a flat surface. Measure along the seam lines, not the cutting edges, and temporarily ignore seam allowances. Add the corresponding front and back sections where necessary. Compare the pattern at the bust, waist, hip, shoulder, and length landmarks.
Pattern envelopes remain useful, but they can't tell you exactly where the extra room is distributed. A brand may build in a different amount of ease from another, so the flat pattern gives you the more relevant evidence for this specific garment.
| Measurement | Your Body | Pattern Piece | Difference |
|---|---|---|---|
| High bust | ______ | ______ | ______ |
| Full bust | ______ | ______ | ______ |
| Natural waist | ______ | ______ | ______ |
| Full hip | ______ | ______ | ______ |
| Across-back shoulder | ______ | ______ | ______ |
| Nape to waist | ______ | ______ | ______ |
Use a size chart as a starting point, but compare it with the actual garment or pattern piece. A unisex Gildan size chart can illustrate why labeled sizes and finished dimensions need to be treated as separate pieces of information.
Write the difference beside each landmark. That list becomes your grading map. If the waist needs less reduction than the bust, your slash lines need to reflect that. If the hip already matches, leave the hip alone.
The Slash and Overlap Method Explained
Slash and overlap is the dependable way to reduce a pattern in selected zones without crushing its silhouette. It works because you remove paper where the measurement calls for less room, while hinges preserve the relationship between important points.
Start by tracing the original piece onto sturdy tracing paper or pattern paper. Keep the original untouched. On a bodice, useful slash lines often run vertically through the bust area, through the waist dart, or through another controlled section of the piece. A horizontal line may be needed through the shoulder, armhole, or a lengthen-and-shorten area, depending on the adjustment.
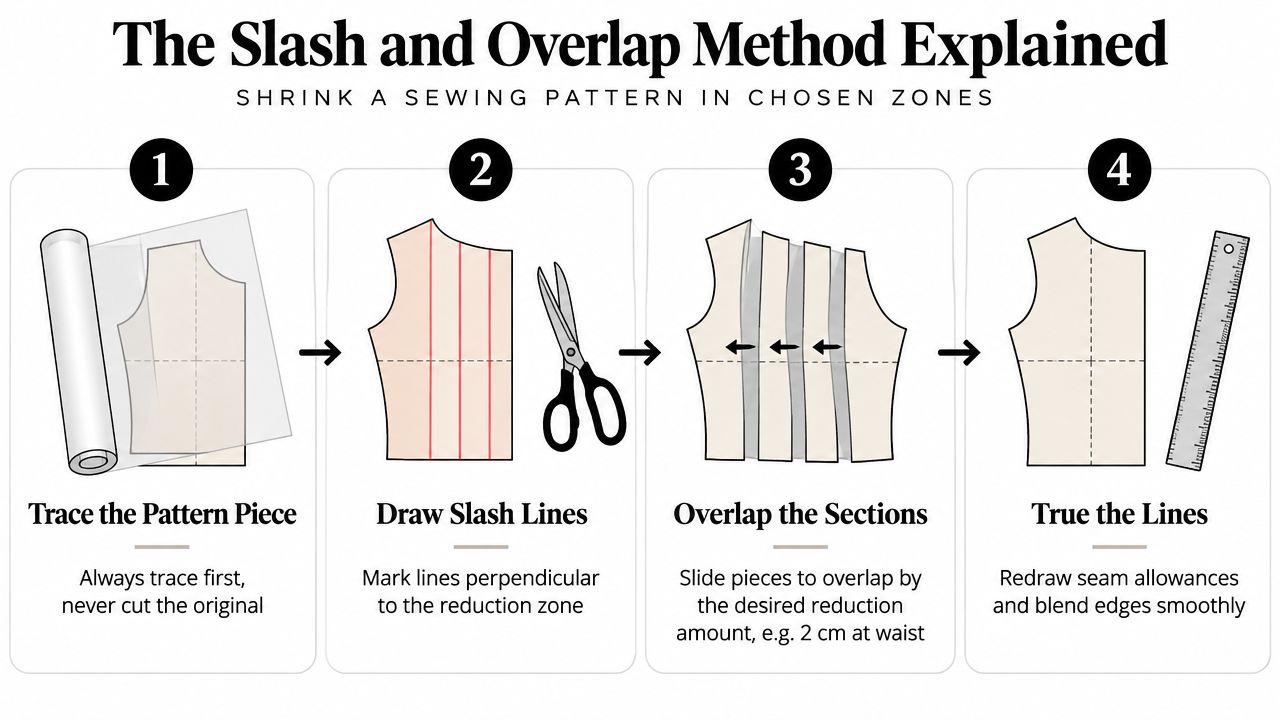
Make the cuts
Draw the slash lines from an edge toward a key landmark. Stop just short of that landmark so a small paper hinge remains. On a bodice, the hinge can sit near the bust apex or another point where you want the surrounding lines to pivot rather than break.
Cut carefully along the marked lines. Don't cut through every intersection. The hinge is what lets the sections swing together while keeping the geometry connected.
Overlap by measurement
Bring the cut sections toward each other until the overlap matches the difference in your measurement table. If the waist needs a smaller reduction than the bust, use a different overlap at each zone. Secure the paper with pins first, then tape it after checking the shape.
The old cutting lines will show you how much you've removed, but they aren't automatically your new lines. Redraw the neckline, armhole, side seam, and hem with a French curve or a long ruler. Blend gradually instead of creating a sharp corner where two sections meet.
Pattern-grading instruction commonly describes reducing a pattern by overlapping sections rather than spreading them apart, and it emphasizes keeping the new lines proportionate to the garment's structure. This practical grading tutorial also describes distributing a reduction across sections rather than treating the entire piece as one undivided shape.
Check the paper before moving on
Look at the grainline, dart, notches, and seam intersections. If a slash has caused a seam to step inward, smooth the line while preserving the intended measurement. The point isn't to make every edge look smaller. The point is to make the finished garment smaller where your body and the design require it.
Grading Different Garment Areas Separately
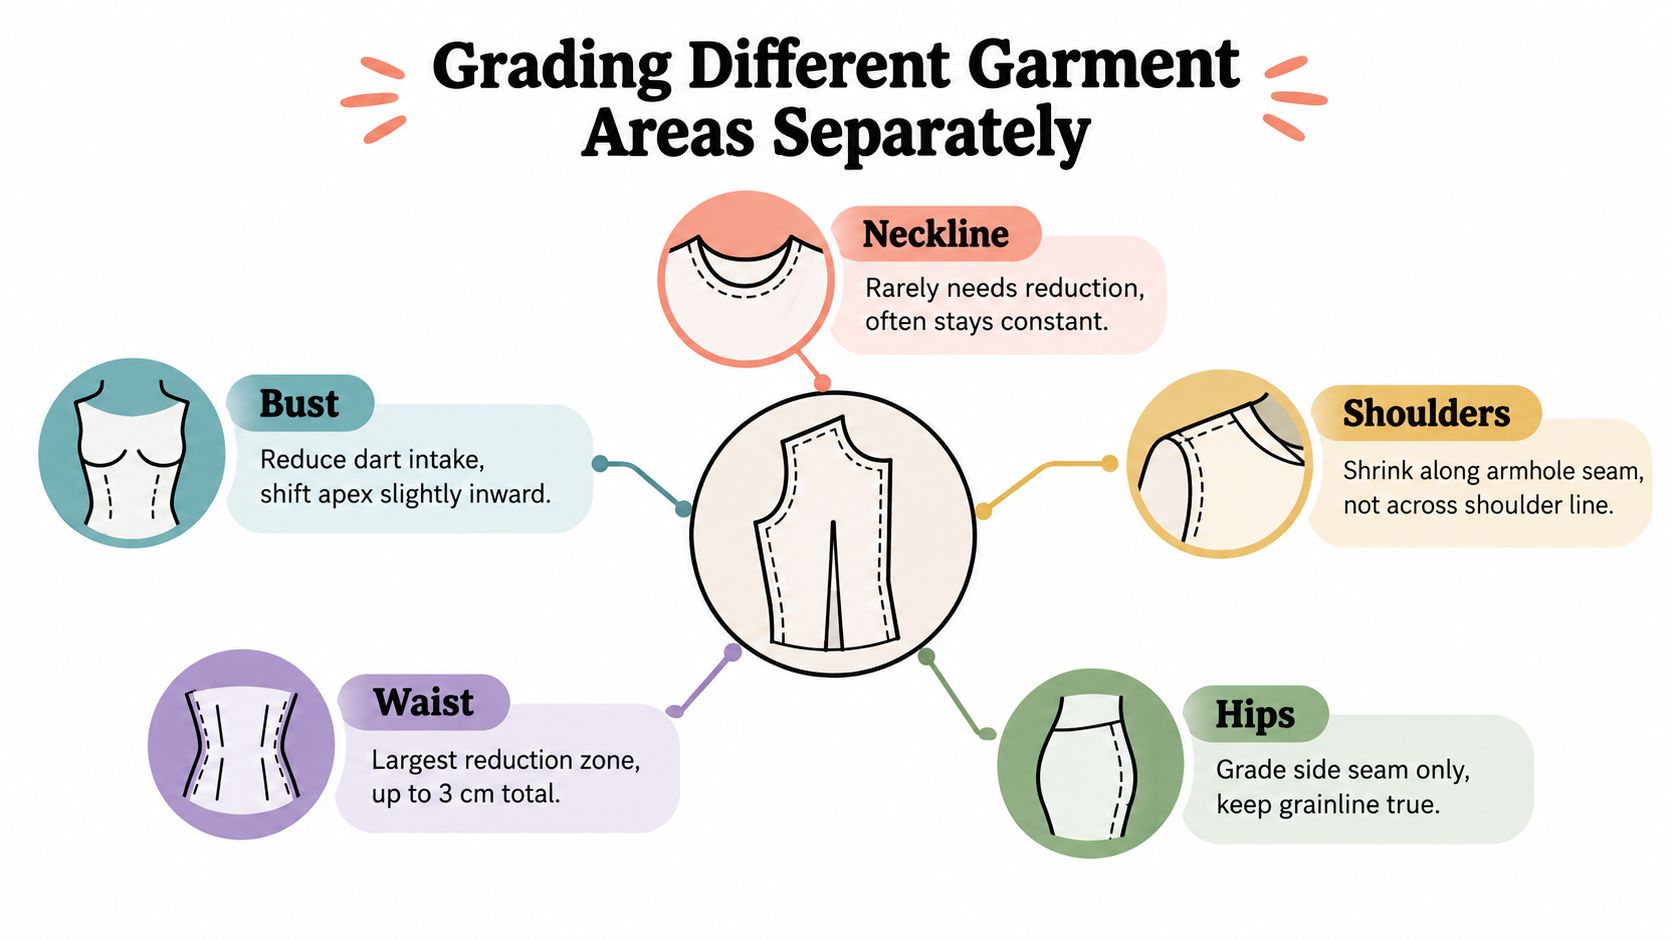
A pattern is a group of connected zones, not one shape that should be shrunk evenly. Necklines, shoulders, bust sections, sleeves, waistlines, hips, and torso length respond differently because they serve different fitting jobs.
Neckline and shoulder
The neckline often needs little or no reduction. If you overlap the shoulder too aggressively, the neckline can collapse inward, become too tight, or lose its intended shape. Reduce the shoulder along the armhole side when the shoulder width is the actual problem, rather than shaving the same amount from the neckline edge.
The shoulder seam should finish near the shoulder bone. If it already does, keep its position and concentrate the reduction elsewhere. This is one reason uniform grading fails: bust and underarm measurements can change unevenly, while the shoulder may need a much smaller change. A pattern-resizing guide from Sensibility Patterns discusses this distinction and notes that the shoulder split may not need the same treatment as the bust area.
Bust and waist
Place the bust reduction where the pattern has room to give. A side bust dart may need to move slightly toward the armhole as the size decreases, while a waist dart can be adjusted without changing the entire front width. Keep the bust apex in a sensible position rather than allowing the overlap to drag it sideways.
The waist often absorbs a more visible reduction, but don't assume it should receive the full change. Blend from the bust into the waist, then continue toward the hip only if the hip measurement also calls for it.
Sleeves and length
Sleeve circumference must relate to the altered armhole. With a set-in sleeve, reduce the underarm area while preserving the sleeve-cap relationship unless the cap itself is too tall or wide. The sleeve cap height shouldn't be flattened automatically just because the garment is smaller.
For torso length, shorten through the lengthen-and-shorten area above the waist when the waist sits too low. Taking length from the hem can change the finished garment length without correcting the body proportion. A-line panels and gathered waistlines tend to absorb width changes more gracefully than fitted princess seams or closely shaped set-in sleeves.
Truing Seams, Darts, and Seam Allowances
After the paper overlaps, the pattern usually looks less tidy than expected. Curves develop small steps, dart points appear to float, and seam edges no longer meet cleanly. This is normal. The alteration isn't finished until the new paper lines are trued.
Begin with the side seams. Place a ruler or French curve over the seam and draw one continuous line from the armhole through the waist toward the hem. Avoid following every tiny jog created by the slash. A smooth seam is easier to sew and will hang better than a mathematically literal line with abrupt changes.
Darts need their own check. A side bust dart generally moves toward the armhole as the size decreases, while a waist dart can become deeper without moving its point away from the bust's shaping area. Keep the dart point slightly back from the fullest point of the bust rather than ending it directly on that point. For a clear explanation of how darts work as a method of shaping fabric with darts, use a dedicated fitting reference before redrawing the final piece.
Preserve the construction logic
Seam allowances aren't the same as seam lines. If your pattern uses a standard 5/8-inch seam allowance on structural seams, keep that allowance consistent where the construction depends on it. That measurement is a pattern convention, not a universal requirement, so follow the instructions for the specific pattern. Facings, hems, and narrow finished edges may need to be redrawn after the seam line changes.
Use this paper-side checklist:
- Seam lines: Front and back seams match at every intersection.
- Grainline: The grainline remains parallel to the fold or fabric grain.
- Notches: Notches still land on the intended landmarks.
- Darts: Dart legs match, and the point is balanced.
- Curves: Neckline and armhole lines flow without corners.
- Flat layout: The piece lies flat without twists, unintended gaps, or overlapping edges.
Trace the cleaned piece onto fresh paper if the working copy has become crowded. Label the size, alteration, grainline, notches, and cut-on-fold information before you put the scissors away.
Testing With a Muslin Before Cutting Real Fabric
The muslin is where the paper has to answer to the body. Cut a test version from inexpensive fabric with a similar weight and drape to the final material. Stitch the main seams with a long basting stitch, leave fitting access where practical, and press the seams so wrinkles aren't caused by construction alone.
Slip the garment on inside out. Pin out excess at the waist, shoulder, or side seam, but don't pull the fabric until every wrinkle disappears. The position of the pins tells you where the paper needs changing. Mark those changes directly on the muslin with chalk or a washable pen.
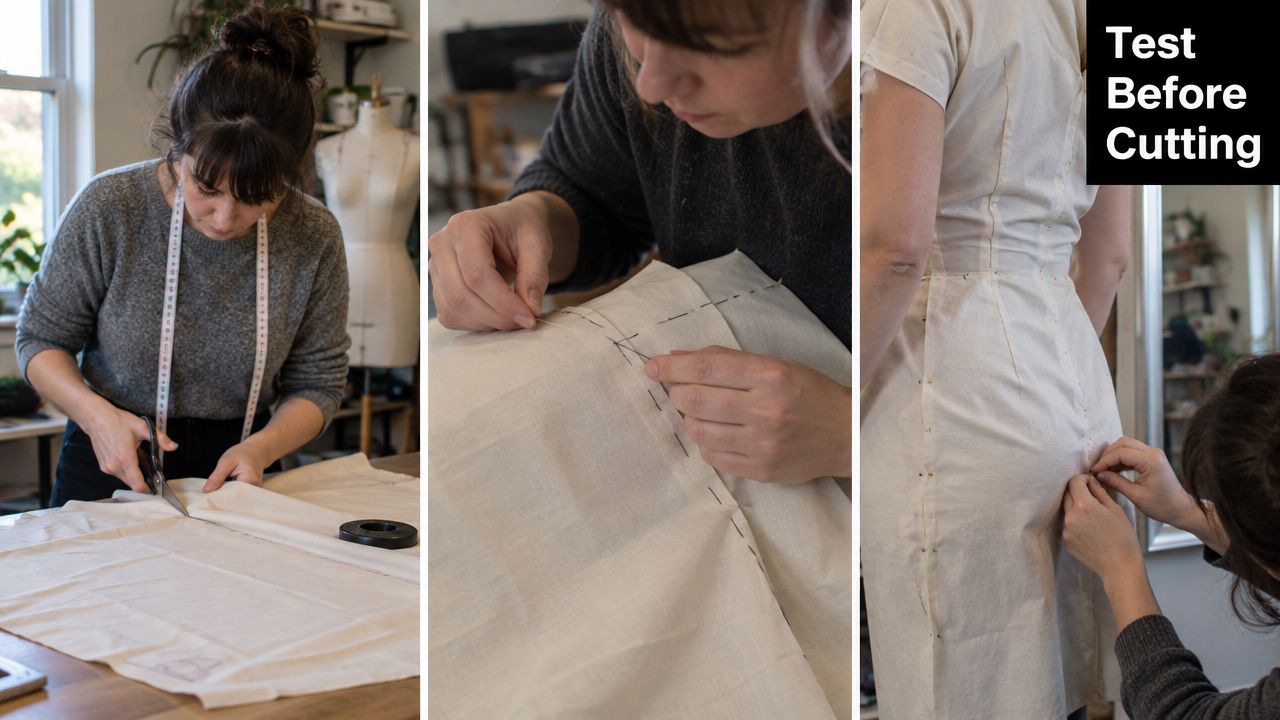
Read the wrinkles as evidence
Photograph the muslin from the front, side, and back in even light before removing it. A diagonal drag line across the bust can indicate that the front needs more room or that the dart is misplaced. Pooling across the upper back may point to excess length or a back-shape issue. Pulling at the armhole can mean the armhole is too small, the shoulder has shifted, or the sleeve and bodice no longer match.
Horizontal chest wrinkles may indicate that the bust dart is too high or that the front needs a different length relationship. Drag lines from the shoulder toward the bust can suggest that the front is too long in the wrong area. A tight neckline may appear after a shoulder reduction because the shoulder and neckline were treated as one zone.
Make one change at a time where possible. A fitting session commonly reveals several modest corrections rather than one dramatic failure. Transfer each marked change to the paper, true the seams again, and make another test if the adjustment affects the armhole, neckline, sleeve, or balance.
The muslin also checks your seam allowances. A pattern can measure correctly along its seam lines and still create trouble if the allowances were altered inconsistently. If you're testing a printed garment or apparel project alongside your sewing work, guidance on choosing suitable shirts for DTF can help you think about fabric weight, surface, and finished use without confusing those decisions with pattern fit.
Final Sizing Down Checklist and Common Mistakes
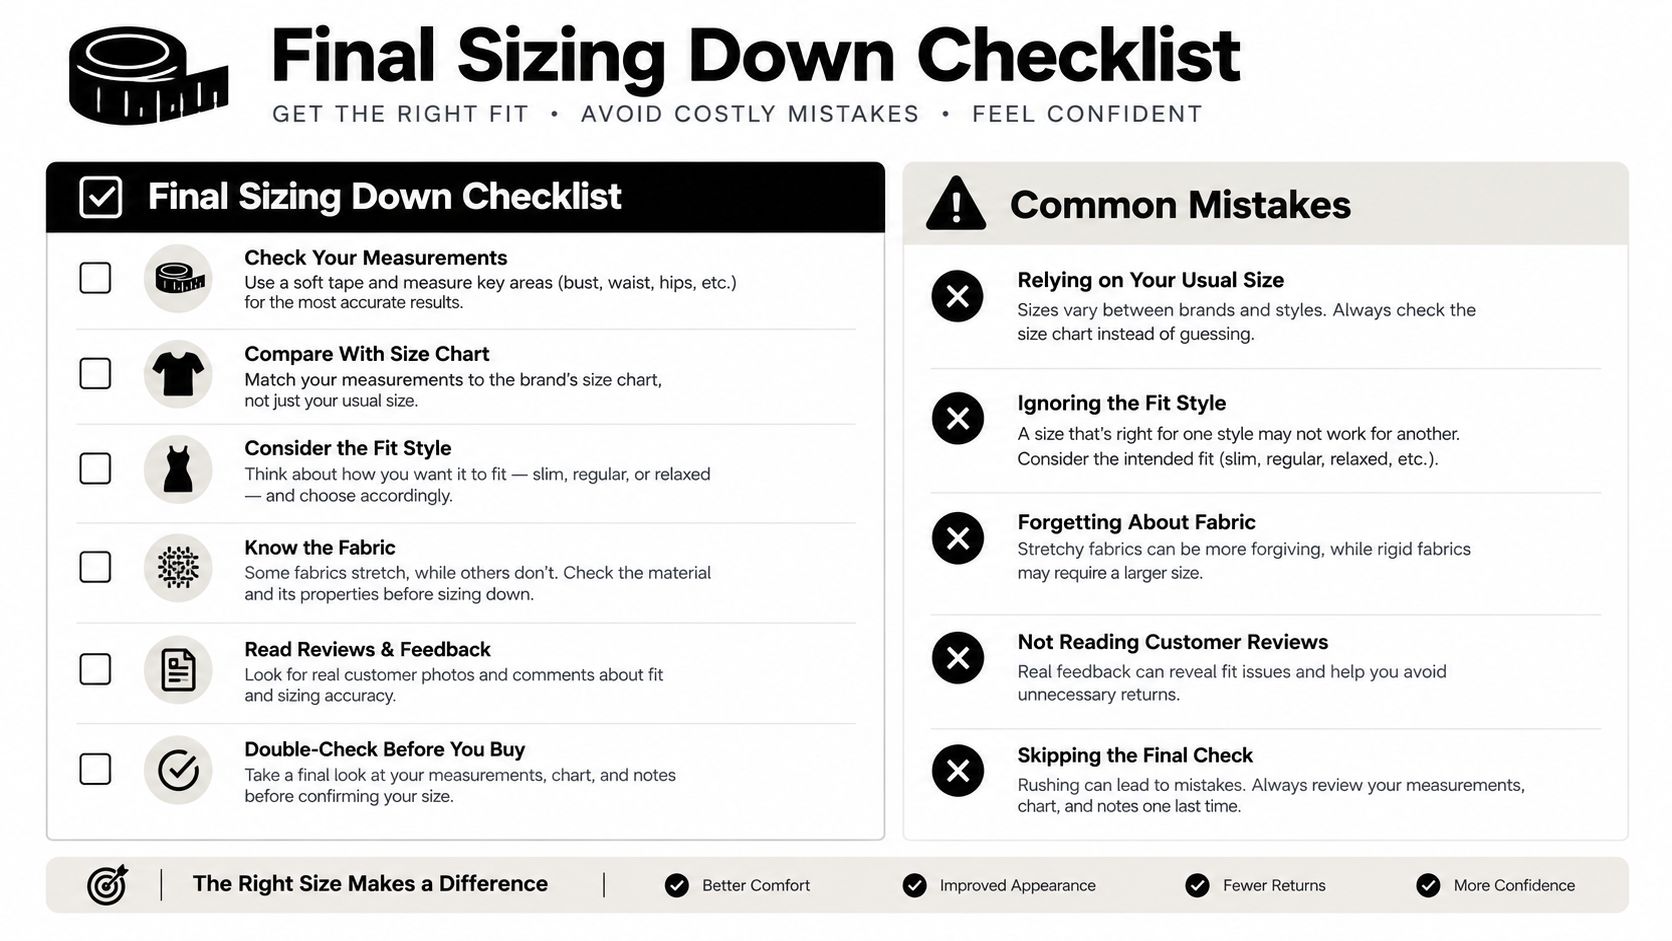
Keep the workflow beside your sewing machine. The sequence matters because every later step depends on the measurement decision made at the beginning.
- Confirm the size choice: Compare your body landmarks with the pattern's finished measurements.
- Map the excess: Mark whether the reduction belongs at the bust, waist, hip, shoulder, neckline, sleeve, or length.
- Trace the original: Preserve the untouched pattern for future comparison.
- Mark slash lines: Place them through controlled areas and toward the landmarks that need reduction.
- Overlap accurately: Use the measurement map rather than guessing by eye.
- True the pattern: Smooth the neckline, armhole, side seams, hem, and dart lines.
- Check matching pieces: Compare sleeve to armhole, front to back, facings to necklines, and pockets to their openings.
- Make a muslin: Test the altered paper before cutting the final fabric.
- Record the result: Transfer the corrected shape to fresh paper with all labels and balance marks intact.
Several shortcuts cause predictable trouble. Overlapping too much at the shoulder can collapse the neckline. Reducing the bodice without checking the armhole can leave the sleeve cap too large or the underarm too tight. Shortening only at the hem can preserve the wrong waist position. Grading through the torso without checking the hip line can create a garment that fits at the waist but won't fall cleanly over the lower body.
Small reductions under one size often don't need full pattern grading. You may be able to remove a little at the seam, or blend between nested sizes, provided the change doesn't disturb the armhole, neckline, dart, or garment balance.
Before cutting good fabric, make sure the altered pattern still has its grainline, notches, seam allowances, darts, and balance marks. A reusable pattern is the result. The paper should tell you not only what size you made, but also where and why you changed it.
Cobra DTF offers DTF transfers and a UV DTF Transfer Gang Sheet Builder for arranging artwork at the sheet length your project requires, which is useful when you're preparing accurately sized apparel graphics after fitting a garment. Visit Cobra DTF to review its transfer options and plan your next custom apparel project.