

Heating Press Machine: A Guide for Custom Apparel Shops
You're probably at the point where orders are coming in faster than your current setup can handle. Maybe you started with a household iron, a hobby press, or a borrowed machine that gets the job done on a good day and ruins blanks on a bad one. That's usually when a heating press machine stops being a nice upgrade and becomes a business decision.
The mistake new shop owners make is shopping by headline specs alone. They compare temperature range, platen size, and price, but they don't ask the harder question first. What does this machine need to do for the business you're building? A home-based Etsy shop, a local school spiritwear operation, and a contract DTF production shop should not buy the same press.
Why Your Business Needs a Heating Press Machine
A heating press machine solves the first serious bottleneck most custom apparel shops hit. You can design well, market well, and sell well, but if the final press step is inconsistent, every other part of the business suffers. Returns go up. Reprints eat margin. Turnaround slips because you're babying every garment instead of running a repeatable process.
That matters more now because heat press equipment is no longer a niche purchase for shirt shops alone. The global heat press machine market was valued at $1.82 billion in 2025 and is projected to reach $3.47 billion by 2034, expanding at a 7.4% CAGR, according to Dataintelo's heat press machine market report. That growth reflects how widely these machines are being used across custom printing, from apparel to hard goods.
What changes when you stop using a stopgap setup
A real press gives you control over the three things that drive quality: heat, pressure, and time. An iron can get hot. It can't give you even pressure across a design, and it can't repeat the same result garment after garment.
For a small shop, that shows up in practical ways:
- Fewer remakes: Designs bond more consistently.
- Faster production: You stop guessing and start repeating proven settings.
- More product options: You can branch out beyond basic tees.
- Better customer confidence: Finished items look cleaner and hold up better.
If your product line includes add-ons beyond shirts, the press becomes even more useful. Shops that sell coordinated merchandise often pair apparel with accessories, and product ideas like branded beanies with your logo can fit that model when your production setup is stable enough to handle varied blanks.
A press doesn't make a weak business model work. It does make a good one easier to scale.
Profitability starts with consistency
Most new owners think speed is the main reason to upgrade. Speed matters, but consistency matters more. A press that gives you dependable results lets you quote jobs with confidence, train staff faster, and protect margin on every order.
That's why this purchase sits near the center of a custom apparel business. It's not just equipment. It's the point where your design becomes a sellable product.
How a Heat Press Fuses Designs to Fabric
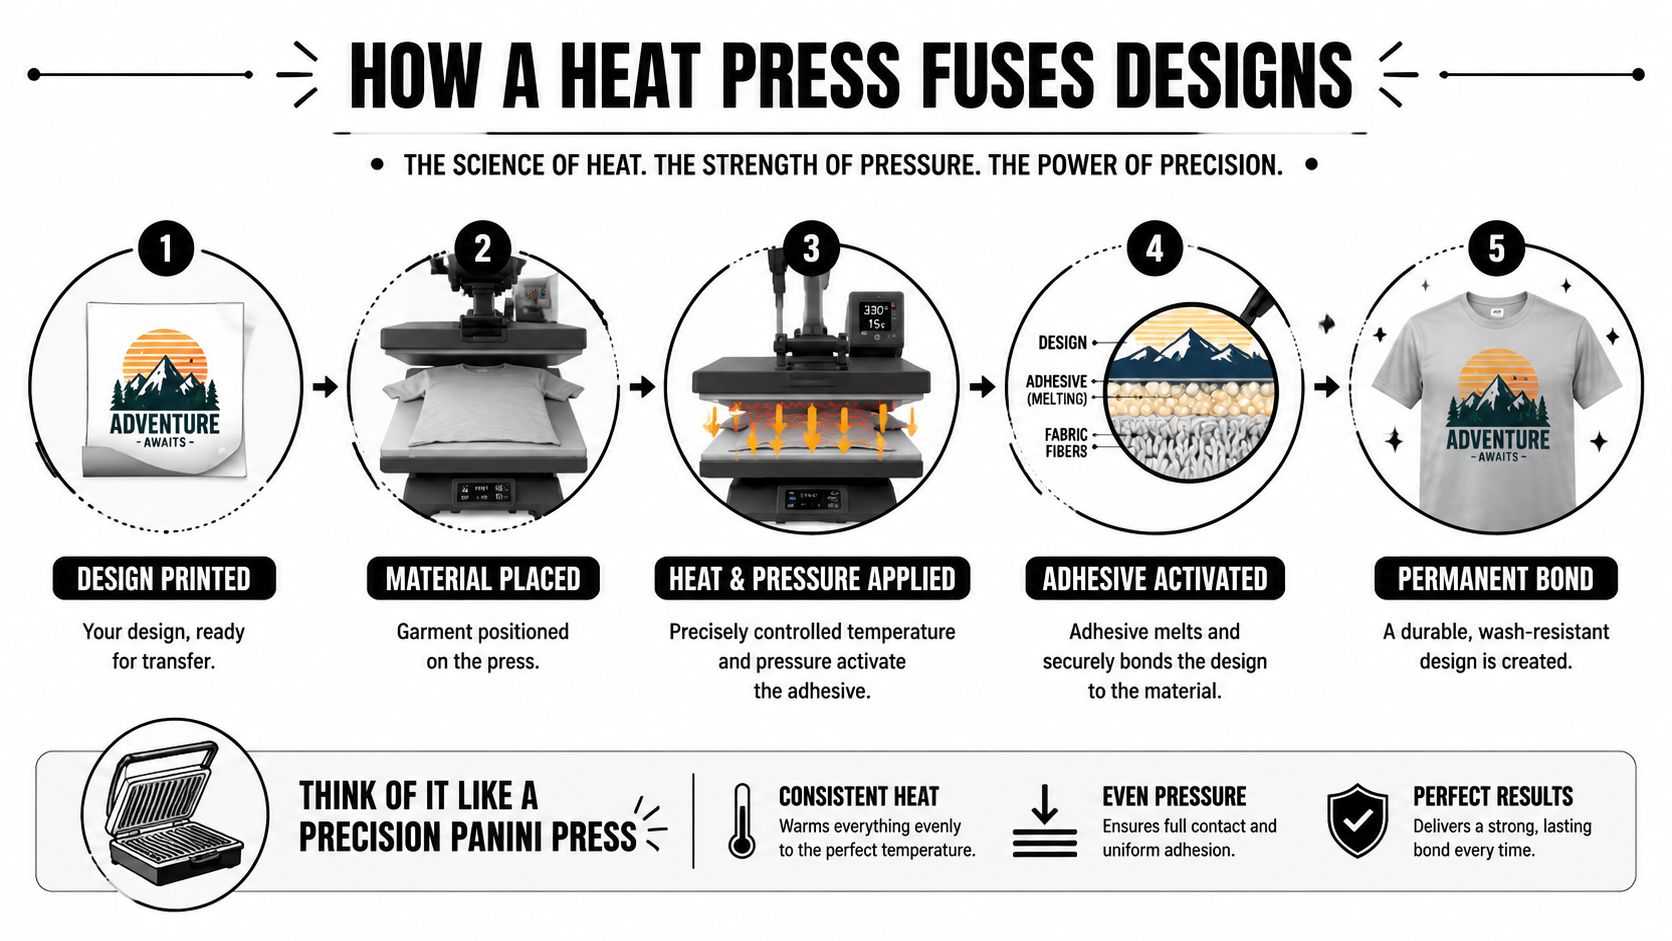
The easiest way to understand a heat press is to think of it as a precision panini press for apparel. It closes with controlled force, applies the right temperature, holds that contact for a set period, and creates a bond that won't happen from heat alone.
A transfer doesn't stick because the garment got warm. It sticks because heat, pressure, and time work together in the correct window. If one of those is off, the result usually looks fine at first and fails later.
The three variables that matter
Heat activates the adhesive or transfer layer.
Pressure creates full contact with the fabric surface.
Time gives the adhesive enough exposure to bond without overcooking the garment.
When any one of those is wrong, problems show up fast. Too little heat and the transfer doesn't fully anchor. Too much heat and you risk scorching, dye shift, or texture damage. Weak pressure leaves parts of the design under-bonded. Too much dwell time can flatten fibers or distort the print surface.
The modern standards for this process were established when the textile industry formally adopted heat transfer printing in the 1960s and 1970s. That era set benchmarks still used today, including 325°F for cotton and approximately 300°F for polyester, as explained in this overview of how heat press machines work. Those benchmarks matter because they help adhesives and inks reach the physical changes needed for a durable bond without damaging the substrate.
Why some presses feel easy to use and others don't
The machine itself doesn't create quality by magic. It gives you repeatability. Once you understand what the transfer needs, the press helps you hit that same result on purpose.
If you want a practical walk-through of operating basics before you start testing production settings, this guide on how to use the heat press machine is a useful reference. For transfer sheet handling and material behavior, you can also learn from The Fabric Company, especially if you're comparing methods and trying to understand why different materials respond differently under heat.
Good pressing is controlled bonding, not guesswork.
Choosing Your Heating Press Machine Type
Most buyers think they're choosing a machine. They're really choosing a workflow. The press type affects how you load garments, how safely you work, how much space you need, and how consistently you can keep production moving when orders pile up.
A machine that looks perfect on a product page can be wrong for your room, your order mix, or your hands. That's why the first filter shouldn't be price. It should be the kind of jobs you expect to run most often.
Clamshell, swing-away, draw, and pneumatic
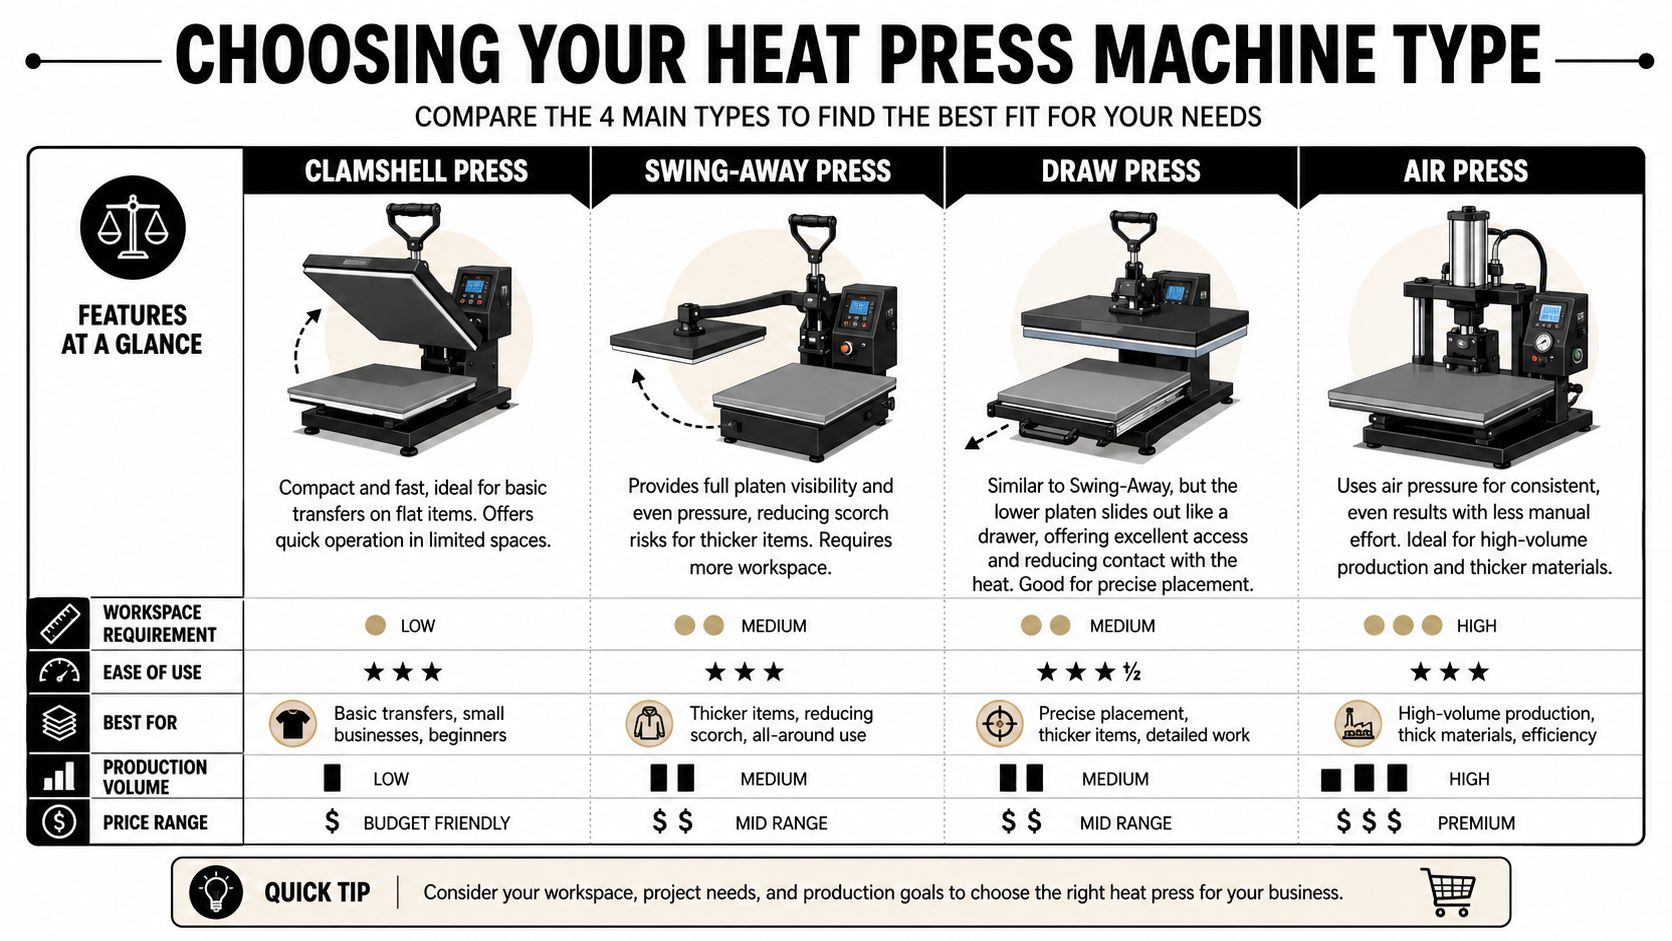
Clamshell presses open upward and close straight down. They're popular because they're compact and quick. If you're working in a small room or spare bedroom, that footprint matters. The trade-off is access. You have less open space when positioning transfers, and thicker items can be more awkward to load.
Swing-away presses move the top platen off to the side. That gives you clear access to the lower platen, which makes placement easier and reduces the chance of brushing against the heated surface while loading. The downside is simple. They need more surrounding space.
Draw presses pull the lower platen out like a drawer. For many operators, this feels safer and more precise because your hands aren't directly under the hot platen during setup. They're useful when you care about alignment and want a more comfortable loading position.
Pneumatic or automatic presses are built for repeatability. Pneumatic models use compressed air to apply pressure and offer more stable, uniform contact than traditional mechanical systems, with temperature control in the 100°C to 200°C range, according to Heat Press Leader's explanation of pneumatic heat press machines. In practice, that matters most when volume rises and inconsistency becomes expensive.
Heat Press Machine Type Comparison
| Machine Type | Best For | Pros | Cons |
|---|---|---|---|
| Clamshell | Home shops, simple flat garments, limited workspace | Compact, fast open-and-close motion, easy to fit into small setups | Less loading room, can feel cramped on thicker items |
| Swing-Away | Shops that value placement accuracy and wider platen access | Better visibility, easier loading, more room for bulky garments | Needs more floor or table space |
| Draw | Operators who want safer loading and clean transfer placement | Lower platen access is comfortable, good for careful positioning | Workflow can feel slower depending on model |
| Pneumatic or Automatic | Higher-volume production and repeat jobs | Stable pressure, less operator fatigue, stronger consistency | Higher upfront cost, added complexity, may require air setup |
Match the press to the business goal
Here's the practical way to decide:
- Starting from home: A clamshell often makes sense if space is the hard limit.
- Selling premium apparel with frequent alignment-sensitive jobs: Swing-away or draw models are easier to live with.
- Running repeat production with staff: Pneumatic becomes easier to justify because it reduces variation between operators.
- Handling thicker blanks or mixed products: More access around the platen usually beats pure compactness.
If you're weighing shop growth against current budget, this resource on choosing an industrial heat press is worth reviewing before you commit.
The wrong press isn't always low quality. Sometimes it just doesn't fit the way your shop actually works.
Decoding Key Specifications and Features
Spec sheets are useful, but only if you translate them into daily production reality. New buyers often compare machines feature by feature without asking how those features affect the kinds of orders they want to win.
Platen size changes what you can sell
Platen size isn't just about fitting a large design. It affects product range, garment handling, and how often you need to reposition. If you plan to press full-front adult prints, hoodies, tote bags, or oversized graphics, a larger platen gives you more flexibility. If you only sell left-chest logos and youth shirts, a massive platen may take up room without adding much value.
A larger work area also helps on garments that don't sit flat easily. You get more options for placement and fewer workarounds.
Temperature control and consistency matter more than maximum heat
Most transfer problems don't come from a machine lacking extreme temperature capability. They come from poor consistency. A press that drifts, runs unevenly, or overshoots forces you into constant adjustment. That slows production and makes troubleshooting harder because you can't trust the machine.
Look for controls that let you set and repeat specific temperatures with confidence. If you plan to work across different fabric types, stable control matters more than a flashy display.
Pressure adjustment is a business feature
Pressure is where cheaper machines often feel vague. If adjustment is clumsy or inconsistent, you'll spend extra time testing and still get mixed results from one garment to the next.
Think about pressure in terms of outcome:
- Accurate pressure control: Better bonding and fewer edge failures
- Easy repeat adjustment: Faster switching between product types
- Consistent pressure across the platen: Fewer surprises on large graphics
Timers, presets, and ergonomics save more than effort
Digital timers sound basic until you're running several garment styles back to back. Presets and intuitive controls reduce errors when you switch from one blank to another. Ergonomics matter too. Handle resistance, platen access, and loading comfort affect fatigue, especially on long production days.
A heating press machine should remove friction from the workflow. If a feature doesn't help quality, speed, safety, or product range, it's usually marketing noise.
The Perfect Workflow for Cobra DTF Transfers
A strong DTF workflow is mostly about discipline. Shops get into trouble when they rush setup, skip pre-pressing, or change two variables at once after a bad result. The transfer gets blamed, but the issue is often process control.
For DTF, your goal is straightforward. Create clean contact, use the right heat and pressure for the film and fabric, peel at the correct stage, and let the transfer set without shifting the garment.

The setup that prevents most mistakes
Before the first shirt goes on the platen, warm the press fully and keep the workspace clean. Lint, moisture, wrinkles, and seams cause more bad presses than people realize.
Use this basic workflow:
-
Pre-press the garment
Remove moisture and flatten the print area. This helps the transfer sit against a stable surface instead of a puffed or damp one. -
Position the transfer carefully
Alignment should be decided before heat enters the process. Once the platen comes down, small placement errors become wasted blanks. -
Apply the main press with controlled settings
For DTF, the machine has to hold the right relationship between heat, pressure, and dwell time. Industrial applications depend on synchronizing all three, and pneumatic systems are especially useful here because they maintain pressure consistently and reduce mechanical wear. Avery Dennison's apparel solutions guidance notes pressure can reach 17.6 lb (8 kg) in industrial applications, where consistency is critical for permanent bonding and avoiding design distortion during release and cooling, as described on Avery Dennison's heat press product page. -
Peel according to the transfer requirement
Some films are hot peel. Others need a cold peel. If you guess here, you can ruin an otherwise correct press. -
Finish with a post-press if the transfer calls for it
This can help settle the print surface and improve feel, depending on the film and garment.
What works and what usually fails
What works: steady settings, a clean platen, garments prepped before loading, and one tested workflow per fabric category.
What fails: chasing problems by increasing heat every time, peeling too early, or using uneven pressure around seams and collars.
If you want a settings reference built around DTF production, this DTF transfer heat press settings guide is the right place to compare transfer instructions before a run. If you're still deciding whether DTF fits your shop model, you can also discover DTF print shirt benefits and compare where it makes sense alongside other decoration methods.
One practical note on materials
Cobra DTF offers USA-made DTF transfers for shops that want a domestic supply option with published pressing guidance. That's useful when you're trying to standardize workflow instead of guessing from transfer to transfer.
If a transfer looks fine off the press but fails after handling or washing, the problem usually started with pressure, peel timing, or garment prep.
Essential Maintenance and Safety Practices
The shops that get the most out of a heating press machine usually aren't the ones with the fanciest equipment. They're the ones that keep it clean, check it regularly, and don't treat maintenance as optional.
A neglected press drifts slowly. You don't notice it all at once. You notice it when one corner stops bonding like the others, when scorch marks start showing up on familiar blanks, or when pressure feels different even though the dial hasn't changed.
A simple maintenance routine
Build these checks into normal production:
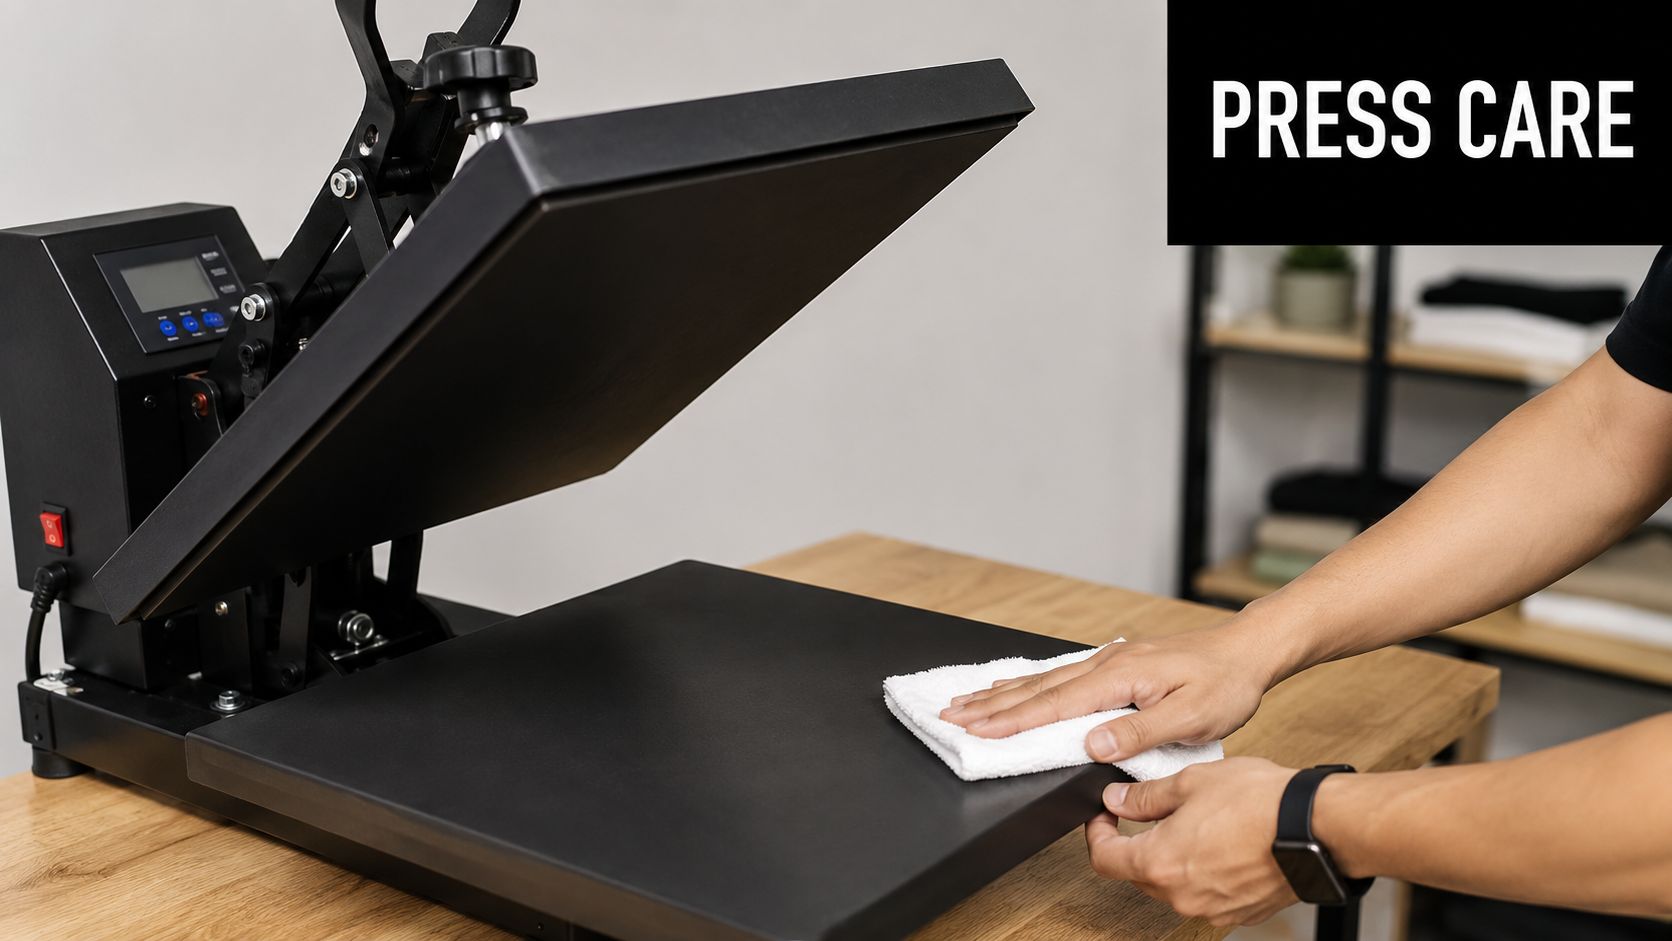
- Wipe the platen regularly: Residue from transfers, adhesives, or protective sheets can affect contact and mark garments.
- Inspect pressure feel: If the machine suddenly feels easier or harder to close on the same blanks, investigate before running an order.
- Watch for uneven results: Repeated weak spots often point to heating or pressure inconsistency.
- Check moving parts: Handles, pivots, and slide mechanisms should move smoothly without wobble or strain.
- Keep the lower platen clear: Lint, thread, or stray backing pieces can create uneven surfaces.
Safety rules that save skin and inventory
Heat presses combine high temperature with a closing mechanism that can burn or pinch in an instant. The risk isn't theoretical. It's built into the tool.
A few habits matter a lot:
- Give the press breathing room: Don't crowd it with boxes, blanks, cords, or finished garments.
- Keep your loading motion consistent: Operators get hurt when they improvise around a hot platen.
- Use protective sheets when appropriate: They protect garments and reduce direct contamination of the platen.
- Don't leave test pieces under the press area: Loose material becomes a distraction and sometimes a hazard.
- Train anyone who touches the machine: Even a simple clamshell can hurt an untrained helper.
Keep your hands where they always go. Most press injuries happen during rushed loading, not during careful production.
Ventilation also matters, especially when pressing transfer materials repeatedly in a small room. A comfortable, organized press station helps you work more accurately and more safely.
Troubleshooting Common Heat Press Issues
When a press job goes wrong, don't change everything at once. Start with the symptom, trace it back to the most likely variable, and test one correction at a time. That approach saves blanks and gets you back into production faster.
Quick diagnosis guide
| Symptom | Likely Cause | Solution |
|---|---|---|
| Transfer peels at the edges | Pressure too light, temperature too low, or press time too short | Recheck pressure first, then confirm your temperature and dwell settings for that transfer |
| Design looks hazy or doubled | Transfer shifted during lifting or peel timing was wrong | Stabilize the garment before release and follow the correct peel method |
| Fabric scorches or gains shine marks | Temperature too high, dwell too long, or direct platen contact on sensitive fabric | Lower heat, shorten press time, and use a protective layer if appropriate |
| One side bonds better than the other | Uneven pressure, debris under the garment, or platen inconsistency | Clear the lower platen, rebalance the garment surface, and retest with a centered sample |
| Print feels under-bonded after pressing | Garment wasn't pre-pressed or moisture remained in fabric | Pre-press first and make sure the print area is flat and dry |
What new shops often misdiagnose
The biggest misread is blaming the transfer when the issue is setup. If a design fails repeatedly in the same area, look at the platen surface and pressure path before you blame materials. If multiple garment types start showing the same issue, the machine or process is usually the common denominator.
Another common mistake is reacting to poor adhesion by only increasing temperature. That sometimes masks the underlying problem for one run and creates a new one on the next. Pressure and peel timing deserve just as much attention.
A practical testing routine
Use a small, controlled retest process:
- Change one variable only: Heat, pressure, time, or peel stage
- Use the same garment type: Don't troubleshoot across mixed blanks
- Check problem areas first: Edges, corners, seams, and large ink zones
- Write down the setting that worked: Memory is unreliable during production
A heating press machine becomes easier to manage once you stop treating bad results like random luck. Most failures leave clues. Good operators learn to read them.
Your Next Step Toward Professional Quality
A heating press machine should match the business you're building, not the fantasy version of it. If you're working from a small room and pressing short runs, compact workflow may matter more than advanced automation. If you're pushing steady volume, consistent pressure and operator comfort will matter more than saving a little on the initial purchase.
That's the fundamental decision. Buy for your order mix, your workspace, and the kind of repeatability your customers expect. Focus on platen access, pressure consistency, temperature stability, and how easily the machine fits into your daily routine. Those factors affect margin more than a flashy control panel ever will.
The same logic applies after the machine arrives. A good press setup only pays off when your workflow is disciplined. Pre-press garments, keep the platen clean, test settings before important runs, and troubleshoot by symptom instead of guessing.
Professional results come from the combination of equipment and materials. If the press is solid but the transfer process is inconsistent, quality still suffers. If the transfer is good but the press can't deliver repeatable heat and pressure, you'll still fight defects.
If you're ready to pair a dependable press workflow with transfer options built for custom apparel production, explore Cobra DTF for USA-made DTF transfers and practical guidance that helps small shops standardize results.