
Blank T Shirt Printing: A Practical Guide for Shops
Monday morning starts with a stack of blank T-shirts beside the heat press, a DTF gang sheet waiting to be cut, and several orders that need to leave before lunch. One customer wants a single detailed logo, another needs a matching run of shirts, and a third has supplied a design that's already been cut in vinyl. The hard part isn't just making each print look good. It's choosing a process that fits the artwork, the fabric, the order size, and the deadline without turning the blank into a costly test.
That's the practical reality of blank T-shirt printing. The blank garment sets the limits for color, feel, fit, and heat tolerance, while the decoration method determines setup, handling, and repeatability. A reliable shop treats those choices as one production workflow, not as separate purchasing and printing decisions.
What Blank T-Shirt Printing Looks Like in a Real Shop
Before the first shirt goes on the press, sort the orders by method and risk. A detailed, multicolor design with a short run may suit DTF. A repeat design across a larger batch may justify screen printing. A personalized name or simple number can make HTV the sensible choice, even if cutting and weeding each piece takes time.
Then check that the blank in the order is the blank on the table. Confirm style, size, color, and fiber content against the job ticket. Keep garments clean, dry, and organized by order so a dark shirt doesn't get mixed into a light-color run and a size substitution doesn't slip through unnoticed. If stock is stacked high, accessible storage matters: shops planning a reorganized print area can find pallet rack solutions in Utah as one resource for managing supplies and workflow.
The blank is not a neutral surface. Its weave affects how a print sits, its fiber content affects how it responds to heat and ink, and its color changes what the design needs to look right. Even the same design can feel different on a light, soft shirt and a heavier, more structured one. That's why experienced operators test the actual garment, not just a scrap of similar fabric.
The scale of standardized blanks helps explain why small shops can focus on decorating rather than manufacturing garments. Industry data reports approximately 27 billion T-shirts produced worldwide in 2024, up 7.8% from 2023, while worldwide consumption reached roughly 22 billion units valued at $85.9 billion (IndexBox's overview of the T-shirt market). For a shop, that broad supply doesn't remove the need to qualify a blank. It makes careful selection more important, because a dependable style can become the basis for repeat orders.
A useful morning routine is simple: match each order to a decoration method, verify its blanks, identify the first-piece test, and only then start production. That's how a shop avoids treating every shirt as a separate surprise.
Choosing Blanks That Actually Print Well
Start with fiber, then consider weight, surface, color, and shrink behavior. Cotton is a familiar, versatile choice, but cotton garments can vary in softness and surface texture. Polyester and blends feel different and can respond differently to heat and ink. Tri-blends bring their own hand and stretch, which may affect how a transfer sits. Don't assume a garment will behave like another shirt just because both are labeled “cotton” or look similar on the rack.
Weight changes the feel and handling. A lighter shirt drapes more and can shift more easily on the platen, while a heavier blank feels more substantial and usually lies flatter during loading. Neither is automatically better. The right choice depends on the customer's expectations and whether the print needs a smooth, stable surface or a softer, lighter garment.
The T-shirt's role as a printed surface has a long history. A printed shirt appeared on the cover of Life magazine as early as 1942, and screen printing became a dominant commercial method after Michael Vasilantone developed a rotatable multicolor garment screen-printing machine in 1960 (T-shirt history). The basic production idea still holds: choose a blank that suits the wearer, then decorate it to suit the design.
Compare the garment before committing
| Blank type | Best decoration method | What to test |
|---|---|---|
| Smooth cotton | DTF, screen printing, or HTV | Print feel, placement, and wash response |
| Heavier cotton | Screen printing or DTF | How the shirt sits on the platen and how the print feels |
| Polyester | Tested transfer or polyester-compatible process | Heat tolerance, color change, and adhesion |
| Cotton-poly blend | DTF or screen printing after testing | Dye response and print appearance |
| Tri-blend | Small test with the chosen method | Stretch, recovery, and how the design moves with the fabric |
A quick hand test helps catch problems before a full case arrives. Stretch the body fabric gently and release it. Notice whether it returns smoothly or stays distorted, then feel the surface for loose fibers, uneven texture, or a finish that might interfere with ink or adhesive. For a fuller explanation of how fibers affect decoration, see this guide to T-shirt material.
Shrinkage is a production issue, not just a fit complaint. A garment that changes shape after washing can distort a multicolor print or shift the design relative to seams. Ask for garment-care and shrinkage information from the supplier, then wash and test a representative blank when the job depends on stable sizing. If the print must align across multiple colors, qualify the blank before ordering the production quantity.
Running a DTF Workflow From Artwork to Shirt
DTF works best when the artwork, printer, film, powder, and press are treated as one system. The process starts at the file, not at the heat press. Check the design's size, transparent areas, fine detail, and color before sending it through the RIP software. Confirm the printer's profile and white underbase settings for the film and ink system you're using, then make sure the film is loaded in the correct orientation.
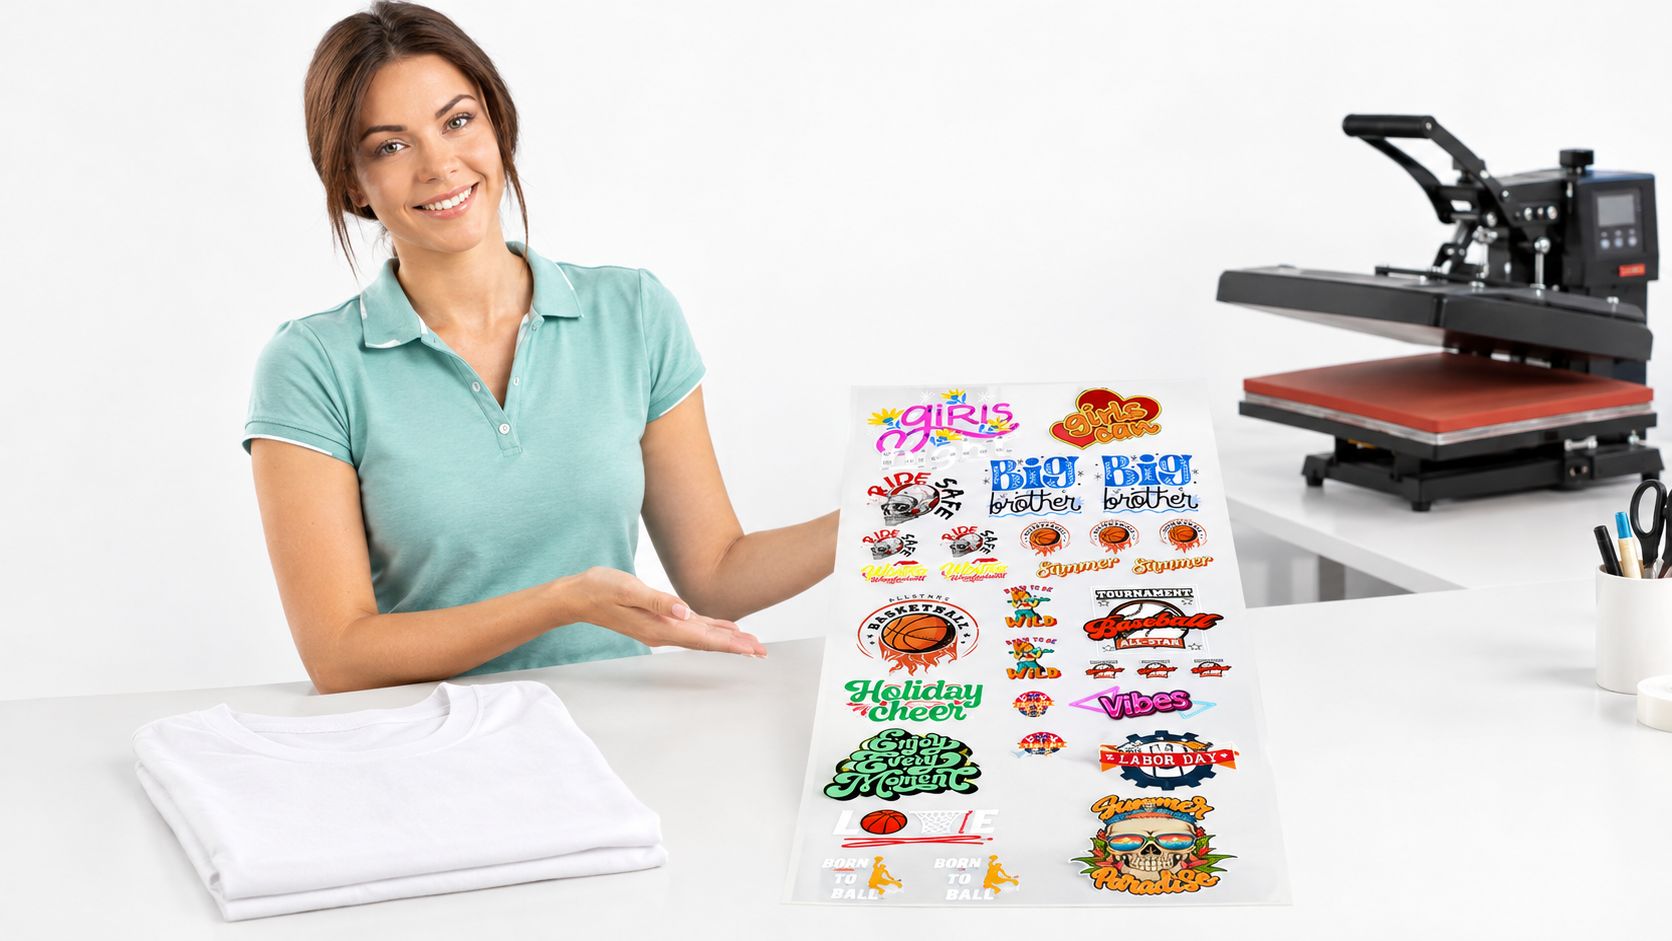
A gang sheet puts multiple designs on one print layout. Operators use one to group artwork, reduce unused film space, and prepare related transfers together. A DTF Transfers Gangsheet Builder provides a way to upload, arrange, resize, and preview designs in a layout, with automatic arrangement available for users who want help placing artwork.
From printed film to press-ready transfer
After printing, apply hot-melt powder evenly over the wet ink. Shake off excess powder, especially around fine details, then cure the powder according to the ink-and-film system's instructions. There isn't a universal temperature and dwell time that can safely be prescribed for every printer, powder, and curing setup. Follow the supplier's profile and verify that the adhesive has fused evenly before using the transfer.
Trim transfers to suit the job, keeping cut edges clear of the artwork. Store them flat and clean, following the supplier's storage guidance. A bent, dusty, or poorly handled transfer can make a good print look like a press failure.
Pre-press the blank to remove wrinkles and surface moisture, then position the transfer with the garment laid square on the platen. Use the transfer manufacturer's recommended settings and peel method rather than guessing from a different film or garment. For a process-specific walkthrough, refer to this DTF printing process guide.
The first shirt is a test, even when the job feels routine. Check position, edges, coverage, and hand feel after pressing. If the result isn't right, stop and correct the process before loading the remaining blanks. That pause costs less than discovering the same defect across a batch.
DTF vs Screen Printing vs HTV vs DTG vs Sublimation
For a 24-shirt reorder, choose by the actual job rather than by whichever method sounds most versatile. DTF suits artwork with detail and varied colors, and it avoids screen creation for each design. Screen printing can become more economical when the same design runs in quantity, but setup and color separations make short runs less attractive. HTV is straightforward for a one-off name or simple shape, while cutting and weeding every shirt can slow down a repeat batch.
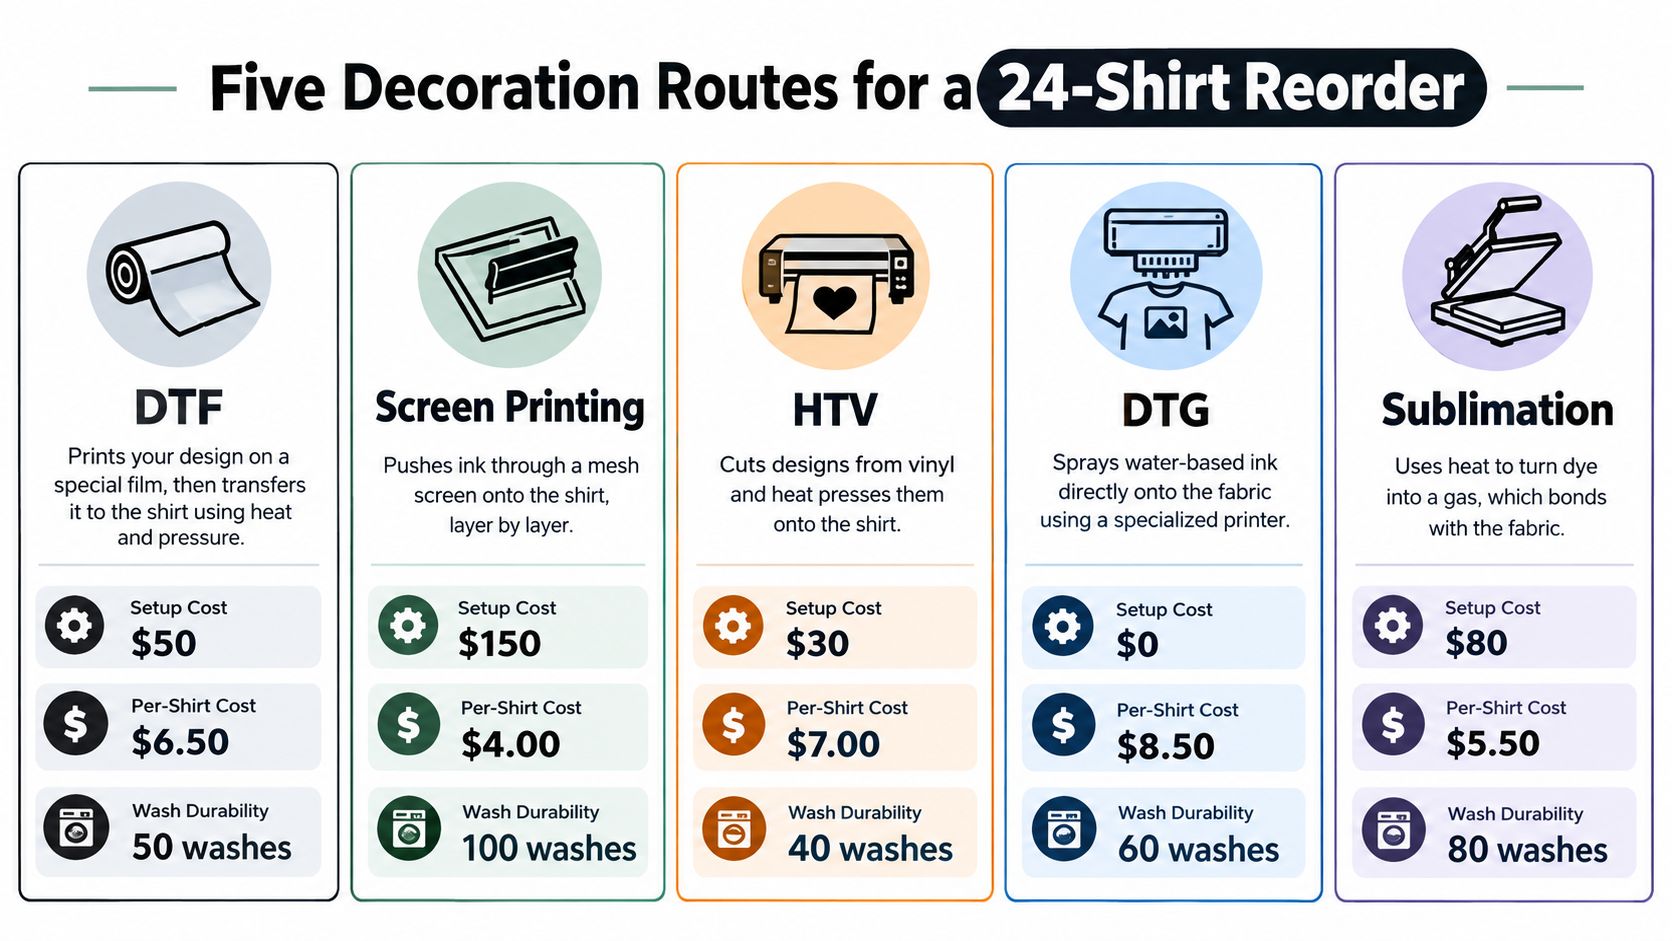
That infographic includes specific setup, per-shirt, and durability figures. Treat those values as an illustration, not a universal quote or guarantee. Real costs depend on equipment, labor, consumables, garment choice, artwork, and the care the finished shirt receives. For a DTF job where artwork sizes vary, DTF Transfers By Size offers size-specific transfer options for placements such as chest logos, sleeve designs, and full-front graphics.
DTG can suit photo-style artwork on cotton, but fabric preparation and curing are part of the production process. Sublimation is limited to suitable polyester garments and light-colored bases, so it isn't a general substitute for printing on ordinary cotton blanks. DTF is often a useful default for a small shop handling mixed artwork and shorter runs, but it doesn't make the other methods obsolete.
When each method earns its place
Screen printing demands controlled setup and registration. Technical guidance places common screen tension in the 0–25 N/cm range and suggests a roughly 75° squeegee angle for consistency. It also identifies 110-mesh screens for heavier ink deposits and specialty finishes, and 200+ mesh for halftones and fine lines (FESPA's textile screen-printing quality guidance). That control matters: a screen that's too coarse for the artwork, poor tension, or inconsistent pressure can turn a repeat run into a stack of rejects.
Shop-floor rule: Choose the method that makes the next repeat order easier, not just the first shirt faster.
For a consistent design ordered again and again, screen printing may reward the setup. For uncertain designs, size variation, or a quick reorder, DTF can reduce the friction of changing artwork. HTV still makes sense when personalization is the point. Choose by the job's real constraints, then record what the method costs in labor and rework.
Heat Pressing and Curing Without Burning the Shirt
The press is where a sound transfer can become a poor garment. Temperature, pressure, dwell time, and peel method must come from the specific transfer supplier's instructions, because film, adhesive, fabric, and press behavior vary. A setting that works on one cotton shirt isn't automatically safe for a polyester blend or tri-blend. The supplied facts don't establish universal settings for those fabrics, so don't copy a generic temperature chart and treat it as a guarantee.

Before pressing, check the garment label and verify that the transfer profile fits the fabric. Lay the shirt flat, align seams, and pre-press only as directed for the garment and transfer system. That clears wrinkles and can help remove surface moisture, but too much heat on a sensitive fabric can leave shine or discoloration. Confirm the press is producing even contact across the platen, especially near the edges.
Follow the transfer's peel and cure instructions
Some transfers are designed for a hot peel, others for a cold peel, and some require a specific wait before peeling. Follow the instructions for the transfer you're holding. Don't peel early just because the film looks ready, and don't add a second press unless the supplier calls for it. Extra pressure or heat can change the finish, flatten the garment, or cause a misaligned print to ghost.
DTF powder curing can happen in a dedicated curing unit or through a process specified by the supplier. Either way, verify that the adhesive is properly fused before production. A short press test on a representative blank lets you inspect the result without risking an entire order.
For repeatable work, write the approved fabric, press profile, pressure, dwell, and peel method on the job record. Use that record when the order returns, but still check the blank and equipment before starting. Research on digital textile printing finds that incorrect curing can reduce wash durability; recognized quality checks include AATCC TM61 for accelerated laundering and TM16.1 for outdoor lightfastness testing (digital textile printing research). See the heat press settings guide for further process guidance, and test before scaling production.
Troubleshooting the Prints That Come Out Wrong
A shirt comes off the press with a shiny patch across the chest. Stop the run. On a polyester blend, the first suspicion should be excess heat or dwell, not a bad transfer. Check the garment label and the transfer instructions, then test a corrected profile on another blank before continuing.
The most common failures have a small number of likely causes. Diagnose the symptom before changing several settings at once.
- Scorching or shine: Reduce heat exposure according to the fabric and transfer guidance, and test again on the same blank.
- Edges lifting after washing: Check that the transfer was pressed and peeled according to its instructions, then confirm the press made even contact.
- Ghosted image: Keep the transfer fixed during the press cycle and avoid shifting the garment before any required second press.
- Off-center placement: Use a placement guide and align the shirt to its seams before applying the transfer.
- Dull or uneven color: Inspect the artwork and transfer first, then check that the blank's color and fabric suit the intended result.
- Print feels like it sits on top: Confirm the transfer is fully applied according to its specifications and test the complete process on a representative garment.
A failed first shirt may be recoverable if the problem is placement and the transfer system allows a safe correction. A scorched garment, badly shifted graphic, or visibly damaged surface usually isn't worth trying to disguise. Scrap it, tag the failure, and keep it away from finished inventory.
A good troubleshooting note records the blank, transfer, press settings, symptom, and fix. “Bad press” isn't enough information to prevent the same mistake on the next order.
Change one variable at a time. If you lower heat, don't also change pressure and dwell in the same test, or you won't know which change fixed the problem. Keep the failed shirt beside the approved sample while you evaluate the next test. That comparison is more useful than relying on memory after a busy run.
A Shop Floor Checklist to Tape Next to the Press
Before production, match the blank to the job ticket. Check the style, size, color, fabric label, surface, and condition. Pull a representative garment for a test, especially when the blank, transfer, or artwork is new. Keep blanks sorted by order so a correct print doesn't end up on the wrong size or color.
Before pressing, confirm the artwork orientation and placement, inspect the transfer for damage, and set the press according to the transfer supplier's instructions for that fabric. Use the approved peel method. Don't substitute a familiar setting just because the last job used a similar-looking shirt.
After the first press, inspect alignment, coverage, edges, and fabric condition. Test the print as appropriate before running the rest of the order. Record the blank and process details so a repeat order starts from a known result rather than guesswork.
Before reordering stock, check which sizes and colors move, which blanks produce reliable prints, and which designs are still uncertain. For a proven design with predictable demand, buying blanks in advance may reduce production friction. For a new design or a wide range of size-color combinations, made-to-order work can limit the risk of leftover stock. Compare garment, decoration, labor, shipping, storage, damaged units, and unsold inventory before choosing.
Sustainability claims need the same verification as print settings. One industry source reports that 80% of custom printers market themselves as eco-friendly, while 22% use fabrics with verifiable certifications such as GOTS or OEKO-TEX, and 67% of mid-sized buyers prioritize certified materials (custom apparel industry discussion). Ask for documentation tied to the exact garment style, including fiber content, certification scope, production location, durability, and packaging. A certified blank isn't automatically the lower-impact choice if poor durability leads to reprints or excess inventory.
Keep the checklist visible, and update it when a test changes the approved process. For mixed, short-run work, DTF may be the practical starting point. Switch to screen printing when a repeat design and order volume justify the setup, and keep HTV for jobs where individual names or simple shapes matter more than batch speed.
Cobra DTF offers custom DTF transfers and a gang sheet builder for arranging and previewing artwork before ordering, which can fit shops testing designs or handling mixed short runs. Visit Cobra DTF to explore those options and plan your next blank T-shirt order around the transfer workflow that suits it.