

Shirt Folding Board Size for Clean, Consistent Folds
You've got two operators folding the same adult T-shirt, but the finished stacks don't match. One shirt has sleeves peeking past the fold, another is wider at the hem, and a third won't sit squarely inside the mailer. The problem may not be training or speed. It may be the shirt folding board size.
A board is a production fixture, not just a laundry accessory. Its footprint determines where the shoulders land, how sleeves wrap, how much fabric bunches at the edges, and whether every finished shirt occupies the same space. The right choice depends on the garment category, fabric weight, finished presentation, and packaging format.
Why Folding Board Size Changes Everything on a Packing Bench
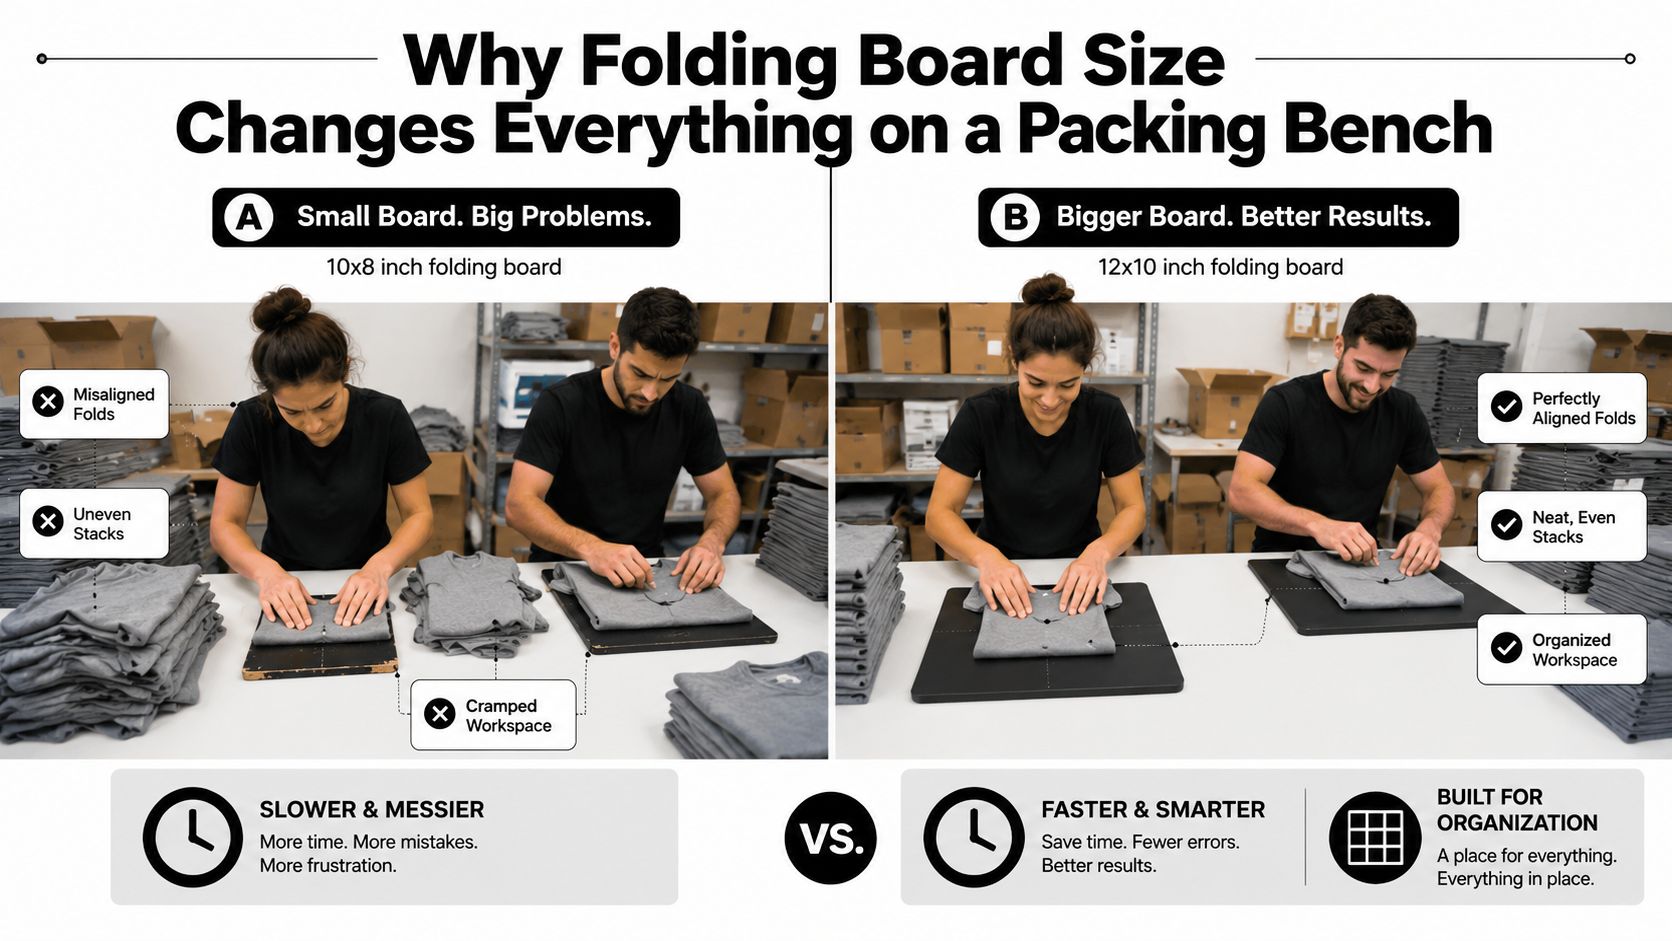
At a busy folding station, the difference becomes obvious within a few minutes. One operator uses a small legacy board on an adult tee. The body hangs beyond the edges, the sleeves escape the intended fold line, and the operator has to smooth the fabric repeatedly before closing the fold. The second operator uses a larger board that supports the shoulders and body. The sleeves drop into the same position each time, and the finished shirt lands squarely in the stack.
That mismatch creates more than an untidy appearance. When folded widths and depths vary, packers have to adjust bundle counts, force shirts into mailers, and realign stacks before placing them on a shelf or into a carton. A board that matches the garment's largest working dimension removes much of that adjustment from the process.
Set the station around the garment
Start with the largest shirt in the SKU family, not the smallest one. Lay it flat, place the board centrally, and check three contact points:
- Shoulders: The seam line should sit just inside the board's working edges.
- Sleeves: Each sleeve should wrap or fold without the cuff slipping beyond the panel.
- Hem: The bottom should finish cleanly without dragging across the bench.
Once those points line up, the fold becomes repeatable. The result is a stable finished footprint that fits the same packaging and display locations without an extra quality-control step for every shirt.
Practical rule: Choose the board for the largest garment in the batch, then test the smallest garment separately. One board may serve a narrow range, but it shouldn't be forced across every category.
Packaging should be part of the setup decision. If folded shirts go into a bag, confirm the finished dimensions before ordering a large supply of packaging bags for shirts. For retail presentation, folded garments may also need garment protective covers when protection from dust, handling, or transit matters.
The Modern Adult Board Footprint and Why It Became Standard
A widely used modern shirt folding board measures about 27.5 by 22.4 inches unfolded, then collapses to roughly 9.5 by 11.6 inches for storage, according to the dimensions shown in this retail folding-board listing. Close variants use nearly the same geometry, which explains why this style appears in homes, retail operations, and general laundry environments.
The large unfolded footprint gives the operator room to position an adult T-shirt before folding. The hinged or slotted panels then reduce the garment to a compact, consistent rectangle. The board itself is large while open, but its folded storage footprint is close to letter-sized, making it easier to keep several boards beside a packing bench.
Why the geometry works
The board's value comes from the relationship between its open working area and its final fold. It gives the shoulders and sleeves enough support to prevent fabric from drifting, while the closing panels establish the same crease positions on every shirt.
A common adult board geometry is also designed to create a finished fold of about 9 by 12 inches, a format used for stacking adult T-shirts and similar garments in retail and laundry settings, as described in this folding-board product specification.
| Feature | Measurement | Purpose |
|---|---|---|
| Unfolded board footprint | About 27.5 by 22.4 inches | Supports adult T-shirts during positioning |
| Folded storage footprint | About 9.5 by 11.6 inches | Keeps the board compact between uses |
| Finished shirt fold | About 9 by 12 inches | Creates a stackable retail-style presentation |
This format works well when one station handles a consistent adult assortment. It doesn't automatically solve oversized blanks, thick sweatshirts, or mixed kids and adult inventory. Those garments need their own test fold because a board can be widely used and still be wrong for a particular SKU.
Smaller Legacy Board Sizes Still in Use
Smaller boards haven't disappeared because they solve a different presentation problem. Fixture suppliers still list formats around 8.5 by 12 inches, 10 by 12 inches, and 11 by 12 inches, while other products use 8.5 by 12 inches or 9.5 by 14 inches, as shown in this display-fixture reference.
A 9 by 12 inch board has also been associated with department-store folding practices for large shirts in an instructional article from 2013, which illustrates an important point. Board dimensions have historically followed garment categories and store presentation methods, not one universal rule.
Where the smaller format earns its place
A narrow board is useful when the garment itself is narrow or when the display needs a compact finished rectangle. Undershirts, lightweight fitted knits, children's garments, and some dress shirts can look cleaner when folded tightly rather than spread across a larger retail-style footprint.
| Board Size | Typical Garments | Best Use Case |
|---|---|---|
| 8.5 by 12 inches | Undershirts and smaller lightweight garments | Compact drawers and travel kits |
| 9 by 12 inches | Fitted shirts and selected adult shirts | Tight department-store style folds |
| 10 by 12 inches | Narrow knits and smaller adult cuts | Shelf stacks with limited depth |
| 9.5 by 14 inches | Dress shirts and longer fitted garments | More length without a wide body |
The trade-off is clear. A small board can produce a tidy result on a fitted shirt, but it gives a relaxed graphic tee nowhere to go. Shoulder fabric may bunch, sleeves may fold back over themselves, and the hem may extend beyond the bottom panel.
Treat these boards as complementary tools, not inferior versions of a large board. Keep them at stations handling compact garments, and keep adult graphic or oversized blanks on a broader fixture.
From Board Dimensions to Finished Fold Footprint
The open board doesn't become the finished shirt. Panels guide the shirt into a smaller rectangle, and the final footprint depends on where the sleeves and body settle during that sequence. A board that's too narrow creates edge spill. One that's too broad may leave a larger finished fold than the packaging or shelf was designed to hold.
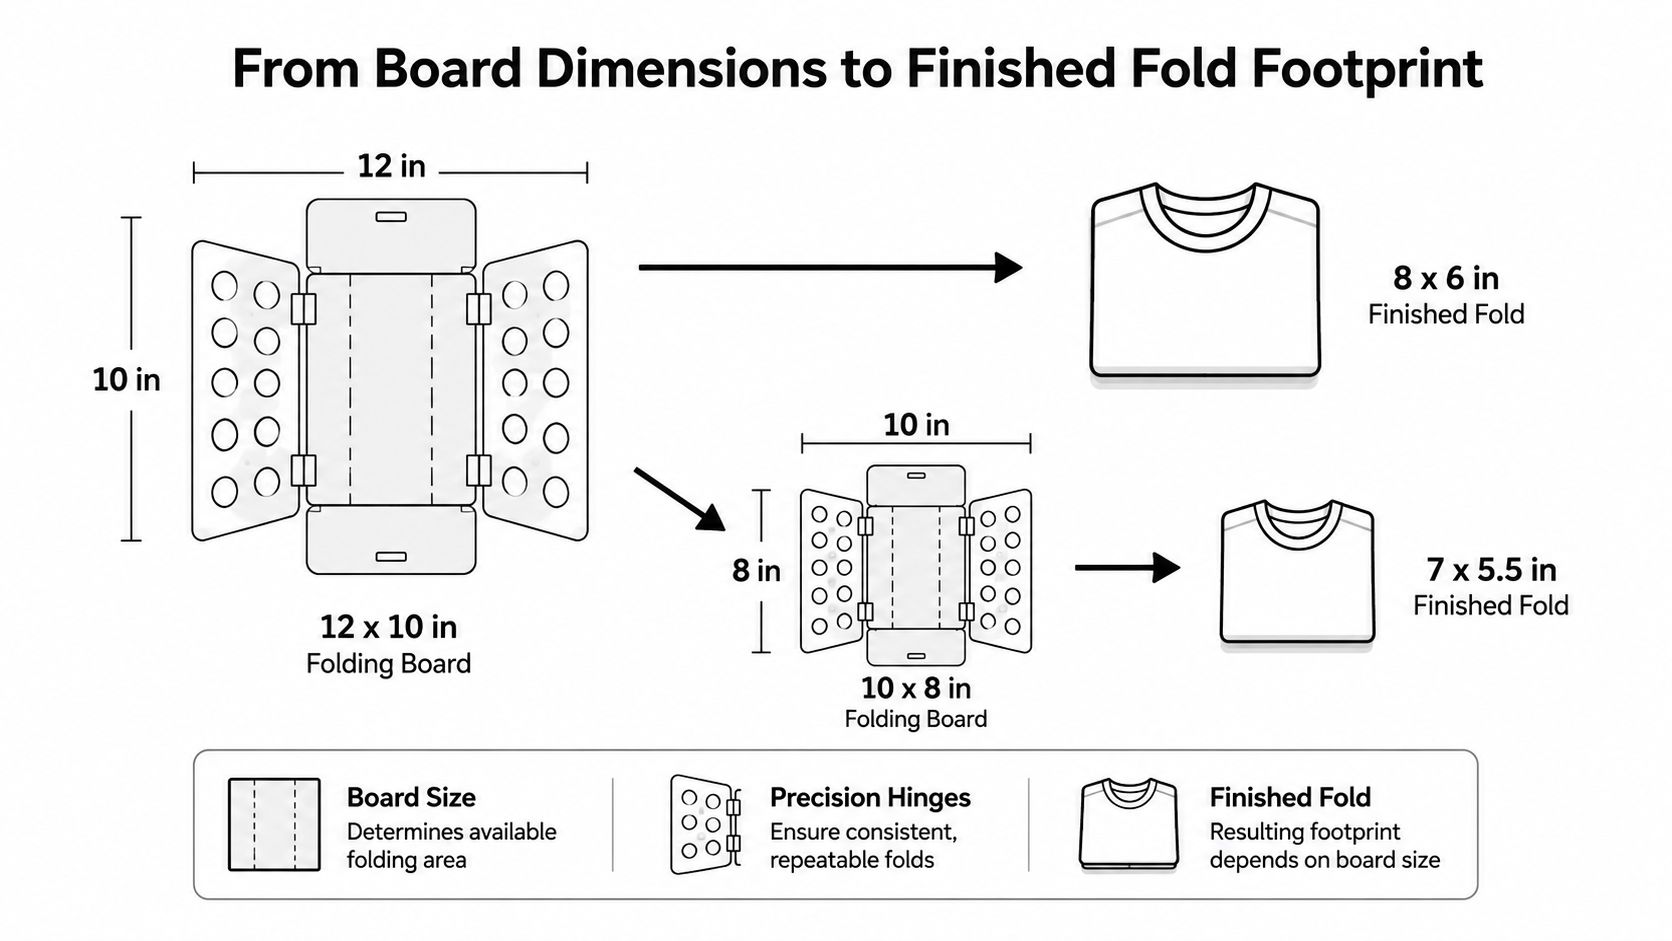
A compact board around 12 by 10 inches can produce a finished fold near 8 by 6 inches, while a 14 by 12 inch board can produce a result closer to 10 by 7 or 8 inches, depending on sleeve placement and garment shape. These figures are useful as working references, not guarantees, because fabric thickness, shoulder width, and operator technique change the result.
Read the footprint in three directions
Measure the finished shirt after folding, not just the board before folding. Record the width, height, and thickness of a representative stack. Then compare those measurements with the packaging or display location.
- Width controls alignment: It determines whether shelf rows look uniform and whether adjacent stacks stay square.
- Height controls layer planning: It affects how many folded garments can sit in a carton or tray before the stack presses against the top.
- Thickness controls density: Heavy blanks occupy more vertical space even when their width and height match lighter shirts.
A small change in board geometry can alter how sleeves overlap and where the body creases. Across a catalog run, that difference can produce visibly different stacks even when every operator follows the same sequence.
A board should be selected by the finished fold it creates, not by the dimensions printed on the product package alone.
Run a sample through the entire process. Fold it, bag it, place it in the intended carton or shelf slot, and inspect the presentation from the customer's viewing angle. That test catches problems a tabletop measurement misses, especially when decorated garments have a large print area or thicker transfer.
Matching Board Size to Kids, Adult S/M, and Adult L/XL
The best board size follows the garment category. Independent folding guidance proposes panel widths of about 7 by 21 inches for kids, 9 by 25 inches for adult S/M, and 10 by 30 inches for adult L/XL, as outlined in this DIY folding-board guide. Those dimensions show why a single board isn't a reliable answer for mixed apparel inventories.
Kids' garments need support without excessive unused surface area. If the board is too large, the operator loses visual reference points and the shirt can shift before the first panel closes. Adult S/M shirts usually need a wider working area, while L/XL garments need additional clearance for shoulders, sleeves, and heavier blanks.
| Garment Category | Board Size | Finished Fold | Typical Use |
|---|---|---|---|
| Kids' shirts | About 7 by 21 inches | Compact, category-specific fold | Children's apparel and small inventory |
| Adult S/M | About 9 by 25 inches | Medium retail-style fold | Standard adult tees |
| Adult L/XL | About 10 by 30 inches | Wider adult fold | Larger blanks and relaxed cuts |
These are category references, not rigid purchasing rules. Longline tees need extra length, tall cuts may require a larger vertical panel, and oversized blanks can exceed the practical capacity of a standard adult board.
Keep the decoration in the decision
A printed shirt can behave differently from a blank shirt. A large transfer, thick ink deposit, or raised decoration may make the center of the garment less flexible. Test the decorated SKU, not only the unprinted blank, before fixing the board size for production.
For mixed inventory, assign a board to a SKU family. Don't ask one small fixture to handle kids' tees, adult S/M, and oversized L/XL garments because the shirts share the same material.
How to Measure a Shirt and Choose the Right Board
Begin with the shirt laid completely flat on a clean, level bench. Smooth the body, align the side seams, and remove folds that could make the measurements look smaller than the actual garment.
Use a repeatable measurement sequence
- Measure shoulder width. Record the distance from shoulder seam to shoulder seam, not the chest width.
- Measure garment length. Start at the collar's top reference point and measure to the bottom hem.
- Add working clearance. Add roughly 2 inches to the shoulder width for sleeve-wrap clearance.
- Compare with the board. Match the calculated working width to the board's shorter working side.
- Run one test fold. The shoulders should sit just inside the edges, sleeves should wrap once without bunching, and the hem should clear the lower edge by about half an inch.
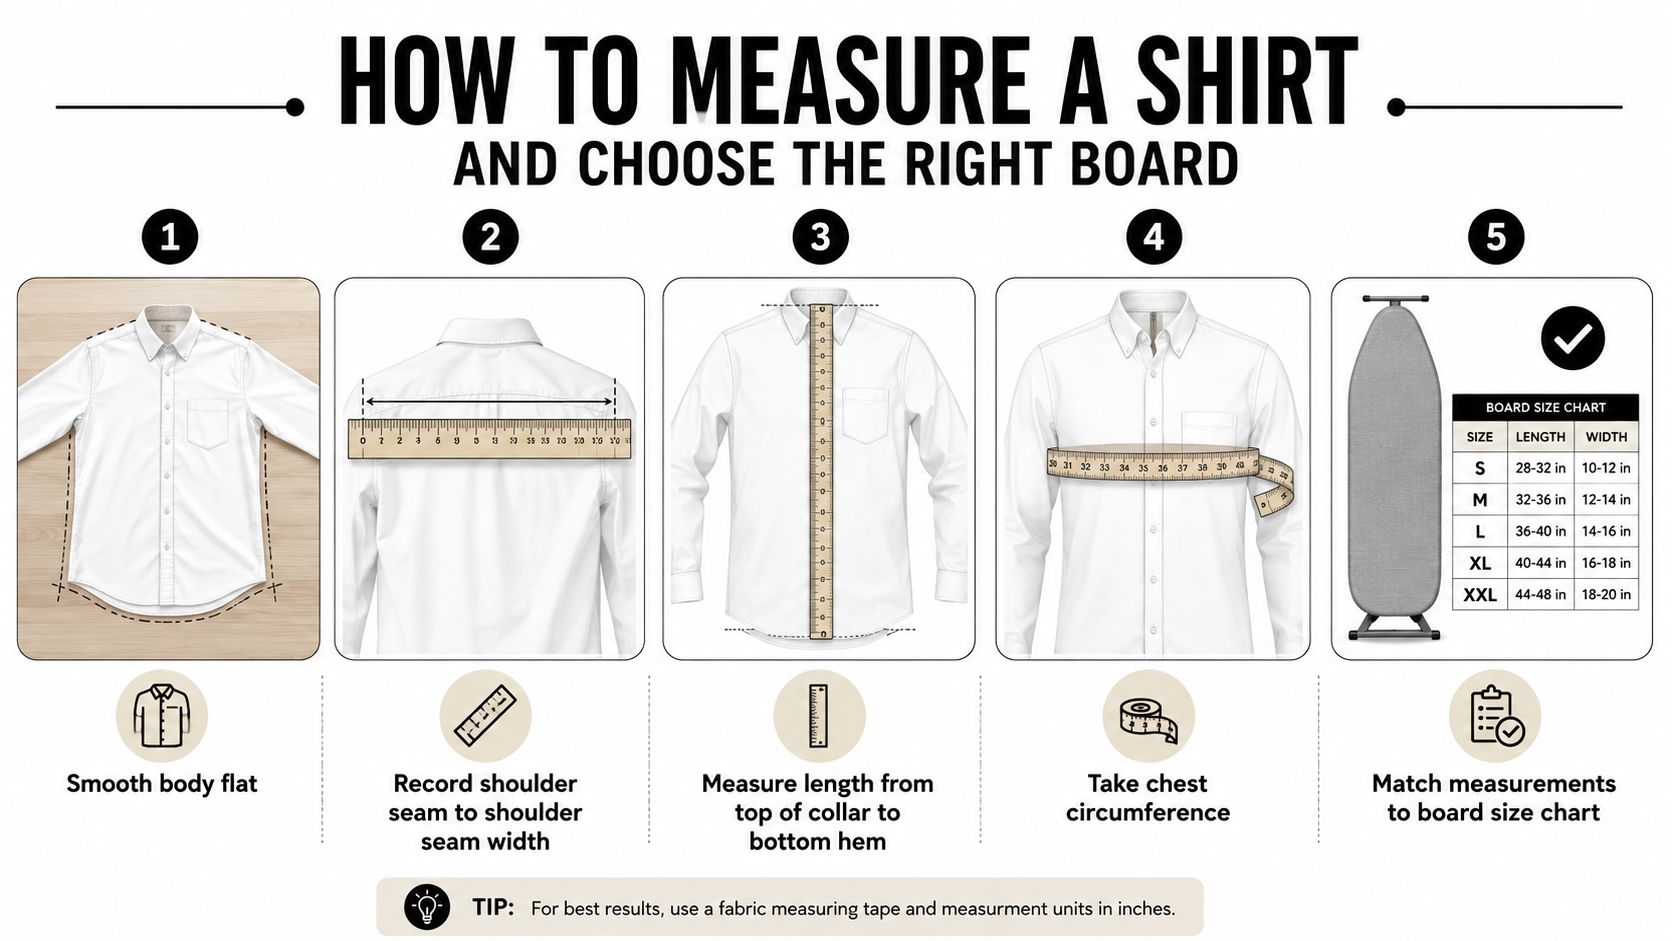
The most common measurement error is using chest width as the board reference. Chest width tells you about the garment's body, but the shoulders and sleeves determine whether the shirt can sit squarely on the folding surface. Curved hems and fashion cuts also need attention because the lower edge may not behave like a straight-bottom tee.
For branded blanks, compare the measured garment with the manufacturer's sizing information, such as this Gildan size chart for unisex shirts. Treat the chart as a starting point, then verify the physical shirt because fabric, cut, and production tolerances can vary.
DIY Folding Boards From Cardboard, Foam Board, or Wood
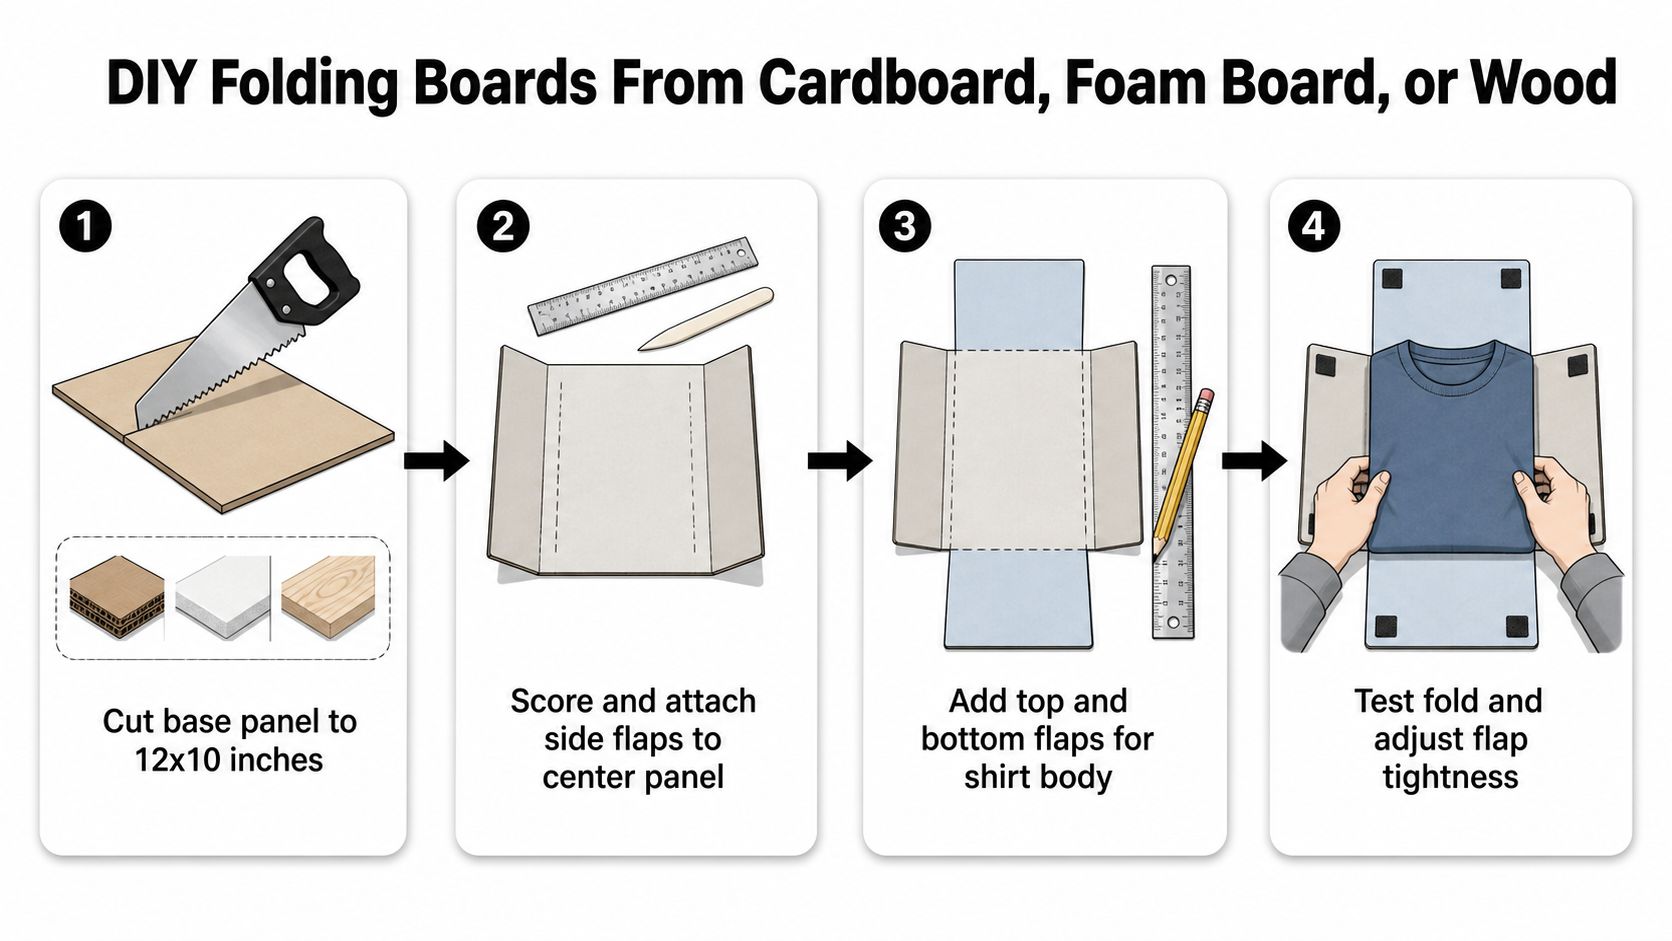
A DIY board works well when you need to validate a shirt folding board size before buying a permanent fixture. Use the intended adult footprint as the reference, then build a temporary version that can be altered after a real test fold.
Build the prototype in stages
Cut the center panel first. Add matching side flaps so the sleeves fold inward symmetrically, then attach a bottom flap for the body fold. Side flaps around 4 to 5 inches wide can work as a starting point for adult garments, but the correct width depends on the shirt category and the amount of sleeve coverage required.
- Corrugated cardboard: Best for a short-run prototype. It cuts quickly and makes resizing easy, but repeated flexing can soften the hinge.
- Foam board: Gives a lighter, flatter template with cleaner registration. It works well for sampling and low-volume stations.
- Thin plywood or MDF: Better for a fixed shop fixture. Seal or laminate the surface so fibers and moisture don't interfere with the shirt.
Score hinge lines instead of cutting completely through the panel. Reinforce the spine with durable tape or a flexible hinge material, then mark registration lines on the surface. Operators should be able to place the collar and shoulder area in the same location without guessing.
Before committing to a full build, test one shirt from the largest size. If the flaps are too narrow, adult L/XL sleeves may bunch or fold back. If the base extends beyond the intended bag or tray, the board may produce a finished fold that doesn't fit the packaging plan.
Print a scaled template, tape it to the prototype, and mark the cut lines directly onto the board. A sample fold tells you more than a perfect drawing because fabric thickness and sleeve shape affect the actual result.
Plastic vs Cardboard vs Wood Boards Compared
Material changes how a board behaves after repeated use. The best choice depends on whether the station is a temporary prototype, a flexible small-shop fixture, or a permanent high-volume tool.
| Material | Durability | Cost per Board | Storage | Fold Consistency |
|---|---|---|---|---|
| Plastic | Strong and resistant to routine handling | Higher than cardboard | Can take more space when stacked | Clean registration and repeatable movement |
| Cardboard | Suitable for prototypes and short runs | Lowest and easy to customize | Light and easy to store | Declines as the board softens |
| Wood | Stable for a fixed station | Higher setup effort | Heavier and less convenient to move | Strong crease control when properly finished |
Plastic boards are practical when operators need a clean, washable surface and consistent hinge action. They usually cost more and may be awkward to store in quantity, especially when the panels don't fold completely flat.
Cardboard is the fastest route to a custom shirt folding board size. It lets a shop test a kids' panel, an adult panel, or an oversized blank without committing to a permanent cut. The weakness is structural fatigue. Repeated folding, damp air, and rough handling can change the board's shape and introduce variation.
Wood is the choice for a dedicated station that won't be reconfigured often. Thin plywood or sealed MDF holds its geometry well, but it adds weight and makes changes more involved. If the assortment changes regularly, plastic or reinforced foam board may be more practical.
Choose the material after you choose the workflow. A durable board in the wrong size is still the wrong fixture.
Printable Templates and How to Scale Them Correctly
Printable templates are useful only when the printed dimensions are accurate. Start by checking the source measurements in inches and locating a reference square on the page. If the reference square doesn't print at its stated size, stop and correct the printer scaling before cutting material.
Print, tile, and verify
Set the printer to actual size rather than a fit-to-page option. For a large board, tile the template across several letter or A4 sheets, then align the registration marks before taping the pages together. Keep the seams flat so the cutting line doesn't drift as it crosses from one sheet to another.
Use the intended garment category to set the final dimensions. A template for an adult S/M board shouldn't be reduced casually for a kids' garment because the panel proportions may become unsuitable even if the overall rectangle looks correct.
- Check the base: Confirm the center panel is square before adding flaps.
- Check the hinge lines: They must be parallel so sleeves fold evenly.
- Check the flap width: Adult panels often begin around 4 to 5 inches, then need testing against the actual sleeve.
- Check the final fold: Measure the shirt after folding and compare it with the packaging.
Transfer the pattern to cardboard, foam board, or plywood with a sharp pencil and a straightedge. Use a fresh blade for clean corners, reinforce hinge areas, and keep the finished surface free from raised tape edges that could mark delicate fabric.
Decoration can affect the usable fold area. If you're preparing decorated apparel, compare the finished board footprint with the transfer dimensions in this DTF transfer size guide for shirts. The board should support the garment without forcing the printed area across a hinge or sharp crease.
Tips for Consistent Folds Across a Team
Standardize the station before training the operator. Mark the board's home position on the bench with tape, place a reference shirt beside it, and display one approved finished fold at eye level. The sample should show collar position, sleeve alignment, and the acceptable final orientation.
Assign one board size to each SKU family. Packers shouldn't switch between a small and large fixture halfway through a batch because the finished footprint changes and the stack becomes difficult to control.
Make the sequence visible
Use a short, fixed sequence:
- Place the shirt face down. Align the collar and shoulders with the station marks.
- Fold the sleeves inward. Keep both sides symmetrical.
- Position the board. Check that the body and hem are supported.
- Close the first panel. Let the board create the crease instead of pressing randomly.
- Close the second panel. Confirm the opposite side matches.
- Fold the bottom. Lift the finished shirt without pulling the fabric out of square.
Track rejects by cause. Mis-folds, overhang, and label placement point to different problems, so they shouldn't be recorded as one generic error category. Review the pattern with the team and inspect the board itself when variation appears.
Keep boards flat and dry between shifts. A warped panel changes the fold angle, and operators often compensate without realizing why their results have changed.
Quick Reference Board Size Lookup
A lookup chart is useful at the bench, but it shouldn't replace a sample fold. The dimensions below organize common categories from compact garments to oversized apparel, while the final decision still needs to account for fabric weight, sleeve length, decoration, and packaging.
| Garment Category | Recommended Board Size | Notes |
|---|---|---|
| Infant onesies and toddler tees | About 8 by 10 inches | Compact footprint for very small garments |
| Kids' sizes 2 to 6 | About 9 by 12 inches | Suitable for children's shelf stacks |
| Youth sizes 7 to 12 | About 10 by 13 inches | Allows more body and sleeve coverage |
| Adult small | About 11 by 14 inches | Useful for fitted adult cuts |
| Adult medium | About 12 by 15 inches | Balanced option for standard adult tees |
| Adult large and XL | About 13 by 16 inches | More clearance for wider shoulders |
| Adult 2XL and 3XL | About 14 by 18 inches | Better support for larger blanks |
| Oversized blanks or hooded sweatshirts | About 15 by 20 inches or larger | Requires a larger bench and packaging check |
Add clearance for heavyweight fabric when the sleeve or body doesn't lie flat during the test fold. Drop down to a smaller board only when a fitted garment still lands squarely and the finished size suits the display or mailer.
For shipping, judge the finished fold against the actual bag or box rather than assuming a board will fit. For retail, prioritize consistent width and depth so stacks align across the shelf. For mixed e-commerce inventory, separate board sizes by garment family and label each station clearly.
The most reliable purchasing process is simple. Measure the largest shirt, select the board that supports it, test the finished fold in its packaging, and then confirm that the smallest shirt in the same family doesn't drift or look undersized.
Cobra DTF supplies high-quality DTF transfers for custom apparel businesses that need consistent decoration before folding and fulfillment. Visit Cobra DTF to explore transfer options and build a production workflow where the garment, print, folding board, and packaging all work together.