
Mastering DTF T-Shirt Printing for Vibrant Results
Direct-to-Film, or DTF, printing is a pretty straightforward concept. We print a design onto a special transfer film, apply a powdered adhesive, and then use a heat press to transfer it onto a shirt. What you get is a vibrant, full-color design that works on almost any fabric you can throw at it—cotton, polyester, blends, you name it. It’s this versatility that’s making it a huge deal in the custom apparel world.
Why DTF Is a Game Changer for Custom Apparel

If you've been in the apparel business for a while, you know the headaches. Screen printing is great for bulk orders, but the setup costs for small, multi-color jobs can kill your margins. Direct-to-Garment (DTG) is fantastic for cotton but can be a real pain on dark polyester. DTF just neatly sidesteps all of that, giving you one solid process that handles the tricky jobs with ease.
This is exactly why so many shops, from small creators to large businesses, are making the switch. Here’s a quick rundown of why:
- Works on Almost Anything: Seriously. Cotton, poly, nylon, leather, and all those tricky blends are no problem. And the best part? No pre-treatment is needed.
- Bright Colors, Even on Dark Shirts: Thanks to a solid white ink underbase, your colors will be brilliant and opaque, no matter how dark the garment is.
- Good for One-Offs or Big Runs: Since there are no screens to set up, DTF is just as cost-effective for a single sample as it is for a large batch. This means no more minimum order quantities.
- Built to Last: These transfers feel soft and flexible, and they hold up incredibly well in the wash. You won't see them cracking or fading after just a few cycles.
The Rise of a Dominant Technology
The buzz around DTF isn't just talk; the numbers back it up. A recent market review showed that global DTF print production shot past 7.2 billion prints last year. That’s a jump of nearly 30% from the year before, which tells you just how quickly this technology is taking over.
This kind of flexibility is a perfect fit for modern e-commerce, especially for businesses built on speed and customization. For example, DTF has been a massive boost for Print-on-Demand platforms like Printify, allowing them to offer a much wider range of products.
The real magic of DTF is that it gives you the vivid detail of DTG combined with the fabric freedom of screen printing, all without the high setup costs. For anyone decorating apparel, it’s truly the best of both worlds.
To really help you see where DTF fits in, here’s a quick comparison against the other main players in the custom apparel game.
DTF Printing vs Traditional Methods at a Glance
This table breaks down how DTF stacks up against DTG and screen printing on the factors that matter most to a print shop.
| Feature | DTF Printing | DTG Printing | Screen Printing |
|---|---|---|---|
| Fabric Versatility | Excellent (cotton, poly, blends, leather) | Limited (best on cotton & cotton-rich) | Good (versatile but ink/setup changes needed) |
| Best For | Small-to-large runs, multi-color designs | Small runs, photorealistic detail | Large bulk orders, simpler designs (1-4 colors) |
| Color Vibrancy | High on all fabric colors, including darks | Good, but can be less vibrant on darks | Excellent, but each color adds cost and complexity |
| Setup Cost & Time | Low; no screens or pre-treatment required | Medium; requires fabric pre-treatment | High; screen prep is time-consuming and expensive |
| Feel of Print (Hand) | Soft and flexible | Very soft, breathable (ink soaks in) | Can be thick and heavy, especially with many colors |
| Durability | Excellent; resists cracking and fading | Good, but can fade with repeated washing | Very durable; often outlasts the garment itself |
As you can see, DTF fills a crucial gap, offering a fantastic balance of quality, cost, and versatility that the older methods just can't match.
Getting a handle on this technology is the first step to figuring out how it can benefit your own projects. Once you understand the basics, you can start making smarter choices about what printing method will deliver the best results. To get a more detailed look, you can dive into our guide on what is Direct-to-Film printing. The mix of affordability, quality, and versatility is exactly why dtf t-shirt printing has shaken up the entire industry.
Getting Your Artwork Ready for Flawless DTF Prints
A killer t-shirt design doesn’t just happen at the printer. It starts with the digital file. Honestly, getting your artwork prepped correctly is probably the single most important thing you can do to guarantee a vibrant, crisp print that lasts. Get this part right, and you'll sidestep a ton of common headaches later on.
First things first: resolution is everything. Your artwork absolutely must be designed at 300 DPI (dots per inch) at the final size you intend to print it. If you grab a 72 DPI image off a website and try to blow it up, you're going to get a blurry, pixelated mess. Always, always start with a high-quality source file.
Just as critical is the background—or rather, the lack of one. Your design needs a transparent background. If you upload a JPEG with a white box around your art, guess what? That white box is going to print right onto the shirt. Stick to file formats that actually support transparency, like PNG, PSD, or TIFF.
Nailing Your Colors and the White Underbase
Once you've got your resolution and transparency sorted, it's time to think about your colors and that all-important white underbase. This is the secret sauce that makes DTF pop on dark shirts, but it takes a little finesse to get it just right.
The printer lays down the white layer first, creating a bright, opaque foundation for the colors to sit on. Without a solid underbase, your design would look dull and washed out on a black or navy shirt. Your RIP (Raster Image Processor) software handles the heavy lifting of creating this white layer automatically, but you're in the driver's seat when it comes to controlling it.
For example, you'll need to manage the ink density. Too little white ink, and your print will look semi-transparent. Too much, and it can feel thick and plasticky on the shirt. Most RIP software lets you dial this in, usually as a percentage. I've found that a good starting point is usually somewhere between 80-90% white ink density, but you'll want to test this with your specific printer and inks to find the sweet spot.
The Pro-Move: Choking the White Layer
Want to know one of the best tips for getting truly professional-looking DTF prints? Learn to "choke" your white underbase. All this means is making the white layer slightly smaller than the color layer—usually by just 1-2 pixels on every side.
So, why is this a big deal? Sometimes, when you press the transfer, a tiny bit of the white base can squish out from behind the color, creating a faint white halo around your design. It's subtle, but it's there. Choking the underbase prevents this entirely, making sure the color layer perfectly covers the white for clean, razor-sharp edges.
Pro Tip: Choking the white underbase isn't optional if you're aiming for professional, retail-quality results, especially with detailed text or logos. It’s one of those small details that makes a huge difference.
Your RIP software should have a setting for this, often called "choke" or "ink spread." A 1 to 3-pixel choke is a great place to start experimenting. To get a deeper understanding of these settings, check out our guide on DTF printing software, where we break down the specific features to look for.
Working with Fine Lines and Tiny Details
DTF is amazing at reproducing detail, but it has its physical limits. The powdered adhesive needs a certain amount of surface area to grab onto the ink. If a line in your design is too skinny, it simply won't pick up enough powder to transfer cleanly to the garment.
As a general rule of thumb, keep your important lines above a minimum thickness.
- Minimum Line Thickness: Aim for at least 1-2 points (that's about 0.014-0.028 inches) for any lines that are critical to the design.
- Small Text: When working with text, make sure the thinnest parts of the letters meet this same minimum thickness so everything stays crisp and legible.
If your design has delicate, wispy elements that you're worried about, here's a trick: add a very thin "stroke" or outline to them in your design software. Just make sure the stroke is the exact same color as the element itself. This invisibly beefs up the line just enough to hold the powder without changing how the design looks. Putting in this kind of prep work on your artwork will make your dtf t-shirt printing process go so much smoother and deliver far better results.
The Hands-On Guide to Printing, Powdering, and Curing
This is where the magic really happens in DTF t-shirt printing. It's the physical part of the process where your digital file becomes a tangible, press-ready transfer. Getting these three steps right—printing, powdering, and curing—is absolutely critical for that vibrant, soft, and durable finish your customers expect. Let’s get into the nitty-gritty of each stage.
First up, you’re sending your perfectly prepped artwork from your RIP software to the printer. The machine gets to work, laying down a layer of CMYK color ink directly onto the DTF film. Right after, it puts down a layer of white ink on top of the color. This white ink does double duty: it’s the underbase that makes your colors pop, and it’s the layer the adhesive powder will stick to.
A clean print is a good print. You'll want to keep an eye out for common issues like banding (those faint lines running across the print) or head strikes, which happen when the print head physically scrapes the film. If you see these, it's usually a sign that your printer needs some maintenance or an alignment check.
Mastering the Art of Powdering
With the ink still wet from the printer, it's time for the adhesive powder. This stuff is the secret sauce that bonds the ink to the fabric when you press it. The goal is simple: get a perfectly even coat of powder across every square inch of wet ink.
You can do this by hand in a shallow tub or use an automated shaker if you have one. If you're going the manual route, don't be shy with the powder. Sprinkle it liberally all over the print to make sure every last detail is covered.
Once the print is completely coated, you have to get rid of the excess. Gently pick up the film and give it a few light flicks and taps from the back. You’ll see all the loose powder fall away, leaving a clean, sharp outline of your design. The powder should only be stuck to the ink—not the empty parts of the film.
Pro Tip: Uneven powder application is one of the most common reasons a transfer fails. If you see patchy spots where the powder didn't stick, those areas of your design simply won't transfer to the shirt. Consistency is everything here.
The Curing Process, Perfected
Now that the excess powder is gone, the next job is to melt it into a solid, uniform adhesive layer. We call this curing, and it transforms that grainy powder into a smooth, slightly rubbery sheet that's ready for the heat press. You can use a heat press in the "hover" position, a dedicated curing oven, or even a heat gun for this.
Your goal is to melt the powder completely without cooking the ink underneath. There's a specific visual cue you're looking for.
- Temperature: I recommend a range of 300-350°F (150-175°C).
- Time: This usually takes about 2-4 minutes, but it really depends on your equipment and how big the transfer is.
You'll know the transfer is perfectly cured when the powdered surface melts down and gets a glossy, slightly bumpy texture. A lot of us in the business call it an "orange peel" look. Seeing that texture is the green light—it tells you the adhesive has gelled just right and is ready to make a rock-solid bond with the garment.
This visual flow chart breaks down the essentials of preparing your artwork for a successful print.
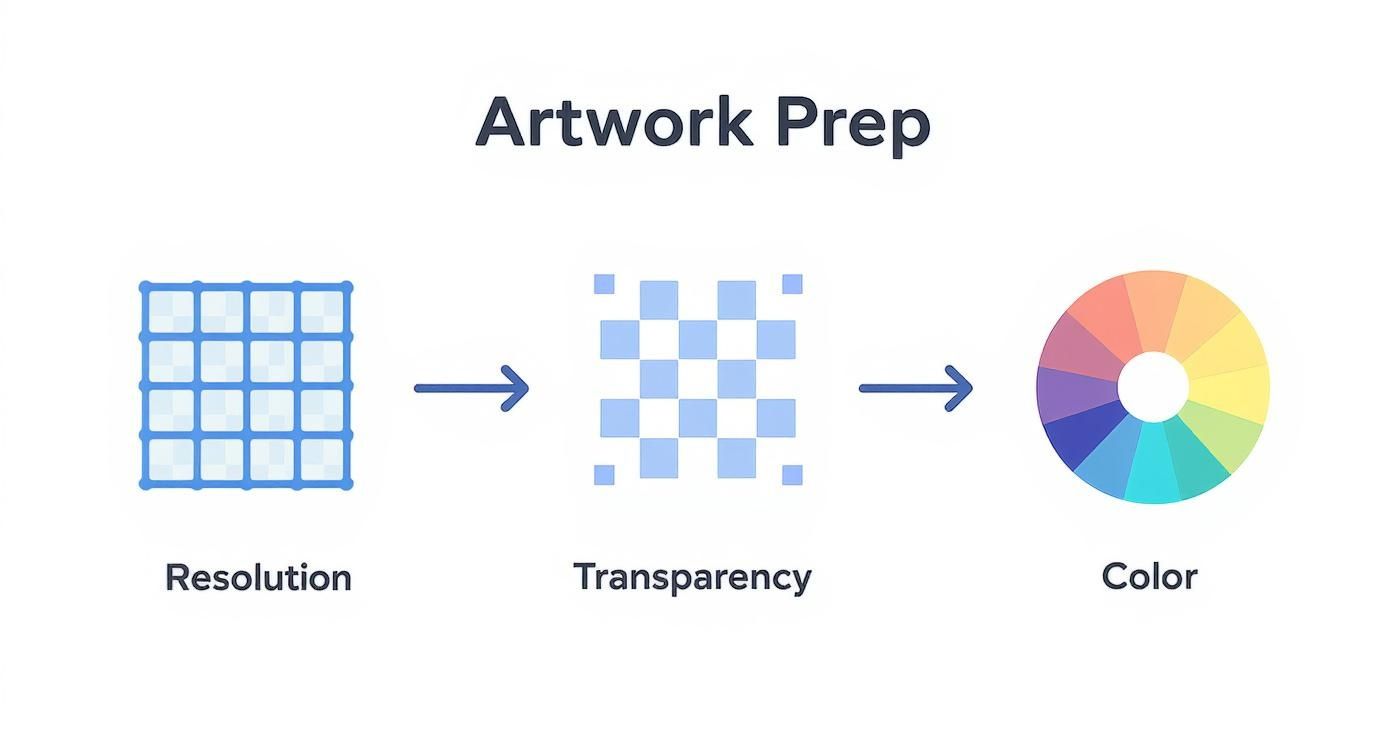
This workflow, focusing on high resolution, transparent backgrounds, and proper color management, really is the foundation for everything that comes next in the printing and curing stages.
Common Curing Mistakes and How to Avoid Them
Getting the curing time and temp just right takes a bit of practice, but once you learn to recognize the signs of a good (or bad) cure, you'll be set. Going too long or not long enough can easily ruin a perfect transfer.
Under-Curing:
If you pull the transfer from the heat too soon, the powder won't be fully melted. It might still look a bit grainy or patchy. This leads to a weak bond, and you can bet the design will start to peel or crack after a wash or two. If you see any powdery spots left, it needs more time under the heat.
Over-Curing:
On the flip side, too much heat creates its own problems. If you over-cure a transfer, you might see the film start to warp or notice an oily residue bleeding out from the ink. This can actually break down the adhesive, resulting in a poor transfer and a design that feels stiff and plasticky on the shirt.
Here's a quick cheat sheet I use to diagnose curing results.
| Curing Result | Visual Cues | Outcome During Pressing |
|---|---|---|
| Perfectly Cured | Glossy, uniform "orange peel" texture | Strong bond, durable wash results |
| Under-Cured | Dull, grainy, or powdery spots remain | Poor adhesion, peeling, and cracking |
| Over-Cured | Oily sheen, film may warp or bubble | Weak adhesion, stiff feel on fabric |
By paying close attention to these hands-on stages—printing, powdering, and curing—you take full control over the quality of your end product. Nailing this part of the DTF t-shirt printing process is how you ensure your transfers are vibrant, tough, and ready to impress.
Perfecting the Heat Press for Durable Transfers
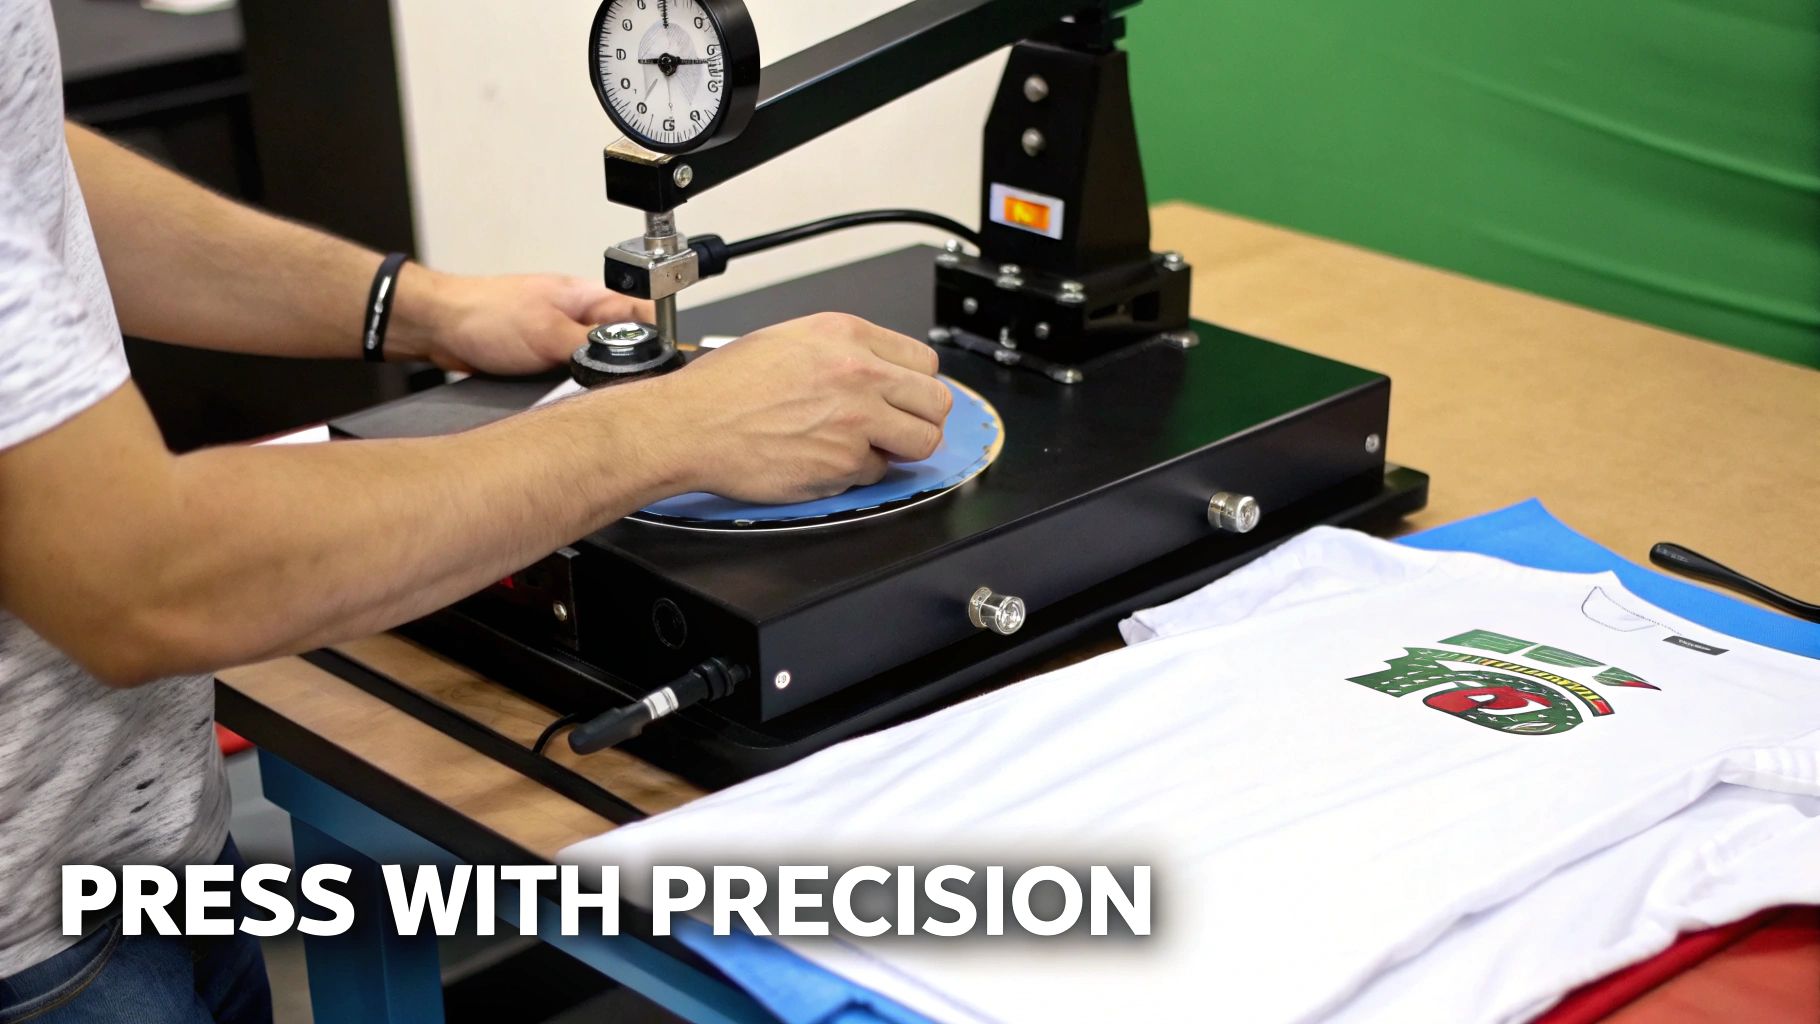
So, you've printed a beautiful transfer, powdered it perfectly, and cured it to that ideal orange-peel finish. Now you've arrived at the moment of truth. This final step is what determines whether your design lasts for dozens of washes or fails on the first try. Honestly, mastering the heat press is what separates an amateur print from a professional-grade product that feels great and stands the test of time.
This stage really boils down to three critical variables: temperature, pressure, and time. Getting this trio just right is what ensures the adhesive fully melts and bonds into the fabric fibers, creating a truly permanent connection. If you get any one of them wrong, you're looking at a print that peels, cracks, or feels stiff and plasticky.
The Critical First Step: Pre-Pressing
Before you even think about laying down your transfer, there’s a non-negotiable step that too many people skip: pre-pressing the garment. Fabrics, especially cotton and its blends, love to absorb moisture right out of the air. Pressing a transfer onto a damp shirt is a recipe for disaster—the trapped steam literally gets in the way of the adhesive, preventing a solid bond.
It's simple. Just lay your shirt on the press and give it a quick hit for 5-10 seconds at your target temperature. This does two essential things at once: it zaps any lingering moisture and smooths out all the wrinkles, giving you a perfectly flat, dry canvas. Trust me, this tiny bit of prep work dramatically improves the consistency and durability of your prints.
Dialing In Your Heat Press Settings
While every heat press and garment has its own quirks, there are some well-established starting points for the most common fabrics we use in dtf t-shirt printing. The goal is always to deliver enough heat to fully activate the adhesive without scorching the fabric.
Here are some reliable settings to start with:
- 100% Cotton: You can go a bit hotter here. I usually set my press to 300-325°F (150-163°C) with medium-to-firm pressure for 10-15 seconds. Cotton is a workhorse and can handle the heat, which helps create a rock-solid bond.
- Polyester & Blends (50/50): Be more careful with these. Drop the temperature to around 275-300°F (135-150°C) and press for 8-12 seconds with medium pressure. If you go too hot, you risk "dye migration," where the color from the shirt bleeds into your beautiful white ink.
- Tri-Blends & Synthetics: These are the most delicate. Start low at 260-275°F (127-135°C) with light-to-medium pressure for just 8-10 seconds. Any hotter and you could damage the synthetic fibers.
A consistent, even pressure is every bit as important as the temperature. If your press has a digital readout, I aim for a 6-8 (heavy pressure). If you're going by feel, it should take a good, solid effort to lock it down—but you shouldn't have to throw your whole body into it.
For a more exhaustive list of settings for different garments, our comprehensive guide on heat press settings for DTF is a great resource to bookmark.
The Peel: Hot vs. Cold
DTF films generally come in two flavors: hot peel and cold peel. You absolutely need to know which one you're working with, because peeling at the wrong time will completely ruin your transfer.
Hot Peel Films are designed for speed. You peel the film almost immediately after the press opens while everything is still screaming hot. Give it maybe a second or two to settle, then pull the film back in one smooth, confident motion.
Cold Peel Films, on the other hand, require patience. You have to wait until the shirt and transfer have cooled completely to room temperature before even thinking about peeling. If you get impatient and peel it warm, you'll pull the ink right off with the film. It adds a few minutes to the process, but many printers (myself included) feel that cold peels give you a slightly smoother, more matte finish.
Unlocking a Softer Feel with a Second Press
Okay, you've peeled the film away, and your design is officially part of the shirt. You could stop here, but there’s one more pro tip that will take your quality to the next level: a finishing press. This second, quick press helps embed the ink even deeper into the fabric's weave, which makes a huge difference in the softness and flexibility of the print.
Just cover the design with a finishing sheet (parchment paper or a Teflon sheet works great) and press it again for 5-10 seconds using the same settings. This quick final step knocks down any residual shine and gives the print a much softer "hand," making it feel like it’s part of the shirt, not just sitting on top of it. It’s a small detail that your customers will absolutely notice.
Troubleshooting Common DTF T-Shirt Printing Problems
Even with a perfectly dialed-in process, every DTF printer runs into a snag sooner or later. This is your field guide for squashing the most common frustrations that pop up in DTF t-shirt printing. Hitting a roadblock is just part of the game; knowing how to quickly fix it is what separates the pros and keeps your production line humming.
Most issues trace back to just a few usual suspects: your artwork file, the printer settings, how the powder was applied, or the final heat press. Once you understand what’s causing the hiccup, the fix is usually pretty straightforward. Let's get into the most frequent challenges we see.
Why Your Print Colors Don't Match Your Screen
This is probably the number one complaint we hear. You spent hours perfecting a design with a vibrant red, but the final print comes out looking like a dull maroon. It’s a classic color management puzzle, and it’s almost never your ink’s fault.
Your monitor creates color using an RGB (Red, Green, Blue) profile, which is based on light. Your DTF printer, on the other hand, uses a CMYK (Cyan, Magenta, Yellow, Black) profile, which is based on ink. They're two completely different languages for color.
The solution lies in your RIP software. You need to make sure it's set up with the correct ICC color profile for your exact combination of printer, inks, and film. Think of the ICC profile as a translator, converting the RGB colors from your screen into the right CMYK recipe to get the color you actually want on the shirt.
Getting Rid of Banding and Ink Smudges
Few things are more aggravating than seeing faint horizontal lines—known as banding—running across an otherwise perfect print. This issue is a dead giveaway that your printer needs a little TLC. Banding is almost always caused by clogged nozzles in the printhead, which means ink isn't being laid down consistently.
Your first move should be to run a nozzle check from your printer's software. If it shows gaps, follow up with a head cleaning cycle. If that doesn't clear it up, a gentle manual cleaning of the printhead and the capping station is probably in order.
Ink smudges are a different beast. This usually happens when the printhead is sitting too low and physically scrapes the wet ink as it passes—a "head strike." Dive into your printer's settings and check the platen gap or height adjustment. You just need to give the film enough clearance to slide through without making contact.
The secret to avoiding most print quality headaches is preventative maintenance. A quick daily wipe of the capping station and a weekly nozzle check can prevent 90% of these problems from ever happening in the first place.
Why Your Prints Are Cracking After Washing
Getting a call from a customer that their brand-new shirt design is cracking after one wash is a gut punch. This kind of failure almost always points to a mistake in the final steps: either the powder wasn't cured correctly, or your heat press settings were off.
If the adhesive powder isn't melted completely into a smooth, even layer, it won't create a strong bond with the fabric. The result is a brittle transfer that easily cracks. Check your curing time and temperature—you're looking for that glossy, "orange peel" texture that signals a perfect melt.
The other culprit could be your heat press. Not enough pressure or too low a temperature means the adhesive never properly melts into the garment's fibers. Double-check your settings for the specific fabric you're using and make sure your press is applying consistent pressure. Sometimes, a quick second press for just a few seconds can make all the difference in durability.
Common DTF Issues and Quick Fixes
When you're in the middle of a production run, you need answers fast. This table breaks down the most frequent problems, their likely causes, and the first thing you should try to get back up and running.
| Problem | Likely Cause | Solution to Try First |
|---|---|---|
| Colors Look Dull or Wrong | Incorrect ICC profile or color space mismatch (RGB vs. CMYK). | Verify the correct ICC profile is selected in your RIP software for your specific ink and film. |
| Horizontal Lines (Banding) | Clogged printhead nozzles. | Run a nozzle check. If gaps appear, perform a head cleaning cycle. |
| Ink Smearing on Film | Printhead is too close to the film (head strike). | Increase the platen gap or printhead height adjustment in your printer settings. |
| Powder Not Sticking Evenly | Static on the film or high humidity in the print room. | Use an anti-static brush on the film before printing. Run a dehumidifier if the room is damp. |
| Transfer Won't Stick to Shirt | Insufficient heat or pressure during the press. | Increase heat press temperature or pressure slightly. Check your press for even pressure distribution. |
| Design Cracks After Washing | Incomplete powder curing or incorrect heat press settings. | Ensure the powder is fully melted (orange peel texture) before pressing. Verify press time/temp and consider a second press. |
Remember, this is your starting point. Consistent, high-quality DTF printing is all about locking in your process and performing regular maintenance on your equipment.
Your DTF Printing Questions Answered
Once you get the hang of the basic DTF printing process, you'll inevitably start asking more questions. That’s a good sign. It means you're moving beyond just following instructions and are starting to really understand the craft.
Let's dive into some of the most common questions that pop up when you're in the thick of it. This is about leveling up your knowledge, moving from the "how" to the "what if" and "why" of great DTF printing.
What Kind of Maintenance Does a DTF Printer Need?
I can't stress this enough: consistent maintenance isn't a chore, it's the single best way to protect your investment. A DTF printer is a piece of precision equipment, and letting the upkeep slide is the quickest path to clogged printheads and a world of frustration.
The good news is that the day-to-day stuff is quick and painless.
- Daily Routine: Before you power down, spend a minute cleaning the printhead capping station and the wiper blade. This simple step stops ink from drying out overnight and causing a jam tomorrow morning.
- Weekly Check-in: Once a week, pop into your printer's software and run a nozzle check. See any gaps or broken lines in the test pattern? Run a head cleaning cycle. Getting ahead of small clogs prevents them from turning into major surgery later.
Think of this routine as your insurance policy against the most common printing headaches.
Can I Use a Home Iron Instead of a Heat Press?
For a one-off personal project, maybe. But for anything you want to sell or have last more than one wash? Absolutely not. A home iron is a terrible substitute for a real heat press, and it all comes down to two things: consistent temperature and even pressure.
A heat press is engineered to lock in a precise temperature across the entire platen and clamp down with uniform force. This is what it takes to properly cure the DTF adhesive and physically bond the design into the garment's fibers. An iron, on the other hand, creates unpredictable hot spots and uneven pressure. The result is a transfer that's guaranteed to crack and peel, probably after its first trip through the laundry.
How Should I Store My Printed DTF Transfers?
One of the best things about DTF is the "print now, press later" flexibility. But you've got to store those transfers correctly to keep them in prime condition.
Keep your cured transfers flat in a cool, dry place, and definitely keep them out of direct sunlight or a humid room. A portfolio box or a shallow drawer works perfectly. If you're stacking them, just slide a sheet of parchment paper between each one so they don't stick together. Stored like this, they’ll be ready to press for months.
What Is the Typical Feel of a DTF Print on a Shirt?
A properly applied DTF print has a fantastic feel—it's the sweet spot between soft and durable. It’s significantly softer and more flexible than traditional heat transfer vinyl (HTV), which often feels like a thick sticker sitting on the fabric.
Compared to a DTG print, you'll notice a DTF transfer has a little more body to it, since the ink layer sits on top of the fabric instead of soaking in. It shouldn't feel heavy or plastic-like, though. When you do it right, especially with a good finishing press, the design feels smooth and integrates beautifully with the shirt, stretching and moving without a problem. This unique balance of a soft "hand" and punchy, vibrant color is a huge part of why DTF has taken off.
And it’s not just a trend. The entire digital textile printing market, DTF included, is booming. Analysts project the sector will rocket from USD 3.2 billion to USD 9.1 billion. This growth is a direct reflection of people wanting more custom and personalized apparel. You can dig into the numbers and trends yourself in this in-depth industry report.
Ready to produce vibrant, durable, and professional-grade custom apparel? Trust Cobra DTF for premium, USA-made DTF transfers that deliver consistent quality every time. Experience the difference with our fast 1-3 day shipping and satisfaction guarantee.